
The first time I made these, I treated both layers the same and the bars came out uneven. The red velvet base baked up too thick in spots, and the cheesecake layer puffed more than I wanted. What works better is spreading the base thin and even, then mixing the cheesecake layer only until smooth.
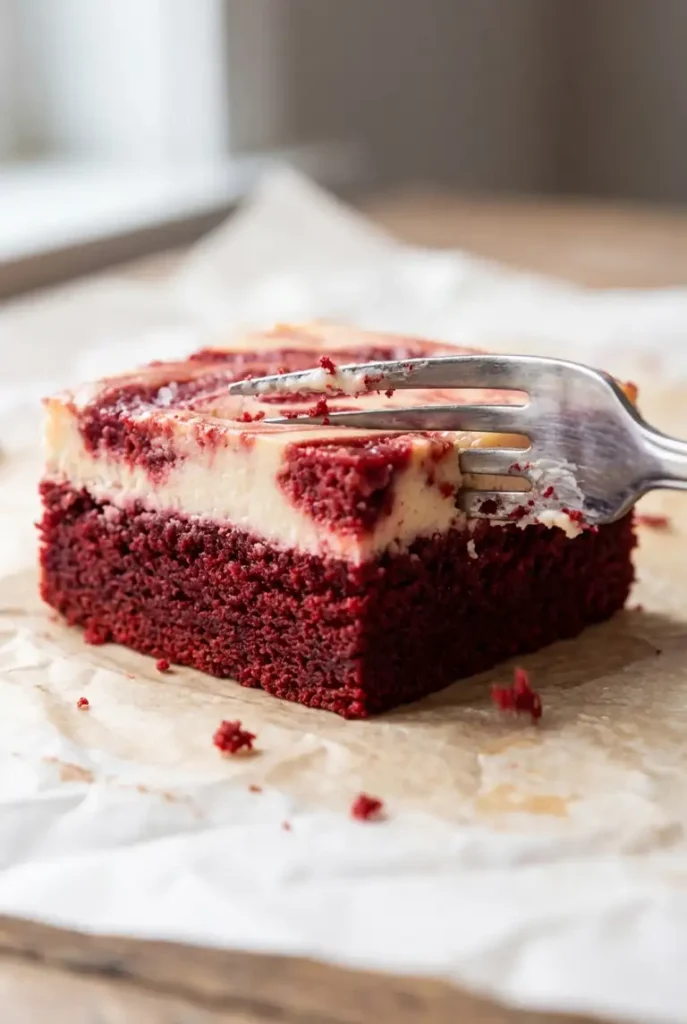
Once they are chilled, the bottom stays soft and lightly cocoa-like, and the cheesecake layer turns firm, smooth, and dense enough to slice cleanly. They feel more like a proper dessert bar than a frosted cake square, which helps keep the sweetness from getting too heavy.
A Few Details That Keep These Bars Balanced
- The cake mix gives you a consistent red velvet base without having to measure flour, cocoa, leavening, and color separately.
- The cheesecake layer stays smoother if you beat the cream cheese and sugar first, then add the eggs last and mix gently.
- Swirling only a few times keeps the red and white layers distinct instead of muddy.
- Chilling overnight firms the cream cheese layer and gives you much cleaner slices than cutting the same day.
Ingredients You Need for Red Velvet Cheesecake Bars with Cake Mix
For the red velvet base
- 1 box red velvet cake mix (430g)
- 1/2 cup unsalted butter, melted (115g)
- 2 large eggs (100g)
For the cheesecake layer
- 16 oz block cream cheese, softened (455g)
- 1/2 cup granulated sugar (100g)
- 2 large eggs (100g)
- 1 teaspoon vanilla extract
Use block cream cheese here, not whipped or tub-style. It gives the bars a firmer cheesecake layer and cleaner slices. Let it soften first so you can smooth out the lumps before the eggs go in.
How to Make Red Velvet Cheesecake Bars
Mix the red velvet base until thick and spreadable
- Preheat the oven to 350°F. Line a 9×13-inch baking pan with parchment, leaving overhang on two sides so you can lift the bars out later.
- In a large bowl, mix the cake mix, melted butter, and 2 eggs until combined. The batter will be much thicker than regular cake batter—closer to a soft brownie batter.
- Spread the batter into the prepared pan in an even layer. An offset spatula helps, or use lightly damp fingers to press it into the corners.
Beat the cheesecake filling just until smooth
- In another bowl, beat the softened cream cheese and sugar until smooth with no visible lumps.
- Add the vanilla, then the 2 eggs. Mix on low just until the filling looks glossy and uniform. Stop as soon as it comes together. If it starts to look foamy, you’ve worked too much air into it.
How to swirl red velvet cheesecake bars without overmixing
- Dollop the cheesecake mixture over the red velvet base in several spots instead of pouring it all into one area.
- Spread it gently into an even layer.
- If you want a swirl effect, pull a knife through the layers in 4 to 6 long passes max. Any more than that and the pattern starts to blur.
- Bake for 35 to 40 minutes. The edges should look set and lightly puffed, and the center 2 to 3 inches should wobble gently as one piece when you nudge the pan. It should not look loose or liquid in the middle.
How to Tell When Cheesecake Bars Are Done Baking
These are not done when the whole pan looks firm and dry. That usually means the cheesecake layer is overbaked.
You want:
- set edges
- a center that still moves slightly
- no wet shine across the whole middle
If using a glass pan, start checking at 35 minutes, but expect they may need 5 to 10 extra minutes.
Tips for Clean Slices and the Best Texture
- Cool the bars completely at room temperature before refrigerating. Putting them in the fridge too early can leave moisture on top.
- Chill for at least 4 hours, but overnight is better if you want sharp edges.
- Lift the slab out with the parchment overhang before cutting.
- Use a hot, dry knife and wipe it clean between cuts.
After a full chill, the cheesecake layer firms up and the red velvet base tastes more settled and less sugary. If you’re deciding between cheesecake bars and a deeper chocolate dessert, these Fudgy Chocolate Brownies are another easy crowd-pleaser.
Red Velvet Cheesecake Bars Variations
Red Velvet Oreo Cheesecake Bars
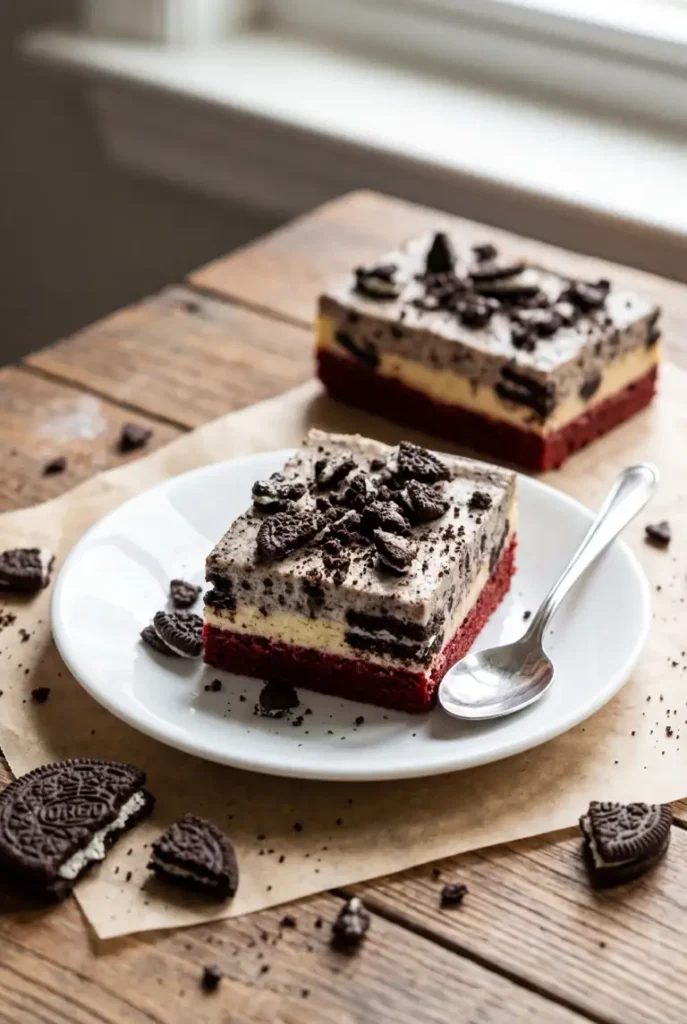
For a cookies-and-cream version, crush 10 to 12 Oreo cookies and fold half into the cheesecake layer. Sprinkle the rest over the top before baking.
The cookies soften a little as the bars chill, so you get pockets of dark cocoa crunch against the cream cheese.
If you love red velvet desserts with a cookies-and-cream twist, try these Red Velvet Oreo Cookies next.
Extra-easy cake mix shortcut tips
- Stick with the standard box size close to 15.25 ounces. If your cake mix box is slightly smaller, the recipe still works, but the base will be a little thinner.
- Don’t add the extra ingredients listed on the cake mix box. For this recipe, use only what’s listed here.
- If your base feels stiff and hard to spread, let it sit for 2 to 3 minutes after mixing, then spread.
How to Store and Freeze Red Velvet Cheesecake Bars
Store the bars covered in the refrigerator for up to 5 days. They are best cold or slightly cool, not at room temperature.
To freeze, cut and chill the bars first. Wrap individual pieces or the whole slab tightly, then freeze for up to 2 months. Thaw in the refrigerator overnight. Do not thaw uncovered, or the surface can get sticky with condensation.
Nutrition
- Serving size: approximately 1/16 of the total recipe
- Calories: 248 kcal
- Protein: 4g
- Fat: 14g
- Carbohydrates: 27g
Per 100g: Calories: 318 kcal, Protein: 5g, Fat: 18g, Carbohydrates: 35g.
These nutritional values are approximate and can vary based on the specific ingredients and brands used.
Red Velvet Cheesecake Bars FAQ
Why did my cheesecake layer crack or puff up?
Usually the filling was mixed a little too much or baked a little too long. Once the eggs go in, mix only until the filling looks smooth. In the oven, pull the bars while the center still has a slight wobble.
How do I know when red velvet cheesecake bars are done?
Look at the middle, not just the edges. The outer edge should be set, and the center should jiggle slightly as one solid section. If it ripples like batter, it needs more time.
Can I use a different size pan for cheesecake bars?
A 9×13-inch pan is the right fit for this recipe. A smaller pan makes the bars too thick and changes the bake time quite a bit. If you change pans, watch the center closely and expect a longer bake.
Can I freeze red velvet cheesecake bars after baking?
Yes. Chill them first, then wrap well and freeze. They thaw best in the fridge, not on the counter.
Red Velvet Cheesecake Bars with Cake Mix
Equipment
- 9×13-inch baking pan
- Parchment paper
- Mixing bowls
- Offset spatula
- Electric mixer
- Knife
Ingredients
- 1 box red velvet cake mix (430g)
- 1/2 cup unsalted butter, melted (115g)
- 2 large eggs (100g)
- 16 oz cream cheese, block, softened (455g)
- 1/2 cup granulated sugar (100g)
- 2 large eggs (100g)
- 1 teaspoon vanilla extract
Instructions
- Preheat oven to 350°F (175°C). Line a 9×13-inch baking pan with parchment, leaving overhang on two sides for easy lifting.
- In a large bowl, mix red velvet cake mix, melted butter, and 2 eggs until combined. Batter will be thick, similar to soft brownie batter.
- Spread the red velvet batter evenly in the prepared pan using an offset spatula or lightly damp fingers.
- In another bowl, beat softened cream cheese and sugar until smooth with no lumps.
- Add vanilla extract and then 2 eggs to the cream cheese mixture; mix gently on low speed just until glossy and uniform. Do not overmix to avoid puffing or cracking.
- Dollop the cheesecake mixture over the red velvet base in several spots; gently spread into an even layer.
- Optionally swirl the layers by pulling a knife through the batter 4 to 6 times max to keep distinct patterns.
- Bake for 35 to 40 minutes until edges are set and lightly puffed, and the center wobbles gently when nudged (not liquid or loose).
- Cool bars completely at room temperature before refrigerating to avoid moisture on top.
- Chill bars for at least 4 hours or overnight for best texture and clean slices.
- Lift bars out using parchment overhang and cut with a hot, dry knife, wiping clean between cuts.