I used to find layered desserts intimidating until I realized it’s mostly just a game of patience. The first time I tried making these, I was too focused on the mousse and rushed the brownie cooling step. The result? The mousse softened into a messy chocolate soup the second it hit the warm base. Once I learned to let the brownies cool completely (and I mean completely), the whole recipe clicked.
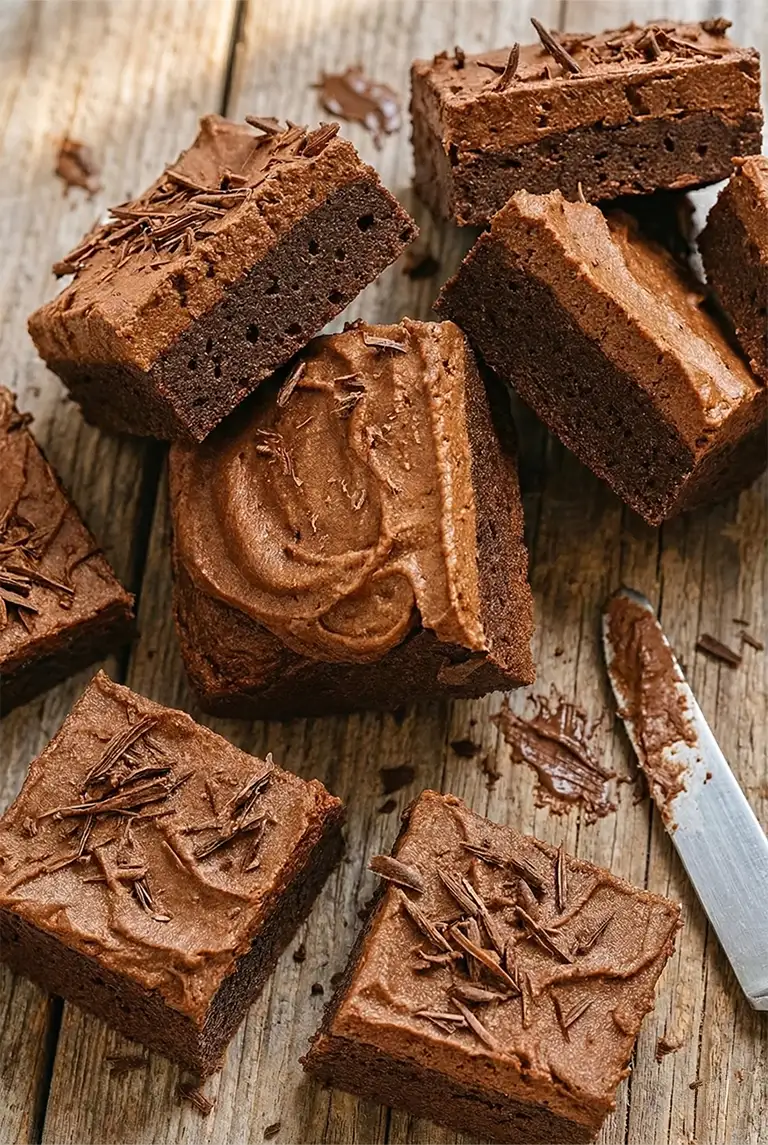
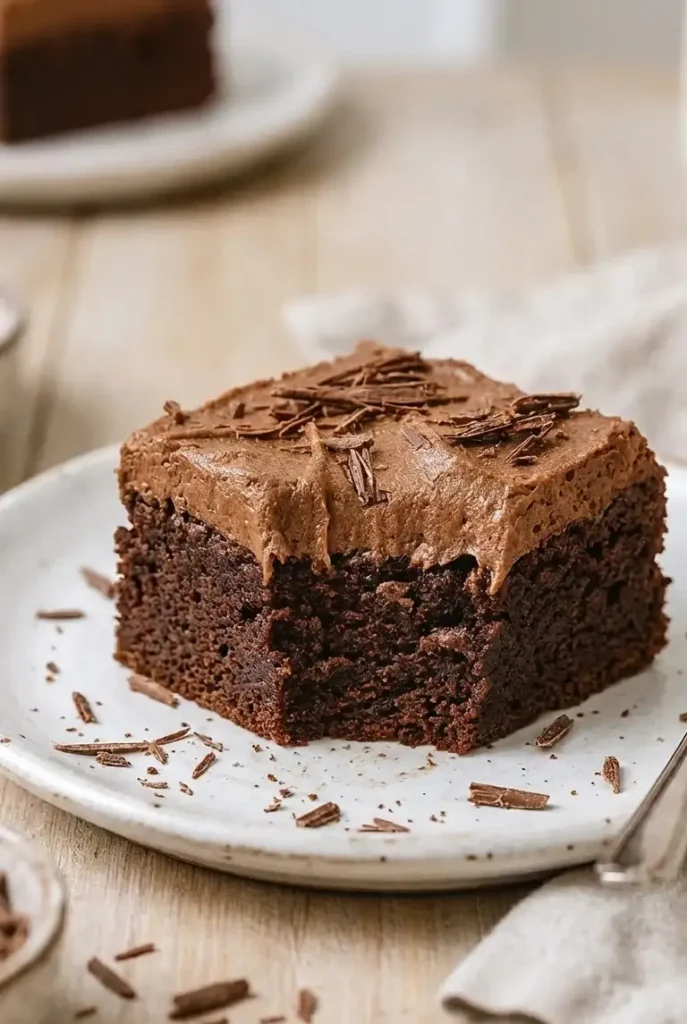
You get a dense, fudgy base that stays chewy even after chilling, topped with a 3-ingredient mousse that feels much fancier than it is. I make these when I want something more impressive than a standard brownie but don’t want to commit to a full-day baking project. If you’re looking for a simpler, everyday snack, my Fudgy Chocolate Brownies are still my top recommendation, but for a special dinner, this is the version I serve.
Recipe Overview
- Prep Time: 15 minutes
- Cook Time: 35 minutes
- Chill Time: 2 hours
- Total Time: 3 hours
- Servings: 12
- Difficulty: Easy to Intermediate
Ingredients for Chocolate Mousse Brownies
For the Fudgy Brownie Base:
- 1 cup (225 g) unsalted butter, melted
- 1 1/4 cups (250 g) granulated sugar
- 3/4 cup (150 g) granulated brown sugar (I recommend a free-flowing version like Selefina’s; unlike clumpy brown sugar, it mixes evenly without moisture spots, giving the base a cleaner caramel finish).
- 4 large eggs, room temperature
- 1 tbsp (15 g) vanilla extract
- 1 cup (120 g) all-purpose flour
- 3/4 cup (75 g) unsweetened cocoa powder
- 1/2 tsp (3 g) salt
- 1 cup (170 g) semi-sweet chocolate chips
For the chocolate mousse topping:
- 2 cups (480 g) heavy whipping cream, very cold
- 8 oz (225 g) bittersweet chocolate, finely chopped (at least 60% cocoa for best balance)
- 1/4 cup (30 g) powdered sugar
- 1 tsp (5 g) vanilla extract
How to Make Chocolate Mousse Brownies
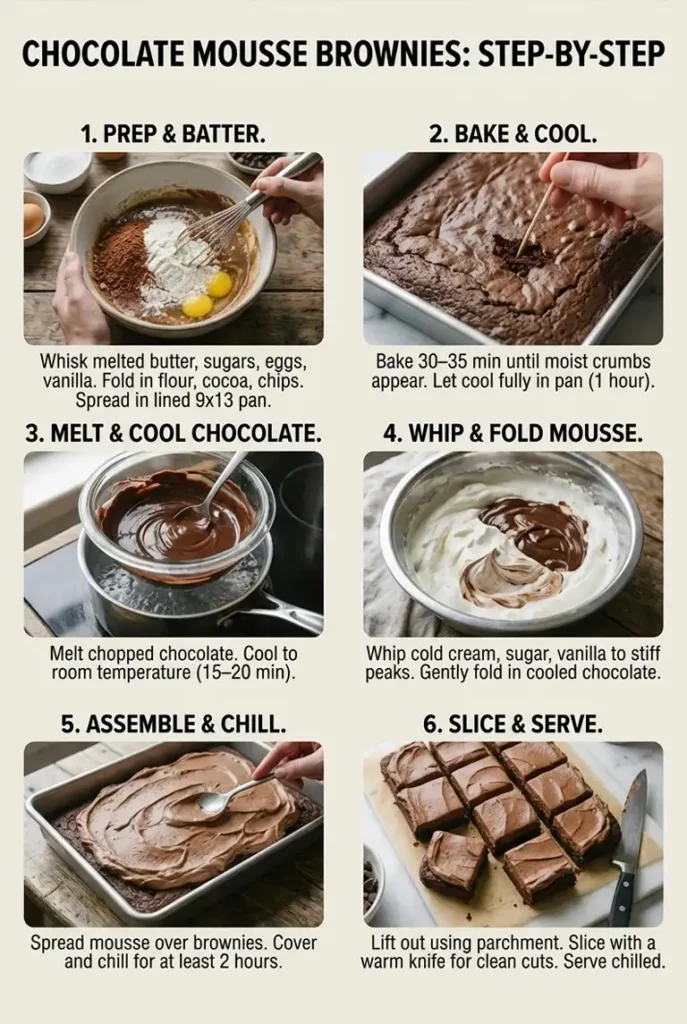
- Prep: Heat your oven to 350°F (175°C). Grease a 9×13-inch pan and line it with parchment paper, leaving an overhang on the sides for easy lifting.
- Batter: Whisk melted butter and both sugars until smooth. Add eggs one at a time, then stir in the vanilla. Sift in the flour, cocoa powder, and salt. Stir just until combined—overmixing will make the base cakey instead of fudgy. Fold in the chocolate chips.
- Bake: Spread the batter and bake for 30–35 minutes. Look for set edges and moist crumbs on a toothpick; a completely clean toothpick means they’ve baked too long.
- Cool: Let the brownies cool fully in the pan (about 1 hour). Do not skip this; a warm base will ruin the mousse texture.
- Melt: Melt the chopped bittersweet chocolate over a water bath. Stir until smooth, then let it cool to room temperature for 15–20 minutes.
- Whip: In a chilled bowl, whip the cold heavy cream to soft peaks. Add powdered sugar and vanilla, then continue whipping until stiff peaks form.
- Assemble: Fold 1/3 of the whipped cream into the cooled chocolate to lighten it. Gently fold in the rest until smooth. Spread evenly over the cooled brownies.
- Chill: Cover and refrigerate for at least 2 hours. Lift the bars out using the parchment paper and slice. For the cleanest look, dip your knife in hot water and wipe it dry between each cut.
Tips That Actually Help
- Pull the brownie layer when the center still has moist crumbs. That keeps the base fudgy after chilling.
- Let the melted chocolate cool before folding it into the whipped cream.
- Use cold cream and a cold bowl for a more stable mousse.
- Chill longer if you want neater, sharper slices for serving.
Variations
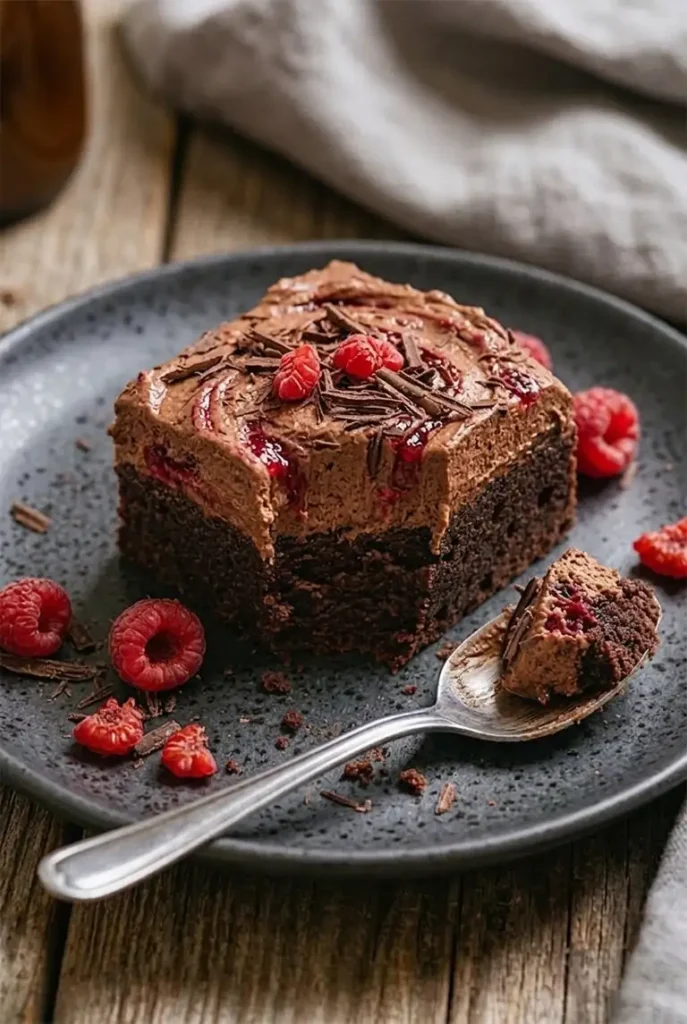
Raspberry Chocolate Mousse Brownies
This is the best variation if you want something brighter and a little less heavy.
To make it work:
- scatter a thin layer of fresh raspberries over the cooled brownie base before adding the mousse, or
- spoon a few small dots of raspberry jam over the mousse and lightly swirl them in
Do not overdo it. A little raspberry is enough to cut through the chocolate without turning the bars soggy or too sweet.
Espresso Chocolate Mousse Brownies
This version deepens the chocolate flavor without changing the texture. It will not make the brownies taste like coffee.
To make it:
- add 1 to 1 1/2 teaspoons espresso powder to the brownie batter, or
- dissolve 1 teaspoon espresso powder into the melted chocolate before folding in the cream
It just makes the chocolate taste darker and fuller. If you’re hosting a party and want a full dessert spread, these brownies look great next to a batch of Thick Soft Chocolate Chip Cookies or my Red Velvet Cheesecake Bars
What to Serve with Them
Fresh raspberries or strawberries are the best side here because they cut through the richness. A small spoonful of lightly whipped cream also works, but I would skip heavy sauces.
Make-Ahead, Storage, and Freezing
These are a good make-ahead dessert because the mousse needs chill time anyway. Keep them covered in the refrigerator for up to 4 days and serve cold.
To freeze, slice first, wrap each piece well, and freeze for up to 3 months. Thaw in the refrigerator for the best texture.
Nutrition (per serving)Approximate per serving:
- Calories: 650–670 kcal
- Protein: about 7 g
- Fat: about 42 g
- Carbohydrates: about 66 g
Per 100 g: about 400–420 kcal
These numbers are estimates, but they are more realistic for this ingredient list than the older 480 kcal figure.
FAQ
Can I use boxed brownie mix instead of homemade brownies?
Yes, if you want to save time. Bake the brownie layer in a 9×13-inch pan, let it cool completely, then add the mousse. The final dessert will still work, but the homemade version usually has a richer texture and better chocolate flavor.
Do these need to stay refrigerated?
Yes. Because of the mousse topping, these brownies should be kept chilled. They hold their shape better cold, and the texture is best straight from the fridge or after a short rest at room temperature.
Can I make them a day ahead?
Yes, and they are actually better that way. Making them the day before gives the mousse time to fully set, which makes slicing much easier and gives the layers a cleaner finish.
What kind of chocolate works best for the mousse?
Bittersweet chocolate gives the most balanced result because it keeps the topping rich without making it overly sweet. Semi-sweet works too, but the mousse will taste a little softer and sweeter.
Why is my mousse thicker or denser than expected?
That usually happens when the whipped cream is folded in too roughly or the melted chocolate cools too much before mixing. You want the chocolate cooled, but still smooth and fluid.