Author

Julia

Browsing

Skull / Brain Chocolates

These individual Halloween desserts have hollow ivory-white chocolate skulls, jagged openings, and pale-pink cheesecake mousse piped into raised brain-like folds. The broken crowns are intentional: they make room for the filling while leaving the molded faces intact.

Two complete coats of chocolate help the shells survive unmolding and breaking. Chill the mousse until it holds a soft mound before piping, then refrigerate the filled skulls until their folds stay defined. No baking is needed.

Ingredients for Skull / Brain Chocolates
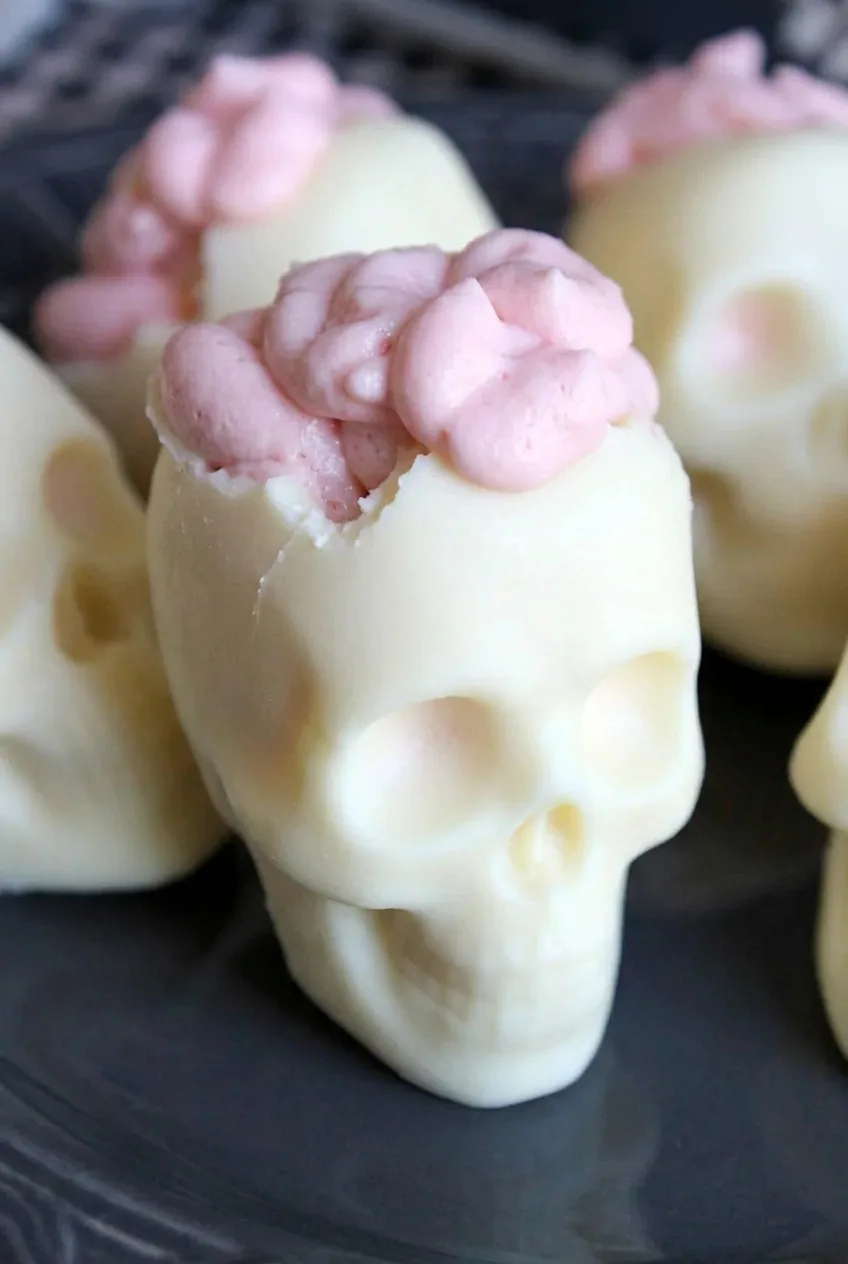
Close view of a white chocolate skull showing the jagged crown edge and thick pale-pink cheesecake mousse brain folds.

Makes approximately 6 to 8 skulls, depending on mold size. You’ll need a detailed, two-piece 3D silicone skull mold; its capacity will also affect how much shell coating you use.

  • 24 oz white melting chocolate or white candy coating, for the shells (680g)
  • 1 cup cold heavy whipping cream (240g)
  • 8 oz full-fat cream cheese, softened (225g)
  • 1/2 cup confectioners’ sugar (60g)
  • 1 teaspoon vanilla extract
  • 4 oz white chocolate, melted and cooled to lukewarm, for the mousse (115g)
  • 2 to 4 drops red or pink gel food coloring, or enough for a pale-pink mousse

Optional for serving: 1 to 2 teaspoons grenadine for a light drizzle.

How to Make Skull / Brain Chocolates
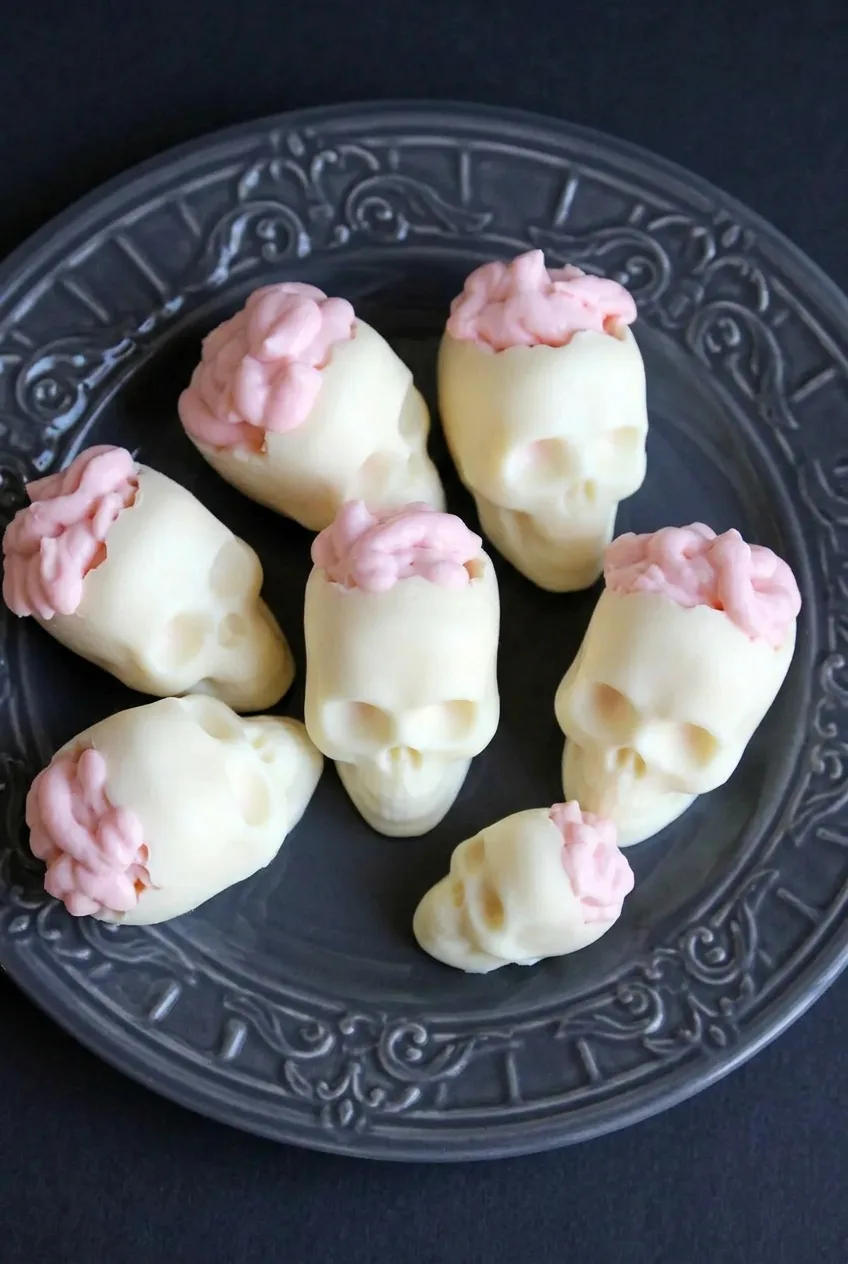
Overhead view of several ivory chocolate skull desserts filled with pink piped brain mousse on a dark serving plate.
  1. Melt the shell coating: Make sure the mold is clean and completely dry. Microwave the 24 oz of white melting chocolate or candy coating at 50% power in 15- to 20-second intervals, stirring after each, until smooth and fluid. Do not add liquid.
  2. Make the first coat: Add melted coating through the mold’s fill opening and secure the halves. Slowly rotate the mold in several directions to cover the face, crown, and back, including the fine facial details. Set it level on a tray and freeze for about 10 minutes, until the coating is firm.
  3. Reinforce the shells: Add a second complete coat, rotating the mold again. Redistribute excess coating so it does not pool at one edge. Freeze for about 10 minutes more, or until the shells are firm and opaque. Complete coverage matters more than one thick, uneven coat.
  4. Break the crowns: Gently separate the mold halves and release the skulls. Let them stand at cool room temperature for 5 to 10 minutes; breaking them while extremely cold can cause uncontrolled cracks. With a small blunt utensil, gently break an irregular opening at the upper back or crown of each skull. Leave the face and sides intact.
  5. Make the mousse: Whip the cold cream until it holds thick peaks but is not grainy. In another bowl, beat the cream cheese, confectioners’ sugar, vanilla, lukewarm melted white chocolate, and gel coloring until smooth. Gently fold in the whipped cream. Cover and refrigerate for about 30 minutes, until the mousse holds a soft mound and is firm enough to pipe.
  6. Pipe the brains: Transfer the mousse to a piping bag with a plain round tip, or snip a round opening in the bag. Pipe into each skull, then continue in thick, overlapping loops that rise above the broken edge without covering the face. If the folds begin to slump, chill the mousse briefly before continuing.
  7. Chill and serve: Stand the skulls upright in a single layer on a parchment-lined tray. Refrigerate for 2 to 3 hours, until the mousse is firm and the ridges stay defined when the tray is moved. If using grenadine, add a light drizzle just before serving.

How to Keep the Skull Details Intact

Stir the melted coating until completely smooth, then fill and rotate the closed mold slowly enough to reach the eye sockets, nose, and teeth. Check for thin or bare areas before chilling each coat. If the mold’s fill opening is too narrow to add the coating, carefully enlarge it or make small slits only as needed; mold designs differ.

Make the broken opening large enough for the piping bag, but work from the crown or upper back so the recognizable face stays whole. The edge should be uneven rather than neatly cut.

Make-Ahead and Storage

Make the empty shells several days ahead and keep them cool and dry. For the clearest piped folds, fill the skulls no more than a day before serving.

Refrigerate assembled skulls in a single layer in a covered container, keeping the cover off the mousse. Serve within 1 to 2 days for the best shell texture and appearance. If the shells are very hard from refrigeration, let the skulls stand for a few minutes before eating. Do not reheat them.

A dark plate makes the ivory shells and pink filling easy to see. For another brain-themed dessert on the same tray, try Halloween Brain Rice Krispie Treats.

Nutrition

Approximate nutrition per skull, based on 8 skulls and all listed core ingredients: 770 calories, 7g protein, 50g fat, and 70g carbohydrates. Approximate values per 100g: 465 calories, 4g protein, 30g fat, and 42g carbohydrates. Values vary with mold size, the amount of coating used per shell, and ingredient brands. Optional grenadine is not included.

Skull Brain Chocolates

Hollow white chocolate skulls with broken crowns are filled with pale-pink cheesecake mousse piped into brain-like folds.
Course: Dessert
Cuisine: American
Prep: 45 min
Total: 225 min
Servings: 8 Calories: 770 kcal

Equipment

  • Two-piece 3D silicone skull mold
  • Microwave-safe bowl
  • Baking tray
  • Parchment paper
  • Mixing bowls
  • Electric mixer
  • Rubber spatula
  • Piping bag
  • Plain round piping tip
  • Small blunt utensil

Ingredients

For the White Chocolate Skulls

  • 24 oz white melting chocolate or white candy coating (680 g)

For the Pink Cheesecake Mousse

  • 1 cup cold heavy whipping cream (240 g)
  • 8 oz full-fat cream cheese, softened (225 g)
  • 1/2 cup confectioners’ sugar (60 g)
  • 1 teaspoon vanilla extract
  • 4 oz white chocolate, melted and cooled to lukewarm (115 g)
  • 2 to 4 drops red or pink gel food coloring

Optional for Serving

  • 1 to 2 teaspoons grenadine, for drizzling

Instructions

  1. Make sure the skull mold is clean and completely dry.
  2. Microwave the white melting chocolate at 50% power in 15- to 20-second intervals, stirring after each interval, until smooth and fluid. Do not add liquid.
  3. Pour melted coating through the mold fill opening, secure the mold halves, and slowly rotate the mold to coat the face, crown, back, and fine details.
  4. Set the mold level on a tray and freeze for about 10 minutes, until the first coating is firm.
  5. Add a second complete coating of melted chocolate, rotating the mold again and redistributing excess coating so it does not pool at one edge.
  6. Freeze for about 10 minutes more, until the shells are firm and opaque.
  7. Separate the mold halves and release the skulls. Let them stand at cool room temperature for 5 to 10 minutes.
  8. Use a small blunt utensil to gently break an irregular opening in the upper back or crown of each skull, leaving the face and sides intact.
  9. Whip the cold heavy cream until it holds thick peaks but is not grainy.
  10. In a separate bowl, beat the cream cheese, confectioners’ sugar, vanilla, lukewarm melted white chocolate, and gel food coloring until smooth.
  11. Gently fold the whipped cream into the cream cheese mixture. Cover and refrigerate for about 30 minutes, until the mousse holds a soft mound.
  12. Transfer the mousse to a piping bag fitted with a plain round tip or a bag with a round opening snipped from the end.
  13. Pipe mousse into each skull, then pipe thick overlapping loops that rise above the broken edge without covering the face.
  14. Arrange the skulls upright in a single layer on a parchment-lined tray and refrigerate for 2 to 3 hours, until the mousse is firm and the ridges hold their shape.
  15. Drizzle lightly with grenadine just before serving, if desired.

Tips

  • Stir the melted coating until completely smooth before filling the mold.
  • Rotate the closed mold slowly to coat the eye sockets, nose, teeth, and other detailed areas.
  • Use two even coats of chocolate rather than one thick coat for sturdier shells.
  • Let skulls warm for 5 to 10 minutes after unmolding before breaking the crowns to prevent uncontrolled cracks.
  • Break the opening from the crown or upper back so the recognizable face stays intact.
  • Chill the mousse briefly if the piped folds begin to slump.

Notes

Empty shells can be made several days ahead and stored cool and dry. Fill the skulls no more than 1 day before serving, and refrigerate assembled skulls in a covered container for up to 1 to 2 days. Do not reheat.

Nutrition

Calories: 770 kcal | Protein: 7 g | Fat: 50 g | Carbohydrates: 70 g

Ghost Thumbprint Cookies

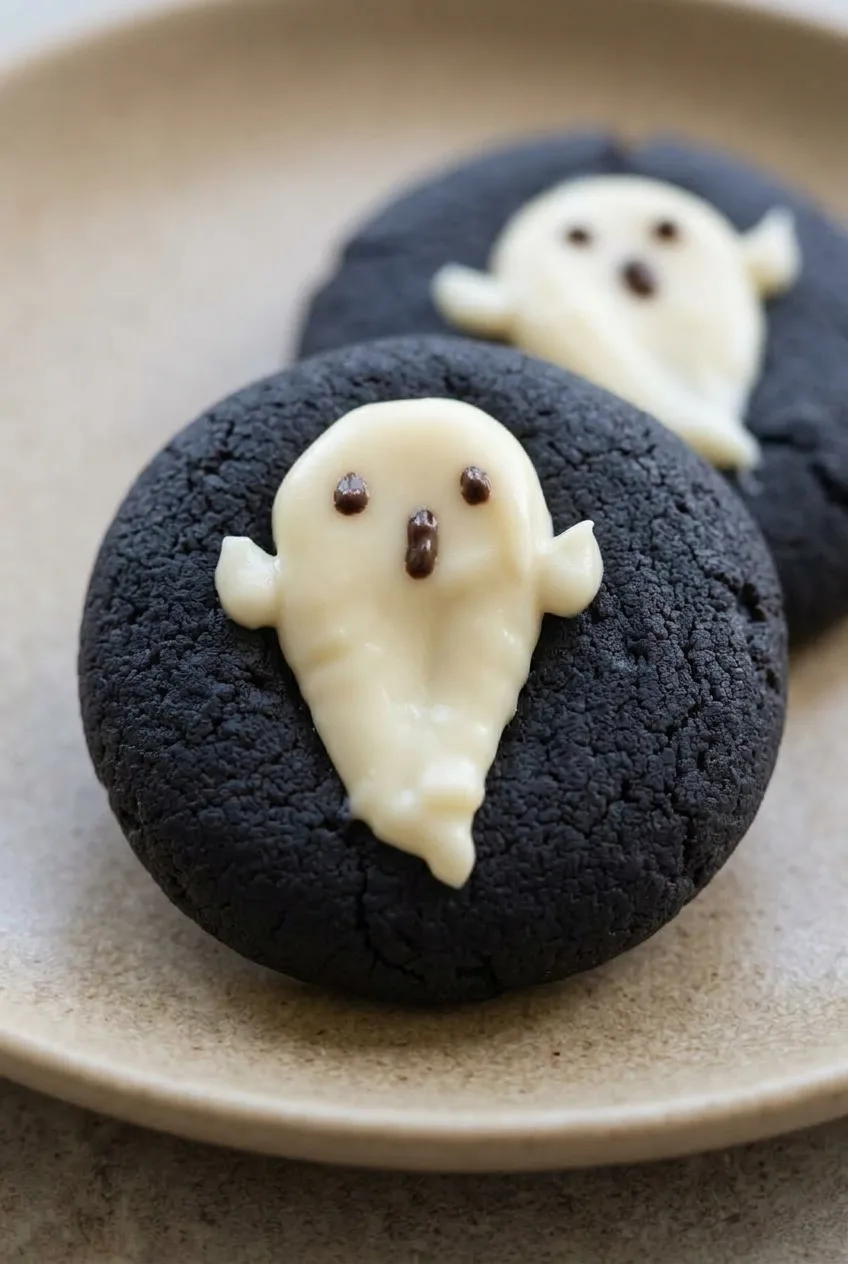
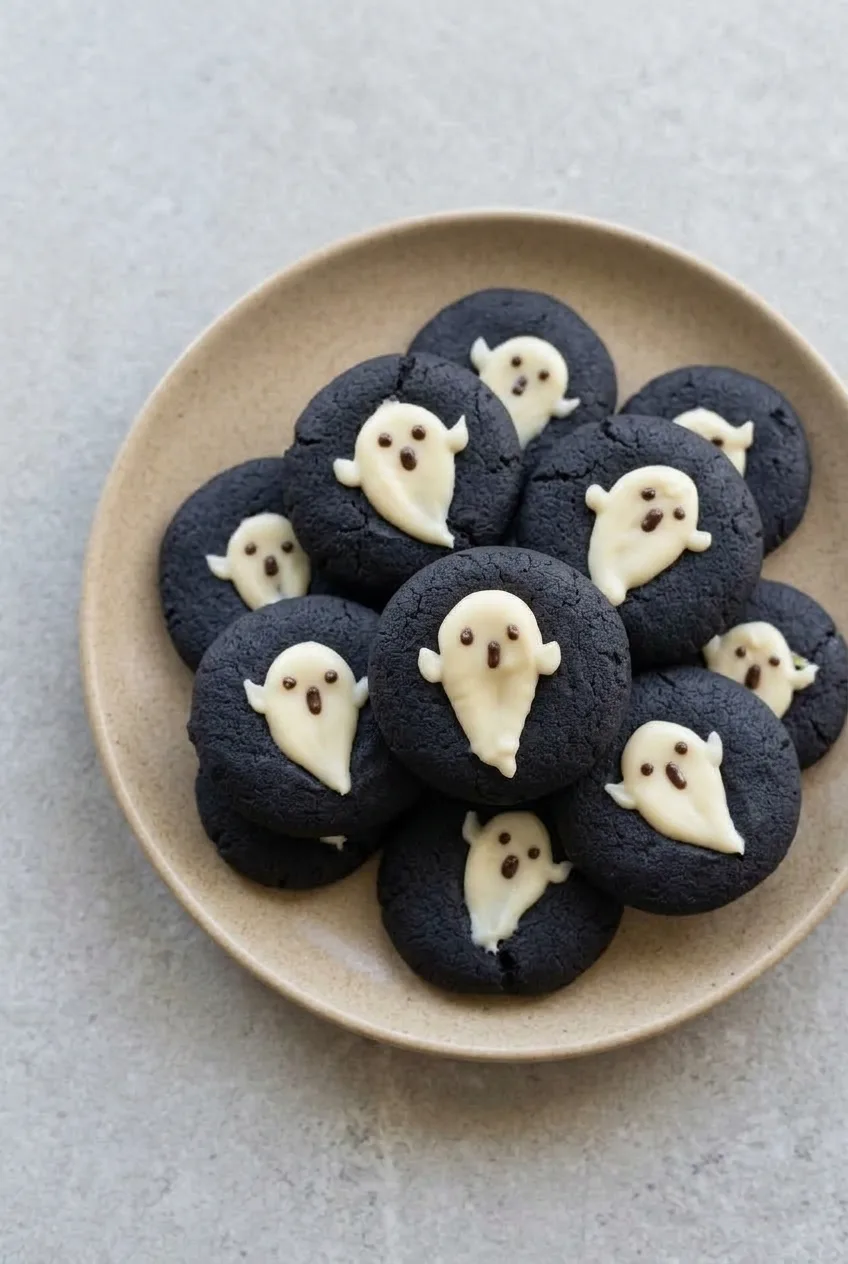
These thick, dark cocoa cookies hold raised white chocolate ganache ghosts, each with a rounded head, small arms, a pointed tail, and two tiny eyes. The contrast is sharpest with black cocoa, though Dutch-process cocoa makes a dark brown cookie if that is what you have.

The ghost shape starts before baking: a spoon handle pulls one edge of each thumbprint into a tail. Once the cookies are completely cool, thickened ganache fills the wells without spreading flat. The dough needs no routine chilling, but the decorated cookies need time to set before they are packed.

Ingredients for Ghost Thumbprint Cookies

Close view of a dark cocoa thumbprint cookie with a raised white chocolate ghost and tiny dark eyes

Makes 16 cookies. Prep time: about 30 minutes. Bake time: 8 to 10 minutes per sheet. Total time: about 1 hour 30 minutes, including cooling and setting.

  • 1/2 cup unsalted butter, softened (115g)
  • 2/3 cup granulated sugar (135g)
  • 1 large egg yolk
  • 1 teaspoon vanilla extract
  • 1/4 teaspoon almond extract
  • 1 1/4 cups all-purpose flour (150g)
  • 1/3 cup Dutch-process cocoa powder (30g)
  • 2 tablespoons black cocoa powder (10g)
  • 1/4 teaspoon fine salt
  • 1 cup white chocolate chips or finely chopped white chocolate (170g)
  • 1/4 cup heavy cream (60g)
  • 32 mini semisweet chocolate chips or small dark chocolate sprinkles, for the eyes

If black cocoa is unavailable, replace it with 2 tablespoons Dutch-process cocoa; the cookies will be dark brown rather than nearly black. For a cookie without almond flavor, replace the almond extract with additional vanilla.

How to Make Ghost Thumbprint Cookies

Overhead view of dark ghost thumbprint cookies arranged across a neutral ceramic plate
  1. Prepare the oven and pans: Heat the oven to 375°F (190°C) with a rack in the center. Line two light-colored baking sheets with parchment paper.
  2. Mix the dough: Beat the butter and sugar until combined and slightly creamy. Beat in the egg yolk, vanilla, and almond extract. In a separate bowl, whisk together the flour, both cocoas, and salt. Mix the dry ingredients into the butter mixture on low just until no dry pockets remain. The dough may look sandy at first; keep mixing until it clumps when pressed rather than adding liquid.
  3. Shape the thumbprints: Divide the dough into 16 level 1 1/2-tablespoon portions. Roll into balls and place about 2 inches apart on the prepared sheets. Press a broad, shallow well into each with your thumb or the back of a teaspoon. Use the narrow end of a spoon handle to pull one edge of each well outward into a pointed tail, about 1/2 inch long. Leave dough beneath the wells so the cookies stay intact. If the shaped dough feels noticeably soft or greasy, chill the tray for 10 minutes.
  4. Bake and cool: Bake one sheet at a time for 8 to 10 minutes, checking at 8 minutes. The tops should look dry rather than shiny, and the edges should be set. Do not wait for browning, which is difficult to see on dark cocoa cookies. Let the cookies rest on the sheet for 5 minutes, then transfer to a rack to cool completely, about 30 minutes.
  5. Make the ganache: Put the white chocolate in a heatproof bowl. Heat the cream just until steaming, pour it over the chocolate, and let stand for 2 minutes. Stir until smooth. Let the ganache cool until it is thick but still pipeable and holds a soft mound on a spoon, about 10 to 20 minutes. If it runs off the spoon, give it more time to thicken.
  6. Form the ghosts: Spoon the ganache into a small piping bag or a zip-top bag with a small corner snipped off. On each cooled cookie, pipe a rounded head at the top of the well, widen the body through the center, and taper it into the pointed tail. Add two small, rounded arms with the same ganache. Use a toothpick to nudge the arms or sharpen the tail if needed.
  7. Add eyes and let set: While the ganache is tacky, place two small dark eyes high on each ghost’s head. Leave the cookies uncovered until the ganache is firm to a light touch, about 30 minutes, before serving or packing.

How to Keep the Ghost Shapes Distinct

Make the center wells broad enough for the ghost bodies, but not so deep that they break through the cookie bases. Shape the pointed tails in the raw dough; trying to press a new tail into a cooled cookie can crack it.

The ganache should mound rather than flow across the well. Pipe the rounded head first, then draw the body toward the tail so the filling stays raised instead of settling into a flat circle.

Serving and Storing Ghost Thumbprint Cookies

Arrange the cookies on a white plate with several ghost faces visible. They can share a Halloween dessert tray with Halloween Brownie Bites with Cookie Bat Wings. For another ghost-shaped treat, try Nutter Butter Ghost Cookies.

Let the ganache set completely before covering or stacking the cookies. For same-day serving, keep them in a single layer in an airtight container at cool room temperature. For longer storage, refrigerate in an airtight container for up to 3 to 4 days as a conservative guideline for the cream-based filling. Place parchment between layers if stacking is necessary, and let the cookies sit at room temperature for 15 to 20 minutes before serving.

The undecorated cookie bases can be baked a day ahead and stored airtight once cool. As a practical make-ahead option, freeze the undecorated bases airtight for up to 1 month; thaw before making fresh ganache and decorating. Avoid freezing or reheating decorated cookies, which can affect the ghost faces.

Nutrition

Approximate per cookie, based on 16 cookies: 200 calories, 2g protein, 11g fat, and 24g carbohydrates. Approximate per 100g of finished cookies: 475 calories, 6g protein, 27g fat, and 57g carbohydrates. Values vary with ingredient brands, decoration amounts, and moisture lost during baking.

Ghost Thumbprint Cookies

Dark cocoa thumbprint cookies filled with thick white chocolate ganache shaped into little ghosts.
Course: Dessert
Cuisine: American
Prep: 30 min
Cook: 10 min
Total: 90 min
Servings: 16 Calories: 200 kcal

Equipment

  • 2 baking sheets
  • parchment paper
  • mixing bowls
  • electric mixer
  • whisk
  • wire cooling rack
  • heatproof bowl
  • piping bag or zip-top bag
  • toothpick

Ingredients

For the Cocoa Cookies

  • 1/2 cup unsalted butter, softened (115g)
  • 2/3 cup granulated sugar (135g)
  • 1 large egg yolk
  • 1 teaspoon vanilla extract
  • 1/4 teaspoon almond extract
  • 1 1/4 cups all-purpose flour (150g)
  • 1/3 cup Dutch-process cocoa powder (30g)
  • 2 tablespoons black cocoa powder (10g)
  • 1/4 teaspoon fine salt

For the Ghost Ganache

  • 1 cup white chocolate chips or finely chopped white chocolate (170g)
  • 1/4 cup heavy cream (60g)
  • 32 mini semisweet chocolate chips or small dark chocolate sprinkles, for the eyes

Instructions

  1. Preheat the oven to 375°F (190°C) with a rack in the center. Line two light-colored baking sheets with parchment paper.
  2. Beat the softened butter and sugar until combined and slightly creamy.
  3. Beat in the egg yolk, vanilla extract, and almond extract.
  4. Whisk the flour, Dutch-process cocoa, black cocoa, and salt in a separate bowl.
  5. Mix the dry ingredients into the butter mixture on low speed just until no dry pockets remain. Continue mixing if the dough looks sandy, until it clumps when pressed.
  6. Divide the dough into 16 level 1 1/2-tablespoon portions, roll into balls, and place them about 2 inches apart on the prepared baking sheets.
  7. Press a broad, shallow well into each dough ball with your thumb or the back of a teaspoon. Use the narrow end of a spoon handle to pull one edge of each well into a pointed 1/2-inch tail.
  8. Chill the shaped dough for 10 minutes if it feels noticeably soft or greasy.
  9. Bake one sheet at a time for 8 to 10 minutes, checking at 8 minutes, until the tops look dry and the edges are set.
  10. Cool the cookies on the baking sheet for 5 minutes, then transfer them to a wire rack and cool completely, about 30 minutes.
  11. Place the white chocolate in a heatproof bowl. Heat the cream until steaming, pour it over the chocolate, and let stand for 2 minutes.
  12. Stir the ganache until smooth, then let it cool for 10 to 20 minutes until thick but pipeable and able to hold a soft mound on a spoon.
  13. Transfer the ganache to a small piping bag or a zip-top bag with a small corner snipped off.
  14. Pipe a rounded head at the top of each cookie well, widen the body through the center, and taper it into the pointed tail. Pipe two small rounded arms on each ghost.
  15. Use a toothpick to adjust the arms or sharpen the tail if needed.
  16. While the ganache is still tacky, add two chocolate chip or sprinkle eyes to each ghost.
  17. Leave the cookies uncovered for about 30 minutes, until the ganache is firm to a light touch.

Tips

  • Do not add liquid if the dough looks sandy; keep mixing until it clumps when pressed.
  • Make the thumbprint wells broad but leave dough beneath them so the cookies do not break.
  • Shape the pointed tails before baking, since pressing tails into cooled cookies can cause cracking.
  • Bake until the tops look dry and the edges are set; browning is difficult to see on dark cocoa cookies.
  • Let the ganache thicken until it mounds on a spoon before piping so the ghost shapes stay raised.
  • Allow the ganache to set completely before covering or stacking the cookies.

Variations

  • Dutch Cocoa Ghost Cookies: Replace the black cocoa with 2 additional tablespoons of Dutch-process cocoa for dark brown cookies.
  • Vanilla Ghost Cookies: Replace the almond extract with additional vanilla extract for a cookie without almond flavor.

Notes

Store set cookies in a single layer in an airtight container at cool room temperature for same-day serving, or refrigerate for up to 3 to 4 days with parchment between layers. Let chilled cookies stand at room temperature for 15 to 20 minutes before serving. Freeze undecorated cookie bases for up to 1 month; decorate after thawing.

Nutrition

Calories: 200 kcal | Protein: 2 g | Fat: 11 g | Carbohydrates: 24 g

Nutter Butter Ghost Cookies

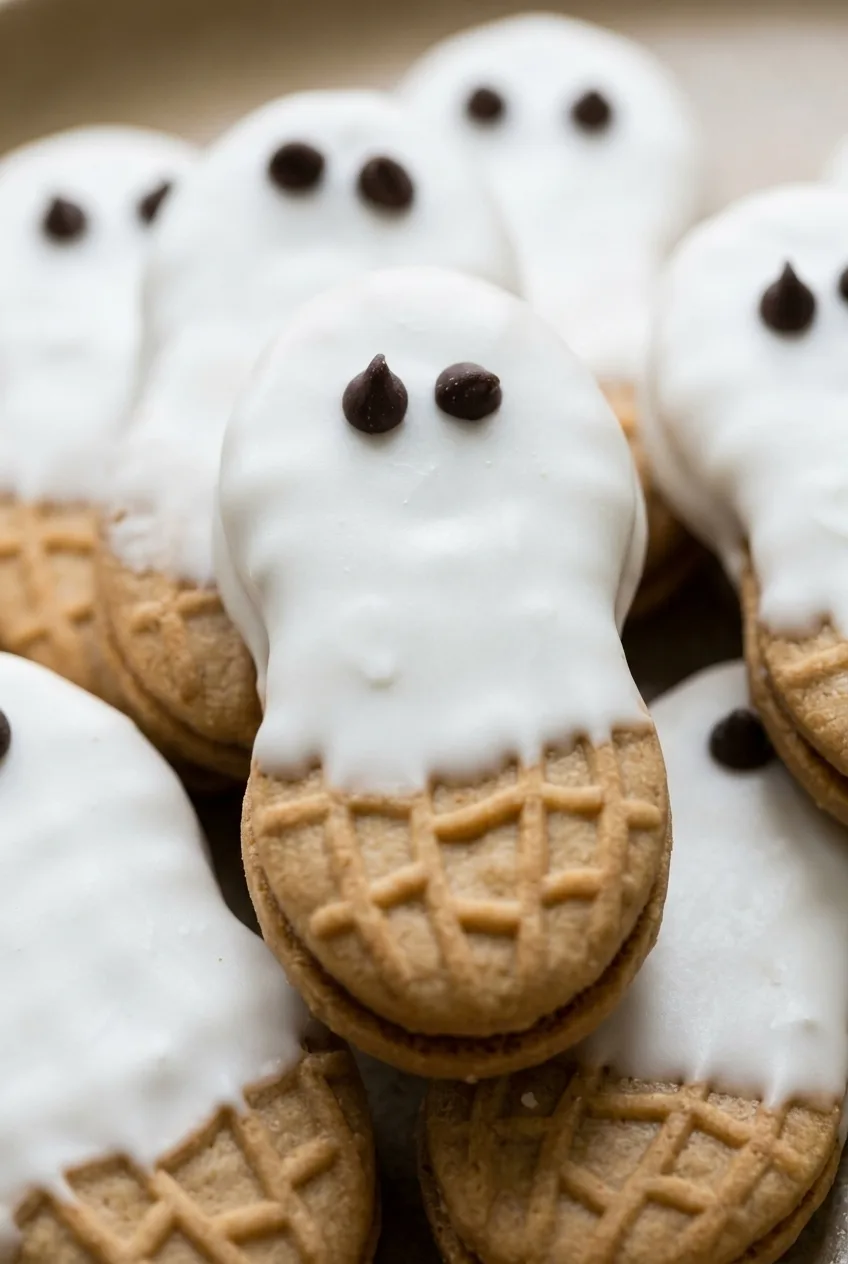
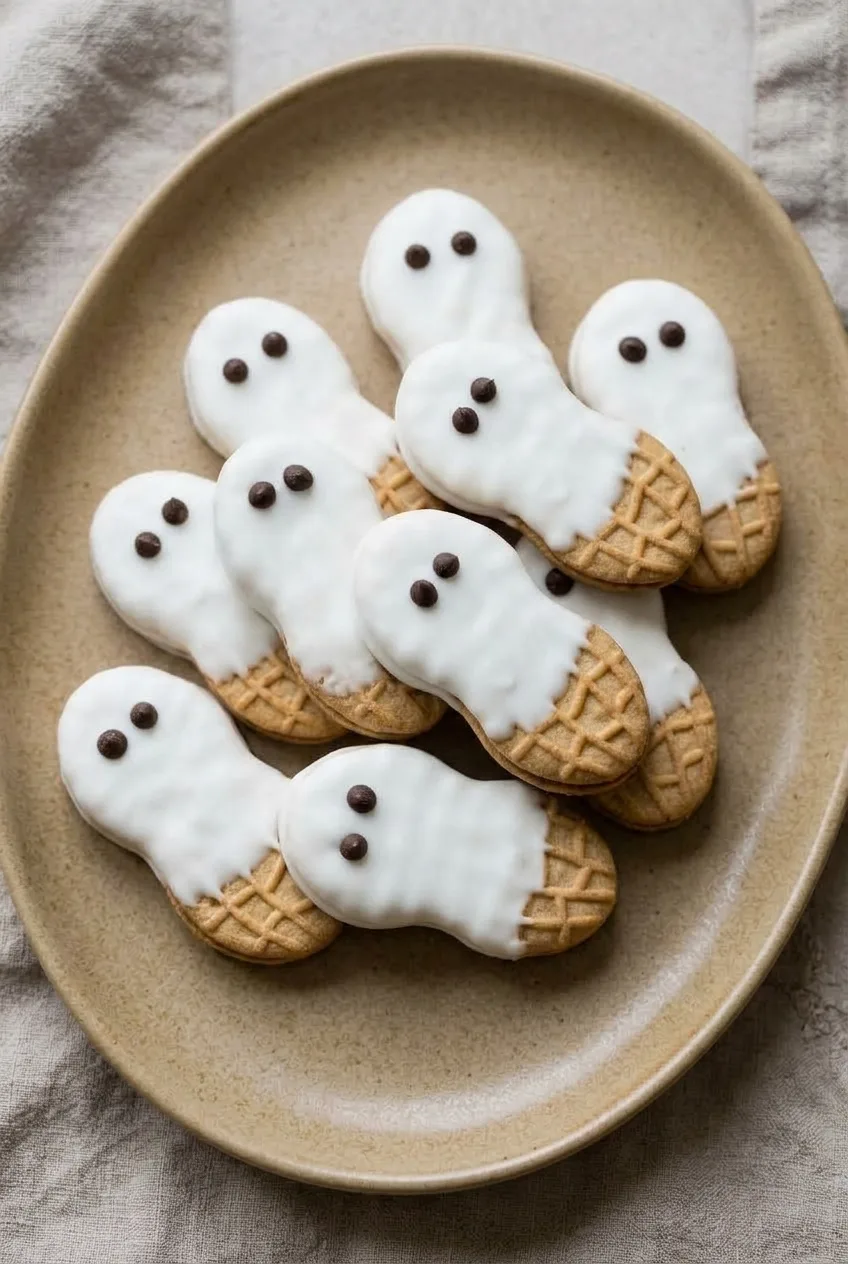
Whole Nutter Butter cookies become no-bake ghosts with a white candy-coating “sheet” and two chocolate-chip eyes. Coat only the rounded top and upper two-thirds of each cookie: the exposed, patterned bottom keeps the peanut shape recognizable, while a few uneven drips make the coating look like a drape.

Have the chocolate chips ready before melting the coating. Decorating one cookie at a time lets you press the eyes into the white coating before it sets. Allow about 15 minutes to assemble the ghosts and another 10 to 15 minutes for them to firm up.

Ingredients for Nutter Butter Ghost Cookies

Close detail of a Nutter Butter ghost cookie showing smooth white coating, chocolate-chip eyes, and embossed cookie base
  • 16 whole Nutter Butter cookies
  • 12 ounces white candy melts or vanilla candy coating wafers (340g)
  • 32 mini semisweet chocolate chips, plus a few extra

You will also need parchment or wax paper. Candy coating gives the ghosts an opaque white finish and sets firm. Almond bark can be used instead; follow its package melting directions. White chocolate needs gentler melting and may give a less opaque finish. Nutter Butter cookies contain peanut ingredients, so check current package labels when serving others.

How to Make Nutter Butter Ghost Cookies

Overhead platter of partial-coated Nutter Butter Ghost Cookies with exposed tan patterned bottoms
  1. Prepare the surface: Line a rimmed baking sheet or large flat surface with parchment or wax paper. Set the whole cookies and mini chocolate chips nearby.
  2. Melt the coating: Place the candy melts in a dry microwave-safe bowl. Microwave in 15- to 20-second intervals, stirring thoroughly after each one. Stop heating when a few pieces remain, then stir until smooth. Use reduced power if the package directs it. The coating should fall slowly from a spoon in a smooth ribbon, not look grainy or pasty.
  3. Coat one cookie: Hold a Nutter Butter by its lower end, supporting it with a fork if helpful. Dip or spoon coating over the rounded top and upper two-thirds, leaving the patterned lower third exposed. Let excess drip back into the bowl, then place the cookie on the lined surface. An uneven edge with a few short drips creates the ghost-sheet look.
  4. Add the eyes: Immediately press two mini chocolate chips, point-side down, into the wet coating near the rounded top. Repeat with the remaining cookies, coating and decorating one at a time so the eyes adhere.
  5. Let set: Leave the cookies uncovered at room temperature for about 10 to 15 minutes, until the coating is firm and dry to a gentle touch. Arrange them in a loosely overlapping cluster on a platter.

If the White Coating Is Too Thick

Stir thoroughly before heating it again; pieces that still look solid may melt in the warm coating. Keep the bowl and utensils dry, since moisture can cause chocolate-based coatings to seize.

If fully melted candy coating is still too thick to flow from a spoon, stir in refined coconut oil or vegetable shortening 1/2 teaspoon at a time, using no more than 1 teaspoon. Let excess coating drip off each cookie before setting it down so it does not pool around the patterned bottom.

Optional Ghost Faces

For a small mouth, press a third mini chocolate chip below the eyes while the coating is wet. Candy eyes can replace the chocolate chips for a more cartoon-like face, but their colors may bleed if exposed to refrigerator moisture.

Serving and Storing the Cookies

For a mixed Halloween dessert tray, serve the ghosts with Easy Purple Witch Hat Cookies or Halloween Brownie Bites with Cookie Bat Wings.

You can make the ghosts the day before serving. Wait until the coating is completely firm before stacking or packaging them, then store in an airtight container at cool room temperature with parchment or wax paper between layers. They have the best crispness and appearance within 1 to 2 days; the cookies may soften with longer storage. Keep them away from heat and humidity, and avoid routine refrigeration or freezing. No reheating is needed.

Nutrition

Approximate nutrition per ghost cookie, based on 16 cookies: 180 calories, 1g protein, 9g fat, and 23g carbohydrates. Approximate values per 100g: 490 calories, 3g protein, 25g fat, and 62g carbohydrates. These estimates assume all 12 ounces of coating are used; values will be lower if some remains in the bowl. Brands and coating thickness also affect the totals.

Nutter Butter Ghost Cookies

Whole Nutter Butter cookies are dipped in white candy coating and decorated with chocolate-chip eyes for an easy no-bake ghost treat.
Course: Dessert
Cuisine: American
Prep: 15 min
Total: 30 min
Servings: 16 Calories: 180 kcal

Equipment

  • Rimmed baking sheet
  • Parchment paper or wax paper
  • Microwave-safe bowl
  • Spoon
  • Fork

Ingredients

  • 16 whole Nutter Butter cookies
  • 12 ounces white candy melts or vanilla candy coating wafers (340 g)
  • 32 mini semisweet chocolate chips, plus extra if needed

Instructions

  1. Line a rimmed baking sheet or large flat surface with parchment or wax paper. Set the cookies and mini chocolate chips nearby.
  2. Place the candy melts in a dry microwave-safe bowl. Microwave in 15- to 20-second intervals, stirring thoroughly after each interval.
  3. Stop heating when a few pieces remain and stir until the coating is completely smooth. The coating should fall from a spoon in a smooth, slow ribbon.
  4. Hold one Nutter Butter cookie by the lower end, using a fork for support if needed. Dip or spoon coating over the rounded top and upper two-thirds, leaving the patterned lower third exposed.
  5. Let excess coating drip back into the bowl, then place the cookie on the lined surface. Leave an uneven coating edge with a few short drips for a ghost-sheet effect.
  6. Immediately press two mini chocolate chips point-side down into the wet coating near the rounded top to make eyes.
  7. Repeat with the remaining cookies, coating and decorating one cookie at a time.
  8. Let the cookies stand uncovered at room temperature for 10 to 15 minutes, or until the coating is firm and dry to a gentle touch.

Tips

  • Have the chocolate chips ready before melting the candy coating so the eyes can be added before it sets.
  • Keep the bowl and utensils completely dry to prevent chocolate-based coating from seizing.
  • Stir thoroughly before reheating coating that seems thick, as remaining pieces may melt from the residual heat.
  • If the coating is too thick, stir in refined coconut oil or vegetable shortening 1/2 teaspoon at a time, using no more than 1 teaspoon.
  • Let excess coating drip off before placing each cookie on the baking sheet to prevent pooling around the bottom.

Variations

  • Ghosts with Mouths: Press a third mini chocolate chip below the eyes while the coating is still wet to create a small mouth.
  • Candy Eye Ghosts: Replace the chocolate chips with candy eyes for a more cartoon-like face.
  • Almond Bark Coating: Use almond bark instead of candy melts, following the package melting directions.

Notes

Store fully set cookies in an airtight container at cool room temperature with parchment or wax paper between layers. They are best within 1 to 2 days; avoid heat, humidity, routine refrigeration, and freezing. Nutter Butter cookies contain peanut ingredients.

Nutrition

Calories: 180 kcal | Protein: 1 g | Fat: 9 g | Carbohydrates: 23 g

Ghost Rice Krispie Treats

These no-bake treats start with a soft marshmallow-cereal slab that is sturdy enough to cut into ghosts once it cools. A lightly greased cutter gives them rounded heads and wavy tails without pulling the cereal apart. Spread white candy coating over each shape for a swirled finish, then add tiny chocolate-chip faces before the coating sets.

The batch makes about 10 to 12 ghosts, depending on the size of your cutter and how closely you arrange the cuts.

Ingredients for Ghost Rice Krispie Treats

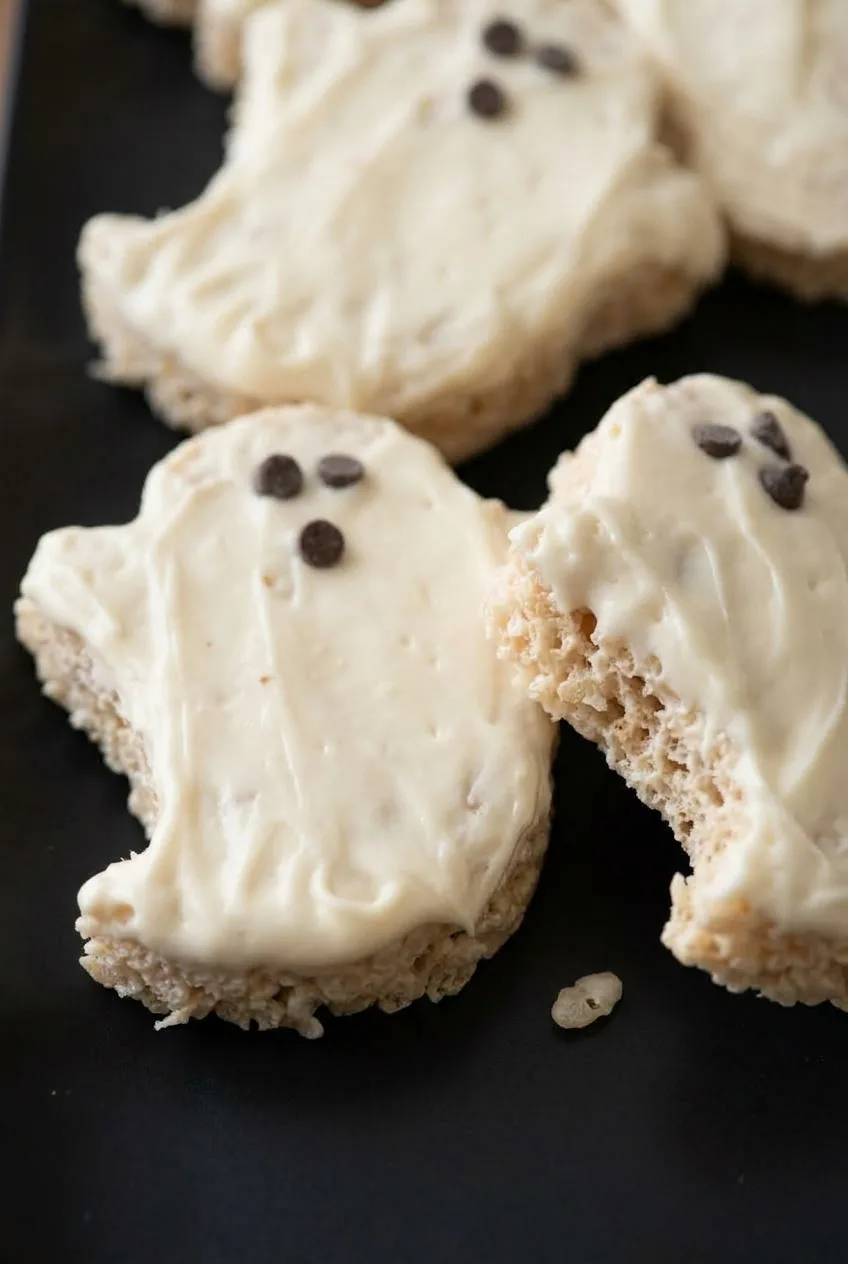
Close view of a ghost Rice Krispie treat showing chewy cereal edges beneath textured white coating
  • 6 cups crispy rice cereal (170g)
  • 1 bag mini marshmallows, 10 ounces (285g)
  • 4 tablespoons unsalted butter (55g), plus a little for greasing
  • 1 teaspoon vanilla extract
  • 1/4 teaspoon fine salt
  • 12 ounces white candy melts or white confectionery coating (340g)
  • 1/3 cup mini semisweet chocolate chips (55g)

White candy melts or confectionery coating spread easily over the cutouts. White chocolate chips can melt thicker and are easier to overheat. For dietary substitutions, check every packaged ingredient, including the cereal, marshmallows, and coating.

How to Make Ghost Rice Krispie Treats

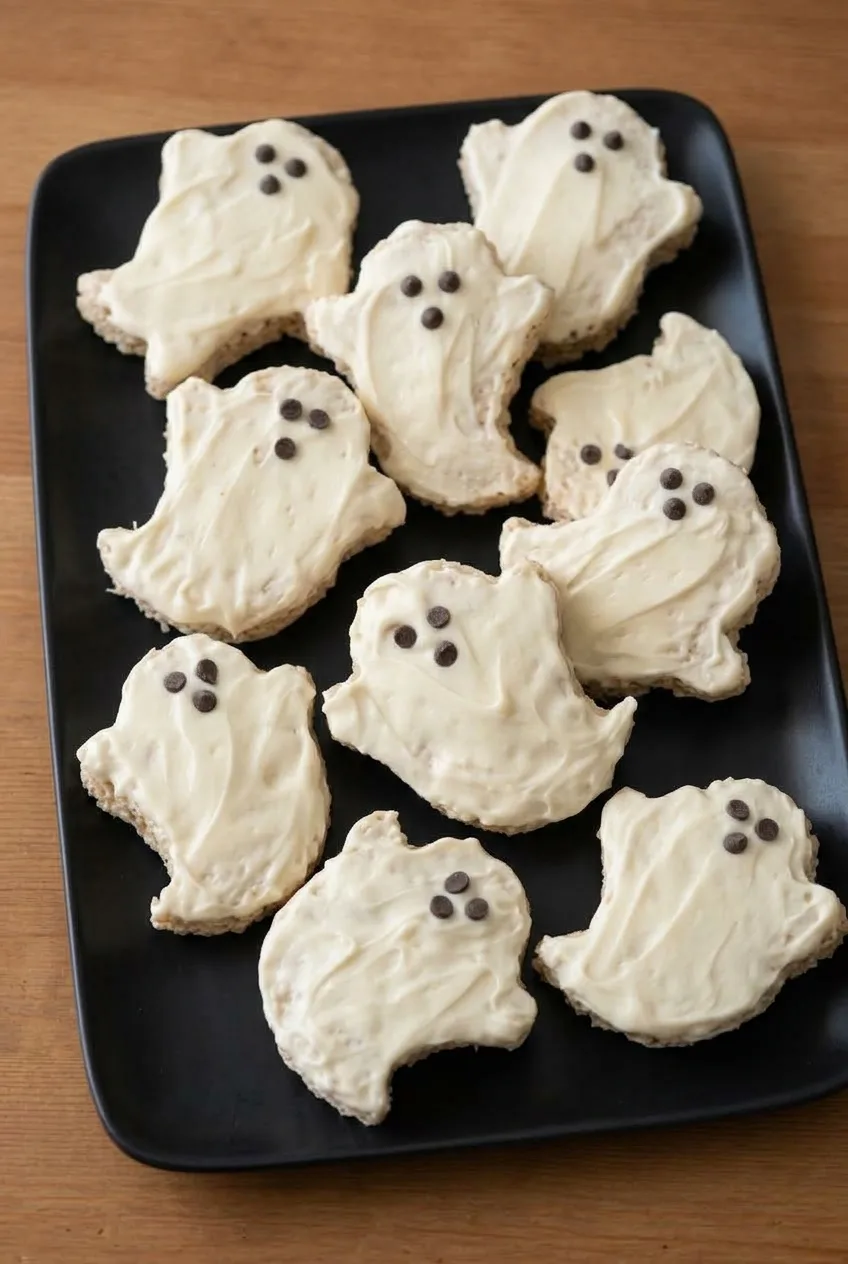
Overhead arrangement of white ghost Rice Krispie treats with chocolate-chip faces on a dark tray
  1. Prepare the pan: Line a 9-by-13-inch pan with parchment, leaving an overhang on two sides. Lightly butter or spray the parchment and a silicone spatula.
  2. Melt the marshmallows: Melt the butter in a large saucepan over low heat. Add the marshmallows and stir frequently for about 4 to 6 minutes, until smooth and glossy. Stir in the vanilla and salt, then remove from the heat. Do not let the mixture brown or boil hard; gentle melting keeps the treats soft.
  3. Press the slab: Fold in the cereal until evenly coated, with no dry pockets. Transfer to the pan and gently press into an even layer about 3/4 inch thick using the greased spatula or lightly buttered hands. Press just enough to hold it together without packing it tightly.
  4. Cool: Leave the slab uncovered at room temperature for about 30 to 45 minutes. Start checking at 30 minutes: the center should feel firm and no longer warm. Lift the slab out using the parchment.
  5. Cut the ghosts: Lightly grease a 3- to 4-inch ghost cookie cutter. Press it straight down through the slab, spacing cuts close together. Transfer the ghosts to a parchment-lined tray. Grease the cutter again if it sticks; gently press scraps together and recut without packing them densely.
  6. Coat and decorate: Microwave the white coating in a microwave-safe bowl at 50% power in 20-second intervals, stirring thoroughly after each. Stop when it is mostly melted and stir until smooth. Spread it over the front and sides of a few ghosts at a time, leaving soft swirls and ridges. Immediately press two mini chips into each ghost for eyes and two or three for a small mouth.
  7. Let set: Leave the ghosts uncovered at room temperature for about 10 minutes, until the coating is dry to a light touch and the faces stay in place.

How to Keep the Ghost Shapes Intact

If the slab stretches or tears under the cutter, let it cool longer. When time is short, refrigerate it for 15 to 20 minutes, just until firm enough to cut. This brief setting shortcut is different from storing the finished treats in the refrigerator, which can make them hard.

To reattach a chocolate chip after the coating sets, use a small dot of melted coating.

Without a Ghost Cookie Cutter

For a simpler alternate shape, cut the cooled slab into rectangles and round one short end of each with a knife. Coat and decorate them as directed. They will look more like ghost bars than the wavy cutouts in the main recipe.

Serving and Storage

Arrange the set ghosts faceup on a dark platter, or package them individually once the coating is firm. For another Halloween dessert, serve them alongside Halloween Dirt Pudding Cups with RIP Tombstones.

Store the treats in an airtight container at room temperature for up to 3 days, with parchment between layers to protect the coating. Make them up to 1 day ahead for the softest texture. Avoid refrigerating leftovers.

Nutrition

Approximate nutrition per ghost, based on 11 treats: 375 calories, 2g protein, 14g fat, and 59g carbohydrates. Approximate values per 100g: 450 calories, 2g protein, 17g fat, and 71g carbohydrates. Values vary with cutter size and ingredient brands.

Ghost Rice Krispie Treats

Soft marshmallow cereal treats cut into ghost shapes, coated with white candy coating, and decorated with chocolate-chip faces.
Course: Dessert
Cuisine: American
Prep: 25 min
Cook: 10 min
Total: 80 min
Servings: 11 Calories: 375 kcal

Equipment

  • 9-by-13-inch pan
  • parchment paper
  • silicone spatula
  • large saucepan
  • 3- to 4-inch ghost cookie cutter
  • parchment-lined tray
  • microwave-safe bowl

Ingredients

For the Rice Krispie Treats

  • 6 cups crispy rice cereal (170g)
  • 1 bag mini marshmallows, 10 ounces (285g)
  • 4 tablespoons unsalted butter (55g), plus more for greasing
  • 1 teaspoon vanilla extract
  • 1/4 teaspoon fine salt

For Coating and Decorating

  • 12 ounces white candy melts or white confectionery coating (340g)
  • 1/3 cup mini semisweet chocolate chips (55g)

Instructions

  1. Line a 9-by-13-inch pan with parchment paper, leaving an overhang on two sides. Lightly butter or spray the parchment and a silicone spatula.
  2. Melt the butter in a large saucepan over low heat. Add the marshmallows and stir frequently for 4 to 6 minutes, until smooth and glossy.
  3. Stir in the vanilla and salt, then remove the pan from the heat.
  4. Fold in the crispy rice cereal until evenly coated with no dry pockets.
  5. Transfer the mixture to the prepared pan and gently press it into an even layer about 3/4 inch thick with the greased spatula or lightly buttered hands.
  6. Cool the slab uncovered at room temperature for 30 to 45 minutes, until the center is firm and no longer warm.
  7. Lift the slab from the pan using the parchment. Lightly grease a 3- to 4-inch ghost cookie cutter and cut out ghost shapes, placing them on a parchment-lined tray.
  8. Microwave the white candy coating at 50% power in 20-second intervals, stirring thoroughly after each interval, until mostly melted. Stir until smooth.
  9. Spread the melted coating over the fronts and sides of a few ghosts at a time, leaving soft swirls and ridges.
  10. Immediately press two mini chocolate chips into each ghost for eyes and two or three chips for a mouth.
  11. Let the ghosts stand uncovered at room temperature for about 10 minutes, until the coating is dry to a light touch.

Tips

  • Melt the marshmallows gently and do not let them brown or boil hard to keep the treats soft.
  • Press the cereal mixture only enough to hold it together; packing it tightly makes the treats dense.
  • Grease the cookie cutter before cutting and re-grease it if it begins to stick.
  • If the slab stretches or tears while cutting, let it cool longer or refrigerate it for 15 to 20 minutes until firm enough to cut.
  • Decorate each ghost immediately after coating so the chocolate chips adhere before the coating sets.
  • Use a small dot of melted coating to reattach chocolate chips after the coating has set.

Variations

  • Ghost Bars: Cut the cooled slab into rectangles and round one short end with a knife, then coat and decorate them as ghost bars.

Notes

Store in an airtight container at room temperature for up to 3 days, separating layers with parchment. Make up to 1 day ahead for the softest texture. Avoid refrigerating finished treats, as they can become hard.

Nutrition

Calories: 375 kcal | Protein: 2 g | Fat: 14 g | Carbohydrates: 59 g

Frankenstein Rice Krispie Treats

These no-bake Frankenstein treats have a pale-green marshmallow base that leaves the crisp-rice texture visible. Six thick rectangles become monster faces with rough chocolate hair, candy eyes, black icing, and mini-marshmallow bolts. Melt the marshmallows gently and press the cereal lightly to keep the bars chewy; vary the expressions for a homemade-looking batch.

Prep time: 25 minutes. Cook time: 10 minutes. Total time: about 1 hour 5 minutes, including setting. Makes 6 large treats.

Ingredients for Frankenstein Rice Krispie Treats

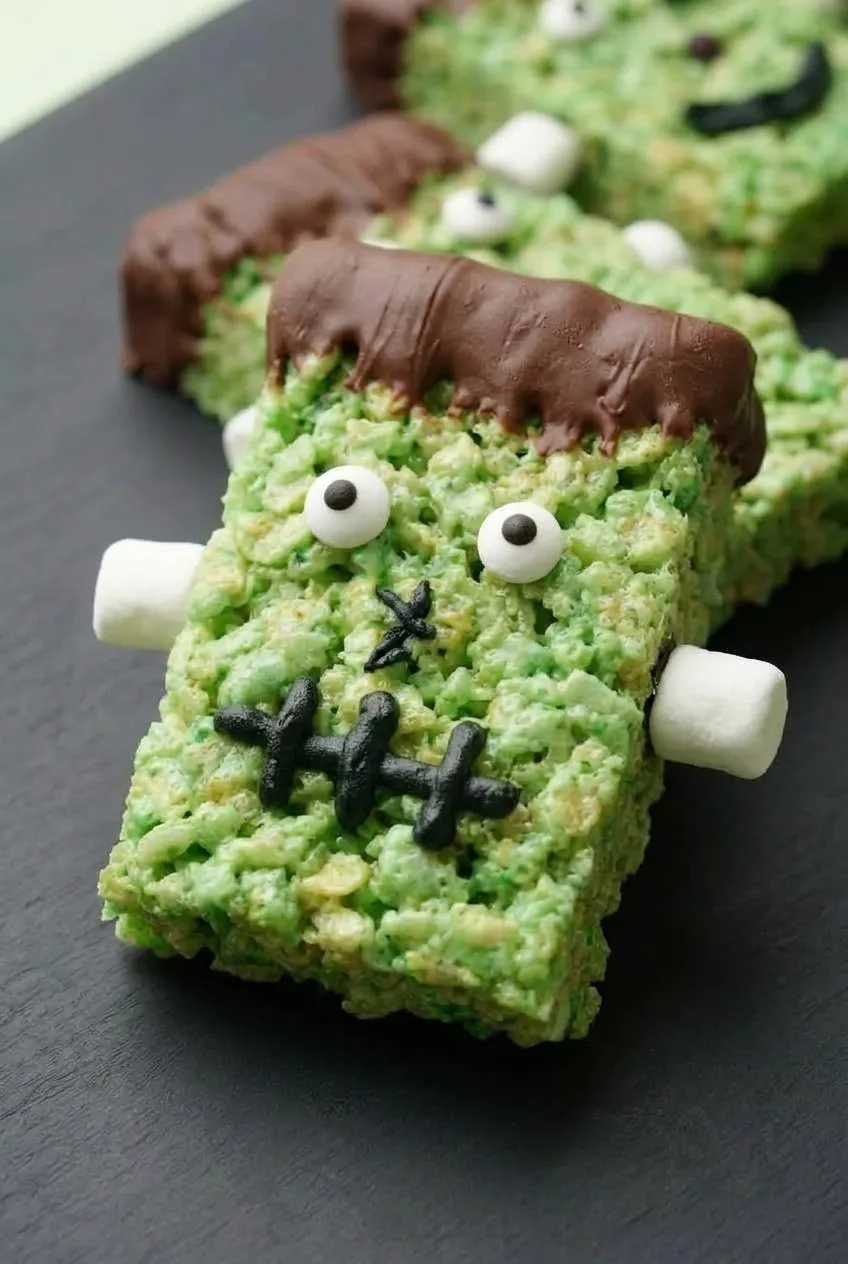
Close view of a green Frankenstein Rice Krispie Treat showing crisp rice texture, chocolate hair, candy eyes, and a marshmallow bolt
  • 4 tablespoons unsalted butter (55g), plus a little for greasing
  • 10 ounces mini marshmallows (285g), for the cereal base
  • 6 cups crisp rice cereal (150g)
  • 1/2 to 1 teaspoon green gel food coloring, as needed
  • 1 cup semisweet chocolate chips or dark chocolate candy melts (170g)
  • 12 medium candy eyes
  • 12 additional mini marshmallows, for the side bolts
  • 1 small tube black decorating icing, about 1/4 cup (60g)

Optional: Up to 2 tablespoons purple jimmies for a few hair caps, or small candy pieces for noses. If the melted chocolate is too thick to spread, stir in up to 1 teaspoon neutral vegetable oil or refined coconut oil. Do not add water.

How to Make Frankenstein Rice Krispie Treats

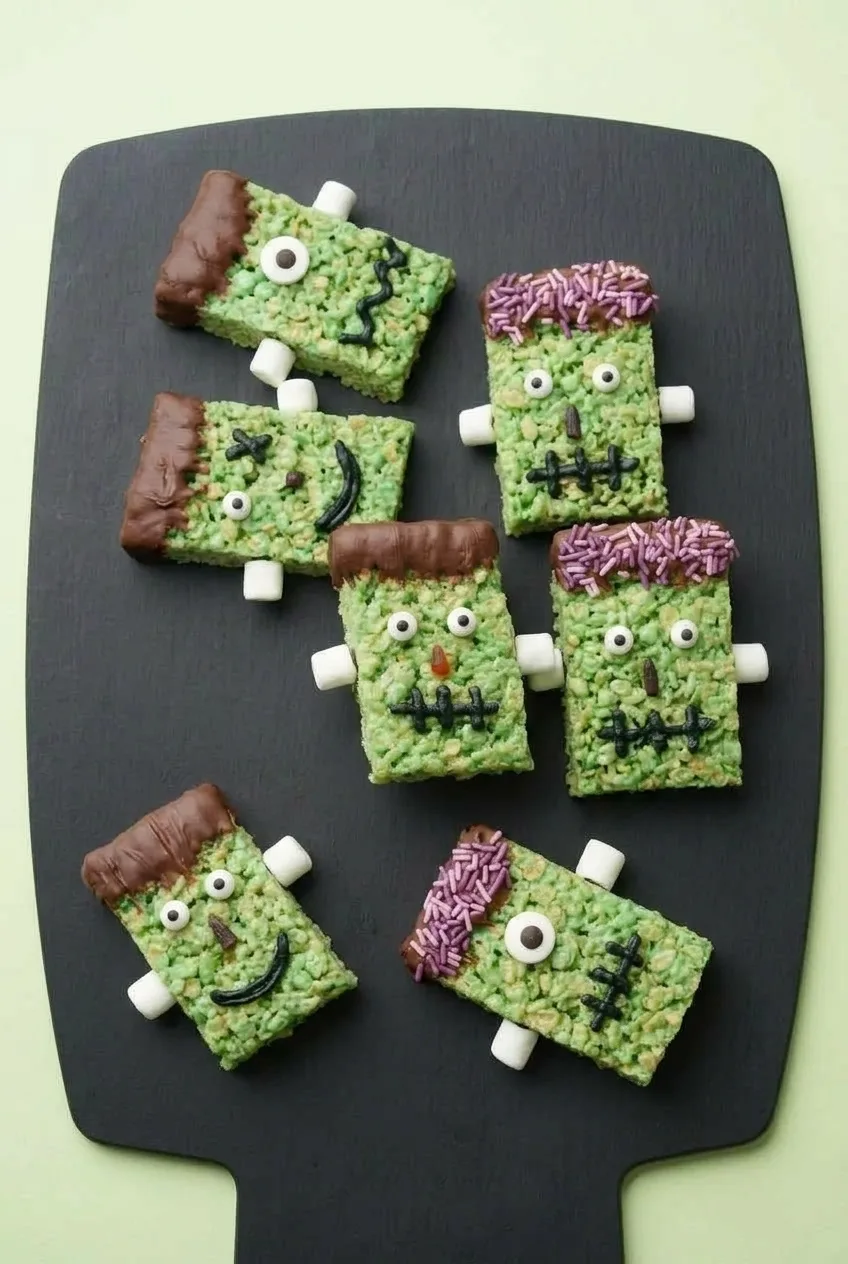
Six green Frankenstein Rice Krispie Treats with varied faces arranged across a dark slate serving board
  1. Prepare the pan: Line a 9-by-13-inch pan with parchment, leaving overhang on two sides, and lightly grease it. Set out the eyes, bolt marshmallows, icing, and a parchment-lined tray. Keep the bowl and utensils for melting chocolate completely dry.
  2. Melt the marshmallows: Melt the butter in a large saucepan over low to medium-low heat. Add the 10 ounces of mini marshmallows and stir for about 5 to 7 minutes, just until smooth and glossy. Remove from the heat immediately; cooking the marshmallows longer can make the treats hard. Stir in the green coloring until the mixture is evenly pale green.
  3. Add the cereal: Quickly fold in the crisp rice cereal until no dry pockets remain. Transfer to the prepared pan and press into an even layer with a greased spatula or buttered hands. Press just enough to hold the mixture together without crushing or tightly packing the cereal.
  4. Set and cut: Let the slab cool, then chill uncovered for 30 to 45 minutes. Start checking at 30 minutes: it should lift without pulling apart and cut cleanly, but still yield when gently pressed. Lift it out by the parchment and cut into six thick rectangles with a lightly greased sharp knife, wiping the blade between cuts.
  5. Make the hair: Melt the chocolate in a dry microwave-safe bowl in 15- to 20-second bursts at 50% power, stirring between bursts, or melt gently in a double boiler. Spread a thick cap across one short end of each bar, shaping an uneven lower hairline while leaving most of the green cereal exposed. Add purple jimmies to a few caps, if using. Let the hair firm up for about 10 to 15 minutes.
  6. Make the faces: Use small dots of melted chocolate or black icing to attach two candy eyes and one mini-marshmallow bolt to each side of every bar. Position the bolts so they project sideways. Pipe varied mouths, brows, stitches, and scars with the black icing; add optional candy noses with a dot of icing or chocolate. Leave the treats uncovered until the details no longer smear and the bolts stay in place when lifted.

Serving and Storage

Serve the treats near room temperature for a softer chew. Arrange the varied faces with space between them on a dark board or platter. For a mixed cereal-treat display, add these Halloween Brain Rice Krispie Treats.

Once the decorations have set, store the treats airtight at cool room temperature in a single layer or with parchment between layers. They have the softest texture within 2 days and can be made one day ahead. Avoid warm spots that could soften the chocolate, and do not serve them straight from the refrigerator if they feel hard.

Freezing is a backup option. Wrap fully set treats individually and freeze in an airtight container for up to 3 months. Thaw them while wrapped at room temperature to limit condensation on the decorations; fresh treats will have a softer texture.

Nutrition

Approximate nutrition per large treat, based on 6 treats and excluding optional decorations: 495 calories, 4g protein, 16g fat, and 87g carbohydrates. Approximate values per 100g: 400 calories, 3g protein, 13g fat, and 71g carbohydrates. Values vary with the cereal, chocolate, icing, and size of each bar.

Frankenstein Rice Krispie Treats

Pale-green marshmallow cereal treats decorated with chocolate hair, candy eyes, icing faces, and mini-marshmallow bolts.
Course: Dessert
Cuisine: American
Prep: 25 min
Cook: 10 min
Total: 65 min
Servings: 6 Calories: 495 kcal

Equipment

  • 9-by-13-inch pan
  • parchment paper
  • large saucepan
  • greased spatula
  • sharp knife
  • microwave-safe bowl or double boiler
  • piping tube

Ingredients

For the Rice Krispie Treats

  • 4 tablespoons unsalted butter (55 g), plus more for greasing
  • 10 ounces mini marshmallows (285 g)
  • 6 cups crisp rice cereal (150 g)
  • 1/2 to 1 teaspoon green gel food coloring

For Decorating

  • 1 cup semisweet chocolate chips or dark chocolate candy melts (170 g)
  • 12 medium candy eyes
  • 12 mini marshmallows
  • 1 small tube black decorating icing, about 1/4 cup (60 g)

Optional Decorations

  • Up to 2 tablespoons purple jimmies
  • Small candy pieces for noses
  • Up to 1 teaspoon neutral vegetable oil or refined coconut oil, if needed to thin melted chocolate

Instructions

  1. Line a 9-by-13-inch pan with parchment paper, leaving overhang on two sides, and lightly grease the parchment.
  2. Set out the candy eyes, mini marshmallows, black icing, and a parchment-lined tray. Keep the chocolate melting bowl and utensils completely dry.
  3. Melt the butter in a large saucepan over low to medium-low heat.
  4. Add the mini marshmallows and stir for 5 to 7 minutes, just until smooth and glossy. Remove from the heat immediately.
  5. Stir in the green food coloring until the marshmallow mixture is evenly pale green.
  6. Quickly fold in the crisp rice cereal until no dry pockets remain.
  7. Transfer the mixture to the prepared pan and gently press it into an even layer with a greased spatula or buttered hands.
  8. Let the slab cool, then chill uncovered for 30 to 45 minutes, until it lifts cleanly and cuts without pulling apart.
  9. Lift out the slab using the parchment overhang and cut it into 6 thick rectangles with a lightly greased sharp knife, wiping the blade between cuts.
  10. Melt the chocolate in a dry microwave-safe bowl in 15- to 20-second bursts at 50% power, stirring between bursts, or melt it gently in a double boiler. Stir in optional oil only if the chocolate is too thick to spread.
  11. Spread a thick cap of melted chocolate across one short end of each treat, creating an uneven hairline. Add optional purple jimmies, then let the chocolate set for 10 to 15 minutes.
  12. Attach two candy eyes and one mini-marshmallow bolt to each side of every treat using small dots of melted chocolate or black icing.
  13. Pipe mouths, brows, stitches, and scars with black icing. Add optional candy noses with icing or chocolate.
  14. Leave the treats uncovered until the decorations no longer smear and the bolts stay in place when lifted.

Tips

  • Melt the marshmallows gently and remove them from the heat as soon as they are smooth to keep the treats chewy.
  • Press the cereal mixture lightly; packing it tightly can make the bars hard.
  • Start checking the chilled slab after 30 minutes so it does not become too firm to cut cleanly.
  • Use a greased knife and wipe the blade between cuts for neat rectangles.
  • Keep all bowls and utensils dry when melting chocolate, and never add water to thin it.
  • Serve near room temperature for the softest texture.

Variations

  • Purple Hair Caps: Sprinkle purple jimmies over a few chocolate hair caps before the chocolate sets.
  • Candy Nose Faces: Add small candy pieces as noses, attaching them with a dot of melted chocolate or black icing.

Notes

Store fully set treats airtight at cool room temperature for up to 2 days, with parchment between layers if stacked. Freeze individually wrapped treats for up to 3 months and thaw while wrapped at room temperature.

Nutrition

Calories: 495 kcal | Protein: 4 g | Fat: 16 g | Carbohydrates: 87 g

Halloween Cupcakes – Pumpkin & Monster

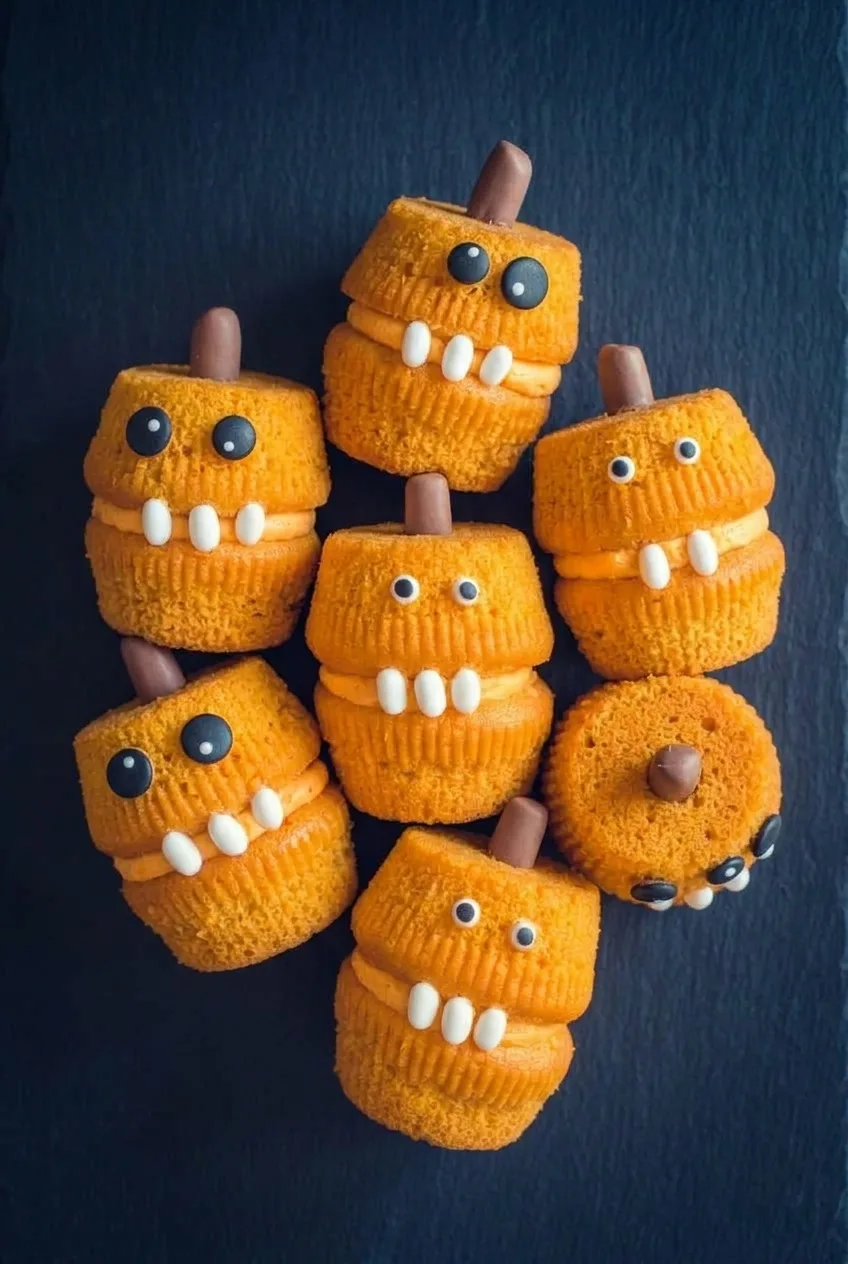
These pumpkin-spice cupcakes become Halloween monsters by stacking them in pairs: one cupcake sits upright, and the other is turned upside down over a thick orange buttercream mouth. Candy eyes, three white teeth, and a small edible stem finish each face. Canned pumpkin gives the cake its flavor, while gel coloring makes the ridged cupcake sides bright orange.

Let the cupcakes cool completely before assembly, and keep the buttercream firm enough to support the top halves. Twelve cupcakes make six large monsters, which can also be shared.

Ingredients for Pumpkin Monster Cupcakes

Overhead arrangement of orange stacked pumpkin monster cupcakes with candy eyes, teeth, and brown candy stems

For the cupcakes

  • 1 1/2 cups all-purpose flour (180g)
  • 1 1/2 teaspoons baking powder
  • 1 1/2 teaspoons pumpkin pie spice
  • 1/4 teaspoon fine salt
  • 3/4 cup granulated sugar (150g)
  • 1/2 cup neutral vegetable oil
  • 2 large eggs
  • 3/4 cup canned 100% pumpkin puree (180g), not pumpkin pie filling
  • 1 teaspoon vanilla extract, divided
  • Orange gel food coloring, about 1/2 teaspoon total or as needed, divided

For the buttercream and faces

  • 1 cup unsalted butter, softened (225g)
  • 4 cups powdered sugar (480g)
  • 2 to 4 tablespoons milk or heavy cream, as needed
  • 24 assorted small and medium candy eyeballs
  • 18 white oval candies or small white jelly beans
  • 6 small, lightweight brown edible candies, for stems

Gel coloring makes the batter and frosting vivid orange without adding much liquid. Choose short brown candies that can stand upright without weighing down the cupcakes.

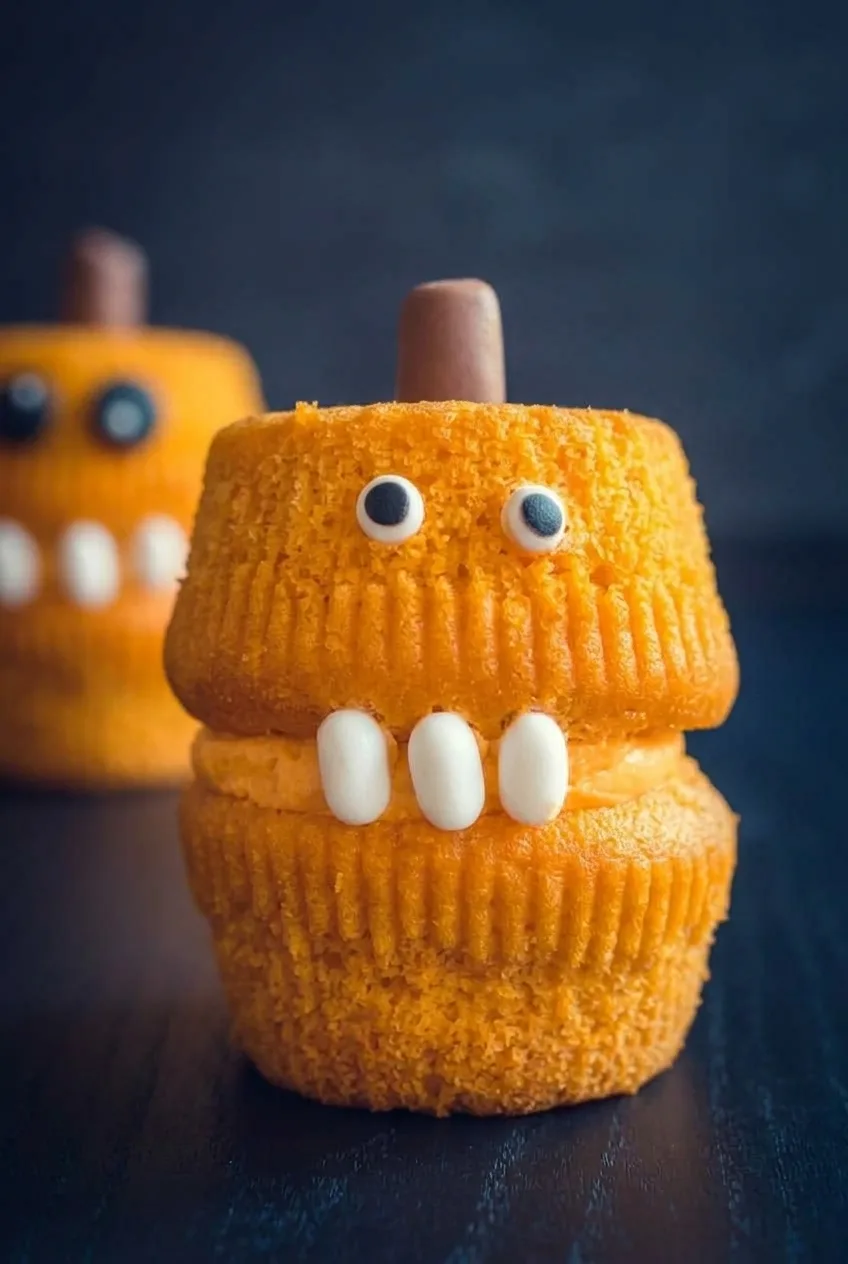
Close view of a pumpkin monster cupcake showing ridged orange cake, thick buttercream mouth, and white candy teeth

How to Bake and Assemble the Cupcakes

  1. Prepare the oven and pan: Position a rack in the center of the oven and preheat to 350°F (175°C). Line a standard 12-cup muffin pan.
  2. Mix the batter: Whisk the flour, baking powder, pumpkin pie spice, and salt in one bowl. In another, whisk the sugar, oil, eggs, pumpkin puree, 1/2 teaspoon of the vanilla, and enough orange gel coloring for a bright orange batter. Fold in the dry ingredients just until no flour streaks remain. The batter should be thick but scoopable.
  3. Bake: Divide the batter evenly among the liners, filling each about two-thirds full. Bake uncovered for 18 to 22 minutes; begin checking at 17 minutes. The tops should spring back lightly, and a toothpick inserted in the center should come out clean or with a few moist crumbs, not wet batter. Rotate the pan near the end only if your oven bakes unevenly.
  4. Cool completely: Let the cupcakes cool in the pan for 5 minutes, then transfer them to a wire rack for about 45 to 60 minutes. Once cool, peel off the liners to reveal the ridged sides. Warm cupcakes will soften the buttercream and make the stacks slide.
  5. Make the orange buttercream: Beat the butter until smooth. Gradually beat in the powdered sugar, the remaining 1/2 teaspoon vanilla, and enough orange gel coloring to make the frosting vivid and opaque. Add milk or cream a little at a time, using only enough to make it thick and pipeable. It should hold a firm peak.
  6. Build and decorate six monsters: Pipe or spread a thick, level band of buttercream on one upright cupcake. Set a second cupcake upside down on top, pressing gently so it stays in place while a substantial frosting mouth remains visible at the front. Attach four candy eyes to the upper cupcake, using small dots of buttercream behind any that will not stick. Press three white candies into the fresh frosting mouth as teeth, then insert one brown candy upright into the top as a stem. Repeat with the remaining cupcakes, varying the eye placement slightly.
  7. Set and serve: If the frosting feels soft or the upper cupcakes shift, chill the monsters for 10 to 15 minutes, just until the stacks hold steady when the tray moves. Arrange them close together on a dark platter. Let chilled cupcakes stand briefly before serving.

How to Keep the Stacked Monsters Steady

The buttercream is both the visible mouth and the adhesive between the cupcakes. If it bulges outward when the top cupcake is added, it may be too soft; chill the frosting briefly until it holds its shape. Add each monster’s candies while its frosting is fresh, and move finished monsters by their bases rather than gripping the upper cupcakes.

Make-Ahead and Storage

Bake the cupcakes up to one day ahead, cool them fully, and keep them airtight until assembly. Buttercream can also be made ahead; bring it back to a firm, spreadable consistency before using it. For the most secure candy faces, assemble and decorate on the day of serving.

Keep finished monsters in a single layer in an airtight container in a cool room for a short period, or refrigerate them if the room is warm. Do not stack them. Let refrigerated cupcakes stand briefly before serving so the cake and buttercream soften. If freezing is needed, freeze undecorated cupcakes rather than assembled monsters, then thaw and decorate.

For a larger Halloween dessert platter, add Halloween brownie bites with cookie bat wings or easy purple witch hat cookies.

Nutrition

Approximate nutrition per large stacked monster (one of six): 1,040 calories, 6g protein, 52g fat, and 144g carbohydrates. Approximate values per 100g: 430 calories, 2g protein, 21g fat, and 59g carbohydrates. Values will vary with candy size, frosting use, and finished weight.

Halloween Pumpkin Monster Cupcakes

Pumpkin-spice cupcakes stacked with orange buttercream, candy eyes, teeth, and edible stems to create six Halloween monsters.
Course: Dessert
Cuisine: American
Prep: 45 min
Cook: 22 min
Total: 127 min
Servings: 6 Calories: 1040 kcal

Equipment

  • 12-cup muffin pan
  • Cupcake liners
  • Mixing bowls
  • Whisk
  • Wire rack
  • Electric mixer
  • Piping bag or offset spatula

Ingredients

For the Cupcakes

  • 1 1/2 cups all-purpose flour (180g)
  • 1 1/2 teaspoons baking powder
  • 1 1/2 teaspoons pumpkin pie spice
  • 1/4 teaspoon fine salt
  • 3/4 cup granulated sugar (150g)
  • 1/2 cup neutral vegetable oil
  • 2 large eggs
  • 3/4 cup canned 100% pumpkin puree (180g)
  • 1 teaspoon vanilla extract, divided
  • Orange gel food coloring, about 1/2 teaspoon total or as needed, divided

For the Buttercream and Faces

  • 1 cup unsalted butter, softened (225g)
  • 4 cups powdered sugar (480g)
  • 2 to 4 tablespoons milk or heavy cream, as needed
  • 24 assorted small and medium candy eyeballs
  • 18 white oval candies or small white jelly beans
  • 6 small lightweight brown edible candies

Instructions

  1. Position a rack in the center of the oven, preheat to 350°F (175°C), and line a 12-cup muffin pan with cupcake liners.
  2. Whisk the flour, baking powder, pumpkin pie spice, and salt together in a bowl.
  3. In a separate bowl, whisk the sugar, oil, eggs, pumpkin puree, 1/2 teaspoon vanilla, and enough orange gel coloring to make a bright orange batter.
  4. Fold the dry ingredients into the pumpkin mixture just until no flour streaks remain.
  5. Divide the batter among the liners, filling each about two-thirds full.
  6. Bake for 18 to 22 minutes, until the tops spring back lightly and a toothpick inserted in the center comes out clean or with a few moist crumbs.
  7. Cool the cupcakes in the pan for 5 minutes, then transfer to a wire rack and cool completely, about 45 to 60 minutes. Remove the liners once cooled.
  8. Beat the softened butter until smooth. Gradually beat in the powdered sugar, remaining 1/2 teaspoon vanilla, and orange gel coloring until vivid and opaque.
  9. Beat in milk or cream a little at a time until the buttercream is thick, pipeable, and holds firm peaks.
  10. Pipe or spread a thick, level band of buttercream onto one upright cupcake.
  11. Place a second cupcake upside down on top, pressing gently while leaving a substantial buttercream mouth visible at the front.
  12. Attach four candy eyes to the upper cupcake, using dots of buttercream as needed.
  13. Press three white candies into the frosting mouth as teeth and insert one brown candy upright into the top as a stem.
  14. Repeat with the remaining cupcakes to make six monster cupcakes.
  15. Chill the assembled cupcakes for 10 to 15 minutes if needed to firm the frosting before serving.

Tips

  • Cool the cupcakes completely before stacking so the buttercream does not soften and slide.
  • Use gel food coloring instead of liquid coloring to keep both batter and frosting thick.
  • Keep the buttercream firm enough to hold a peak and support the upside-down cupcake.
  • Add the eyes and teeth while the frosting is fresh so they adhere securely.
  • Move finished monsters by their bases rather than gripping the upper cupcakes.
  • Chill soft or shifting cupcakes for 10 to 15 minutes before serving.

Notes

Bake cupcakes up to 1 day ahead and store airtight before assembly. Keep finished monsters in a single layer; refrigerate if the room is warm and let stand briefly before serving. Freeze undecorated cupcakes only, then thaw and decorate.

Nutrition

Calories: 1040 kcal | Protein: 6 g | Fat: 52 g | Carbohydrates: 144 g

Halloween Brain Rice Krispie Treats

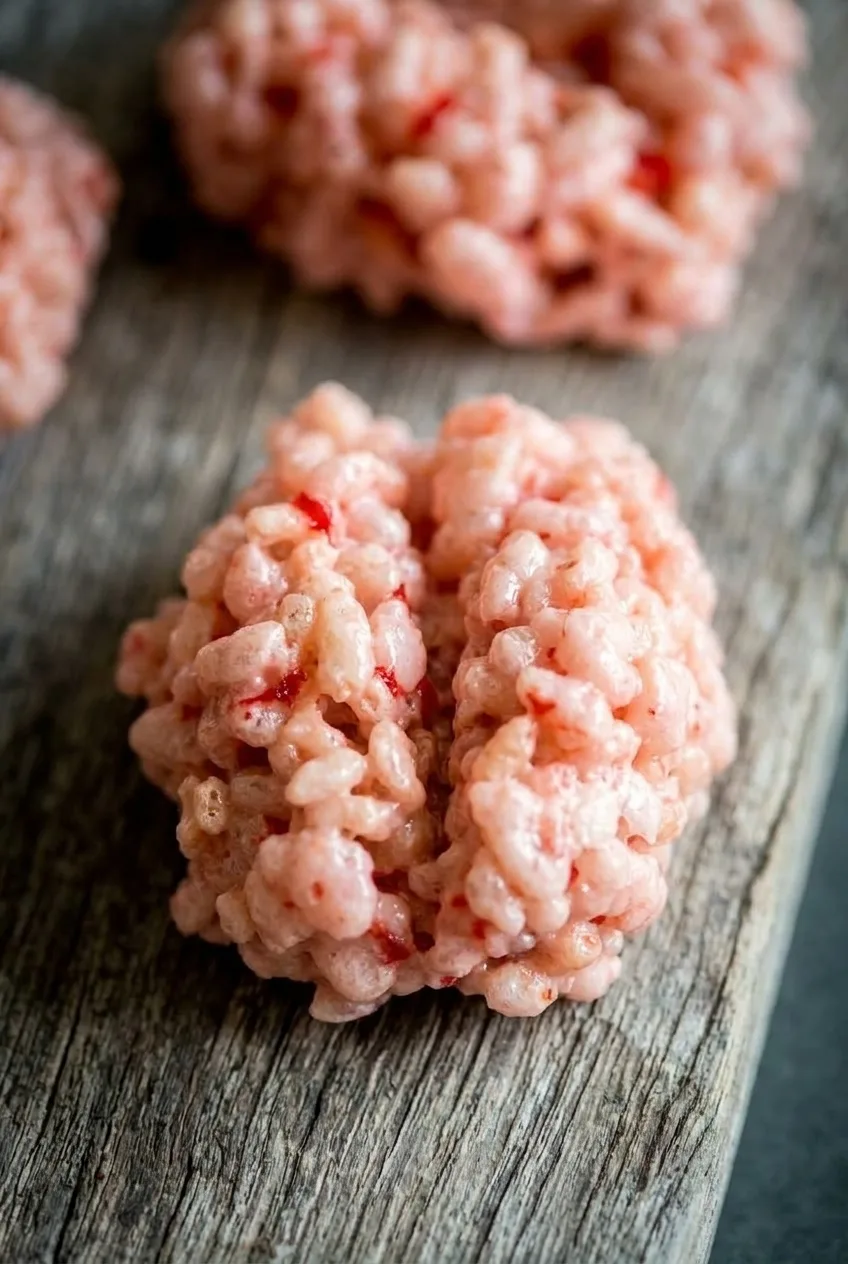
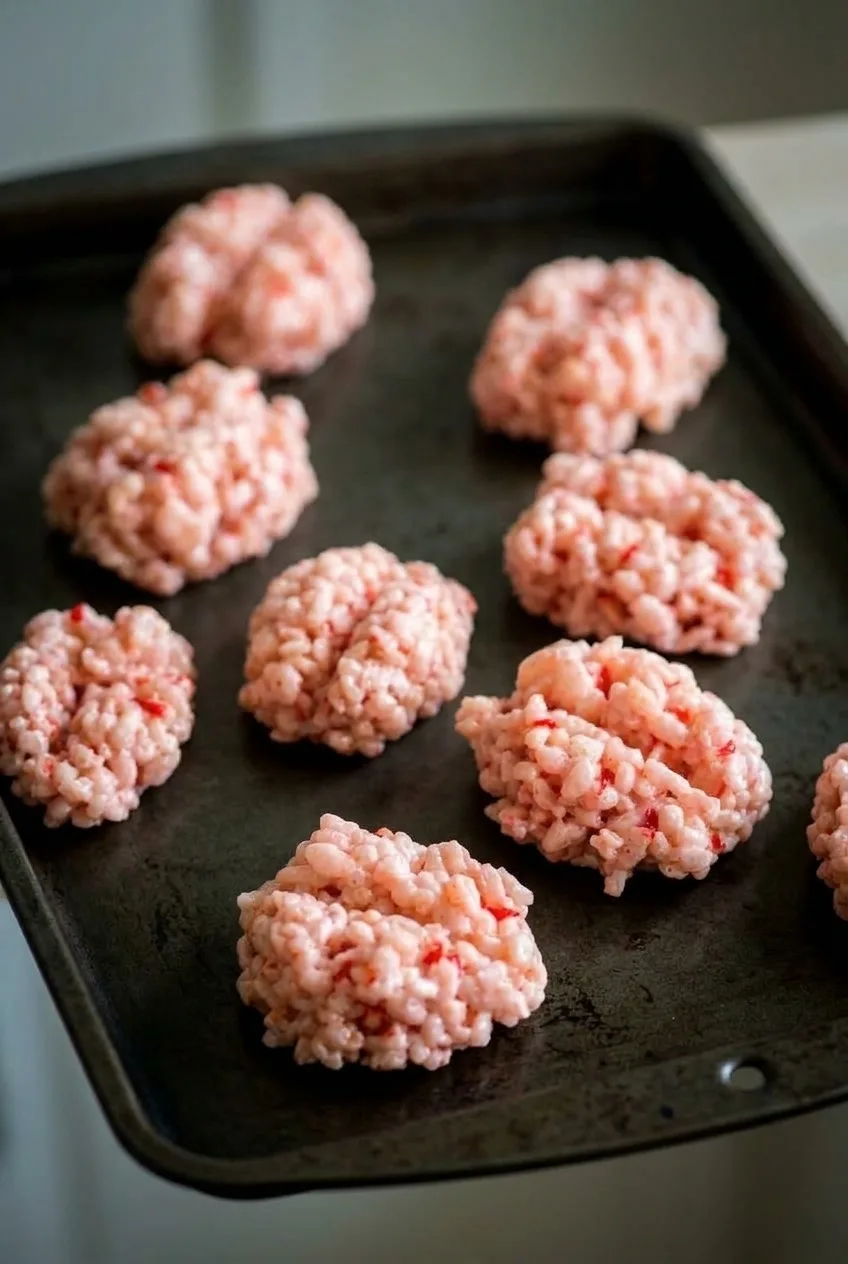
These no-bake cereal treats are shaped into small, bumpy brains rather than pressed into a pan and cut into bars. A pale pink marshmallow coating and a few red streaks leave the crispy rice visible; a deep groove down each short oval gives it the brain shape. Lightly grease your hands and tools before you start, then shape the mixture while it is still warm and pliable.

Yield: 12 small brains. Prep: 20 minutes. Cook: About 5 minutes. Total: About 1 hour, or until firm enough to serve.

Ingredients for Halloween Brain Rice Krispie Treats

Close view of a pink brain-shaped Rice Krispie treat showing glossy puffed rice, red flecks, and a deep center groove.
  • 6 cups crispy rice cereal (about 150g)
  • 10 ounces mini marshmallows (about 285g)
  • 4 tablespoons unsalted butter (about 55g)
  • About 1/4 teaspoon red gel food coloring, plus more as needed
  • Nonstick cooking spray or neutral oil, as needed for shaping
  • Red gel icing, optional, for a few thin lines or dots

How to Make Rice Krispie Treat Brains

Several pale pink Halloween Brain Rice Krispie Treats arranged on a dark metal tray from a low three-quarter angle.
  1. Prepare the tray and tools: Line a baking sheet with parchment or wax paper. Lightly grease the liner, a 1/4-cup measure or small scoop, a spatula, your hands, and the handle of a small knife. Keep the tray close to the stove.
  2. Melt the marshmallows: Melt the butter in a large saucepan over low heat. Add the marshmallows and stir frequently for about 3 to 5 minutes, until the mixture is smooth and glossy with no intact marshmallow pieces. Remove from the heat promptly; do not let it brown or bubble vigorously.
  3. Tint and marble: Stir in most of the red gel coloring a little at a time, until the marshmallow mixture is slightly deeper pink than you want the finished treats. The cereal will lighten its appearance. Add a few tiny dots of the remaining color and make just one or two broad swirls, leaving red streaks visible.
  4. Fold in the cereal: Add the crispy rice cereal and fold gently until coated, with no dry pockets. Stop before the cereal is crushed or the red streaks are completely blended away.
  5. Shape the brains: Use the greased measure or scoop to transfer the warm mixture to the tray, dividing it into 12 portions. With lightly greased hands, gather each portion into a squat, slightly irregular oval about 2 1/2 to 3 inches long. Press only enough to hold it together.
  6. Make the grooves: If the ovals are too soft to hold an indentation, let them stand for 3 to 5 minutes. Press the greased knife handle lengthwise down the center of each one, making a clear groove from end to end. Gently nudge the sides upward if needed, without flattening or splitting the treat.
  7. Cool: Leave the brains uncovered until they are no longer warm or overly tacky, hold their grooves, and lift without deforming. This may take roughly 30 to 60 minutes, depending on the room. Add optional red gel icing only after the treats have cooled.

How to Keep the Brain Shapes Defined

Reapply a little spray or oil whenever the mixture clings to your hands or the knife handle. If a groove starts to close, let that mound settle for a few more minutes before pressing it again. Keep any optional icing to a few thin lines or dots so the pink, bumpy cereal remains visible.

For microwave melting instead of stovetop melting, heat the butter and marshmallows in a large microwave-safe bowl in 20- to 30-second intervals, stirring after each interval until smooth. Continue with the coloring step; avoid overheating the marshmallows.

Serving and Storage

Arrange the individual brains loosely on a dark tray or rustic board. For another shaped cereal treat, serve them alongside Pumpkin Rice Krispie Treats with Pretzel Stems.

Once completely cool, store the treats in an airtight container at room temperature. Keep them in a single layer or separate layers with wax paper to protect the grooves. For the softest texture, serve within 2 to 3 days. They can be made a day ahead; let any gel icing set before stacking or packaging.

Nutrition

Approximate nutrition per brain, based on 12 treats without optional icing: 155 calories, 1g protein, 4g fat, and 30g carbohydrates. Per 100g: approximately 380 calories, 3g protein, 10g fat, and 73g carbohydrates. Values vary with the cereal, marshmallows, and portion size.

Halloween Brain Rice Krispie Treats

Pink marbled rice cereal treats shaped into bumpy little brains with a center groove for a Halloween dessert.
Course: Dessert
Cuisine: American
Prep: 20 min
Cook: 5 min
Total: 60 min
Servings: 12 Calories: 155 kcal

Equipment

  • Baking sheet
  • Parchment paper or wax paper
  • Large saucepan
  • Spatula
  • 1/4-cup measure or small scoop
  • Small knife

Ingredients

For the Brain Treats

  • 6 cups crispy rice cereal (about 150 g)
  • 10 ounces mini marshmallows (about 285 g)
  • 4 tablespoons unsalted butter (about 55 g)
  • About 1/4 teaspoon red gel food coloring, plus more as needed
  • Nonstick cooking spray or neutral oil, as needed for shaping

Optional Decoration

  • Red gel icing, for thin lines or dots

Instructions

  1. Line a baking sheet with parchment or wax paper and lightly grease it. Grease a 1/4-cup measure or small scoop, a spatula, your hands, and the handle of a small knife.
  2. Melt the butter in a large saucepan over low heat. Add the marshmallows and stir frequently for 3 to 5 minutes, until smooth and glossy with no intact pieces.
  3. Remove the pan from the heat. Stir in most of the red gel coloring until the mixture is slightly deeper pink than desired.
  4. Add a few tiny dots of the remaining food coloring and make one or two broad swirls to leave visible red streaks.
  5. Add the crispy rice cereal and gently fold until evenly coated with no dry pockets. Do not overmix or crush the cereal.
  6. Use the greased measure or scoop to divide the warm mixture into 12 portions on the prepared baking sheet.
  7. With greased hands, shape each portion into a squat, slightly irregular oval about 2 1/2 to 3 inches long, pressing only enough for it to hold together.
  8. Let the ovals stand for 3 to 5 minutes if they are too soft to indent. Press the greased knife handle lengthwise through the center of each oval to create a clear groove.
  9. Cool uncovered for 30 to 60 minutes, until the treats are firm, no longer tacky, and hold their grooves.
  10. Decorate with optional red gel icing after the treats have completely cooled.

Tips

  • Grease your hands, scoop, spatula, and knife handle before shaping to prevent sticking.
  • Work quickly while the cereal mixture is warm and pliable.
  • Do not let the marshmallow mixture brown or boil vigorously.
  • Fold gently so the cereal stays crisp and the red streaks remain visible.
  • If a center groove closes, let the treat firm for a few minutes before pressing it again.
  • Use only a few thin icing lines or dots so the bumpy cereal texture remains visible.

Variations

  • Microwave Method: Melt the butter and marshmallows in a large microwave-safe bowl in 20- to 30-second intervals, stirring after each interval until smooth, then continue with the coloring and shaping steps.

Notes

Store completely cooled treats in an airtight container at room temperature for 2 to 3 days. Keep in a single layer or separate layers with wax paper to protect the grooves. The treats can be made one day ahead.

Nutrition

Calories: 155 kcal | Protein: 1 g | Fat: 4 g | Carbohydrates: 30 g

Poison Candy Apples

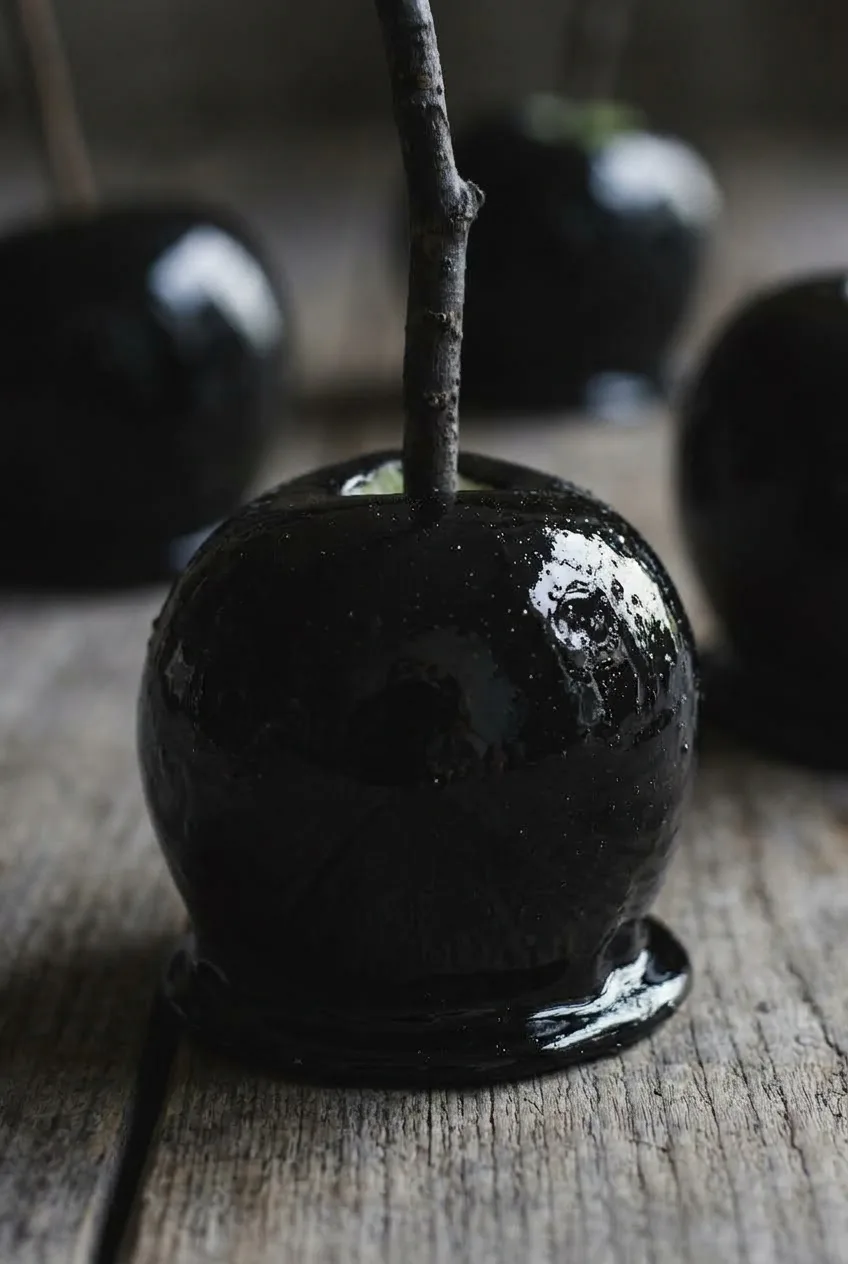
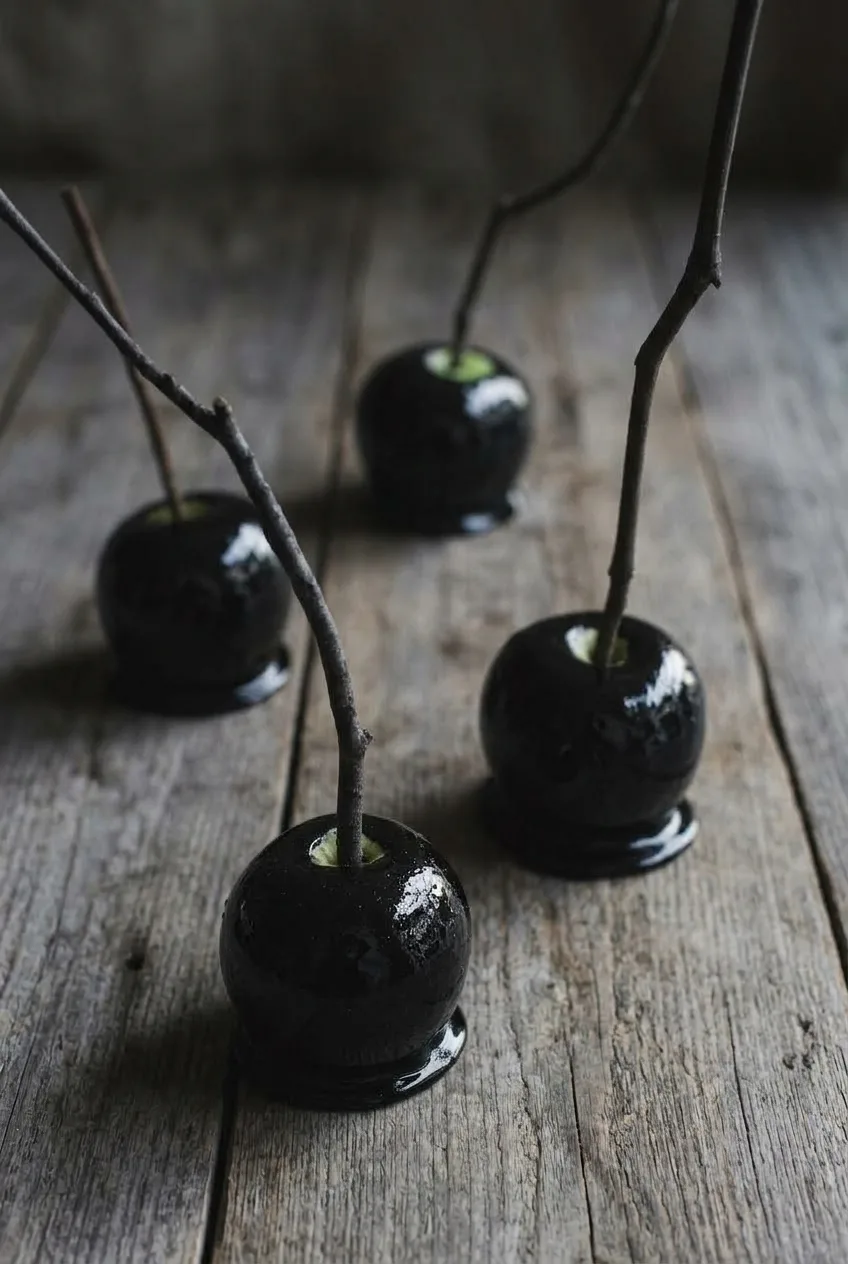
Whole tart apples get a crisp, glossy black candy shell and tall, dark handles for a spare Halloween look. A little coating settles at each base into a small hardened candy foot. This is cooked sugar syrup, not caramel or chocolate: dry apple skins help it adhere, and a candy thermometer tells you when the shell will set hard and crackly.

Prepare the apples and tray before heating the syrup. Once it reaches hard-crack stage, the dipping moves quickly.

Ingredients for Poison Candy Apples

Close view of a black poison candy apple showing its glassy hard shell, tiny bubbles, and hardened candy foot.
  • 6 small Granny Smith apples (about 900g total)
  • 3 cups granulated sugar (600g)
  • 1/2 cup light corn syrup (160g)
  • 3/4 cup water (180g)
  • 1 to 2 teaspoons black gel food coloring, or enough for an opaque black syrup
  • 6 tall, sturdy dark wooden candy-apple sticks or clean, untreated decorative twigs intended for food contact
  • Nonstick cooking spray, if using parchment instead of a silicone mat

Choose firm, unbruised apples. Wash away any wax and dry the skins completely; moisture or wax can make the coating slide or pucker. Another small, firm apple can replace Granny Smith, but its skin must be just as dry. Gel coloring gives the syrup a dense color without adding much liquid.

How to Make Poison Candy Apples

Several glossy black poison candy apples spaced across a dark rustic serving surface.
  1. Prepare the apples and tray: Wash and dry the apples thoroughly, including around the stem cavities. Remove the stems and firmly insert a stick into each apple. Line a rimmed baking sheet with a silicone mat or lightly sprayed parchment, and place it beside the stove.
  2. Dissolve the sugar: Combine the sugar, corn syrup, water, and black gel coloring in a heavy 3- to 4-quart saucepan. Heat over medium, stirring only until the sugar dissolves and the color is even, about 3 to 5 minutes. Wash any crystals from the pan sides with a wet pastry brush.
  3. Cook to hard-crack stage: Clip on a candy thermometer. Bring the syrup to a steady boil over medium-high heat, then cook uncovered without stirring. Adjust the heat if the syrup threatens to boil over. Watch closely once it reaches 280°F (140°C); the temperature can rise quickly near the end. Remove the pan from the heat at 300°F (150°C). This may take 10 to 20 minutes after boiling begins, but follow the thermometer rather than the clock.
  4. Dip the apples: Wait about 1 minute for the most vigorous bubbling to settle. Holding an apple by its stick, tilt and rotate it through the syrup until coated, leaving the stick opening uncovered. Lift it over the pan and let the heavy stream of candy slow to a thick drip. Keep hands clear of the syrup; hot sugar clings to skin.
  5. Set them upright: Place the apple on the prepared sheet so the remaining syrup forms a small rounded candy foot, not a wide puddle. Dip the remaining apples promptly, leaving space between them. If the syrup becomes too thick to coat an apple, warm it briefly over the lowest heat just until fluid enough to dip; do not bring it back to an aggressive boil.
  6. Harden and serve: Leave the apples undisturbed at room temperature for 20 to 30 minutes, until the shells are firm, glossy, and no longer tacky. Serve the day they are made for the crispest shell.

Why the Thermometer Matters

For this syrup, 300°F produces a crisp hard-candy shell. Pan and burner heat affect how long it takes to get there, so boiling time alone is unreliable. As a backup check, a drop of syrup placed in ice water should harden quickly and crack rather than bend.

Once the sugar has dissolved, stirring the boiling syrup or leaving dry crystals on the pan wall can make the coating grainy. Letting the most active bubbles settle before dipping also helps the black shell look smoother.

Choosing Safe Twig-Style Handles

Use decorative twigs only if they are clean, untreated, sturdy, and intended for food contact. Avoid painted, varnished, splintering, or unknown branches. Tall dark wooden candy-apple sticks give a similar slender look and are the practical alternative.

Serving and Storing Candy Apples

Arrange the hardened apples with space between them on a rustic board or dark platter. For another witchy treat, serve easy purple witch hat cookies alongside them.

For the best gloss and crunch, make the apples the day you plan to serve them. You can wash and dry the apples, insert the sticks, and prepare the tray ahead; cook the syrup closer to serving time. If you need to hold finished apples briefly, keep them separate in a cool, dry place and cover them loosely only after they are fully cool. Short refrigerated storage is possible, but condensation can dull the coating or make it tacky. Do not reheat or freeze finished candy apples.

Nutrition

Approximate nutrition per candy apple, based on 6 apples: 540 calories, 0g protein, 0g fat, and 142g carbohydrates. Approximate values per 100g: 195 calories, 0g protein, 0g fat, and 51g carbohydrates. These estimates use the full ingredient amounts; actual values may be lower if syrup remains in the pan.

Poison Candy Apples

Tart apples coated in a crisp, glossy black hard-candy shell with tall dark handles for a Halloween treat.
Course: Dessert
Cuisine: American
Prep: 20 min
Cook: 25 min
Total: 75 min
Servings: 6 Calories: 540 kcal

Equipment

  • Rimmed baking sheet
  • Silicone baking mat or parchment paper
  • Heavy 3- to 4-quart saucepan
  • Candy thermometer
  • Pastry brush
  • Wooden candy-apple sticks

Ingredients

For the Candy Apples

  • 6 small Granny Smith apples (about 900g total)
  • 3 cups granulated sugar (600g)
  • 1/2 cup light corn syrup (160g)
  • 3/4 cup water (180g)
  • 1 to 2 teaspoons black gel food coloring, or enough for an opaque black syrup
  • 6 tall, sturdy dark wooden candy-apple sticks or clean, untreated food-safe decorative twigs
  • Nonstick cooking spray, if using parchment instead of a silicone mat

Instructions

  1. Wash the apples thoroughly to remove wax, then dry them completely, including around the stem cavities.
  2. Remove the stems and firmly insert a candy-apple stick into each apple.
  3. Line a rimmed baking sheet with a silicone mat or lightly sprayed parchment paper and place it near the stove.
  4. Combine the sugar, corn syrup, water, and black gel food coloring in a heavy 3- to 4-quart saucepan.
  5. Heat over medium heat, stirring until the sugar dissolves and the color is even, about 3 to 5 minutes.
  6. Wash any sugar crystals from the sides of the pan with a wet pastry brush.
  7. Attach a candy thermometer and bring the syrup to a steady boil over medium-high heat.
  8. Cook uncovered without stirring until the syrup reaches 300°F (150°C), about 10 to 20 minutes after it begins boiling.
  9. Remove the pan from the heat and let the vigorous bubbling settle for about 1 minute.
  10. Holding an apple by the stick, tilt and rotate it through the syrup until coated, leaving the stick opening uncovered.
  11. Lift the apple over the pan and allow the excess candy to drip off until it slows to a thick drip.
  12. Place the apple upright on the prepared baking sheet, allowing a small rounded candy foot to form at the base.
  13. Dip the remaining apples promptly, leaving space between them. If the syrup becomes too thick, warm it briefly over the lowest heat until fluid enough to dip.
  14. Let the apples stand undisturbed at room temperature for 20 to 30 minutes, until the coating is firm, glossy, and no longer tacky.

Tips

  • Dry the apple skins completely, as moisture or wax can cause the candy coating to slide or pucker.
  • Use a candy thermometer and cook the syrup to exactly 300°F (150°C) for a hard, crackly shell.
  • Do not stir the syrup after it begins boiling, since stirring can make the coating grainy.
  • Wash sugar crystals from the pan sides with a wet pastry brush to prevent crystallization.
  • Wait for the most active bubbles to settle before dipping for a smoother candy shell.
  • Keep hands clear of the hot syrup, as melted sugar can cling to skin and cause severe burns.

Variations

  • Alternative Apple Varieties: Use another small, firm apple in place of Granny Smith, making sure the skin is thoroughly washed and completely dry.
  • Twig-Style Handles: Use clean, untreated, sturdy decorative twigs intended for food contact instead of dark wooden candy-apple sticks.

Notes

Serve the apples the day they are made for the best gloss and crunch. Store finished apples separately in a cool, dry place; refrigeration can cause condensation and make the coating dull or tacky. Do not reheat or freeze candy apples.

Nutrition

Calories: 540 kcal | Protein: 0 g | Fat: 0 g | Carbohydrates: 142 g

Halloween Dirt Pudding Cups / Mini Trifles

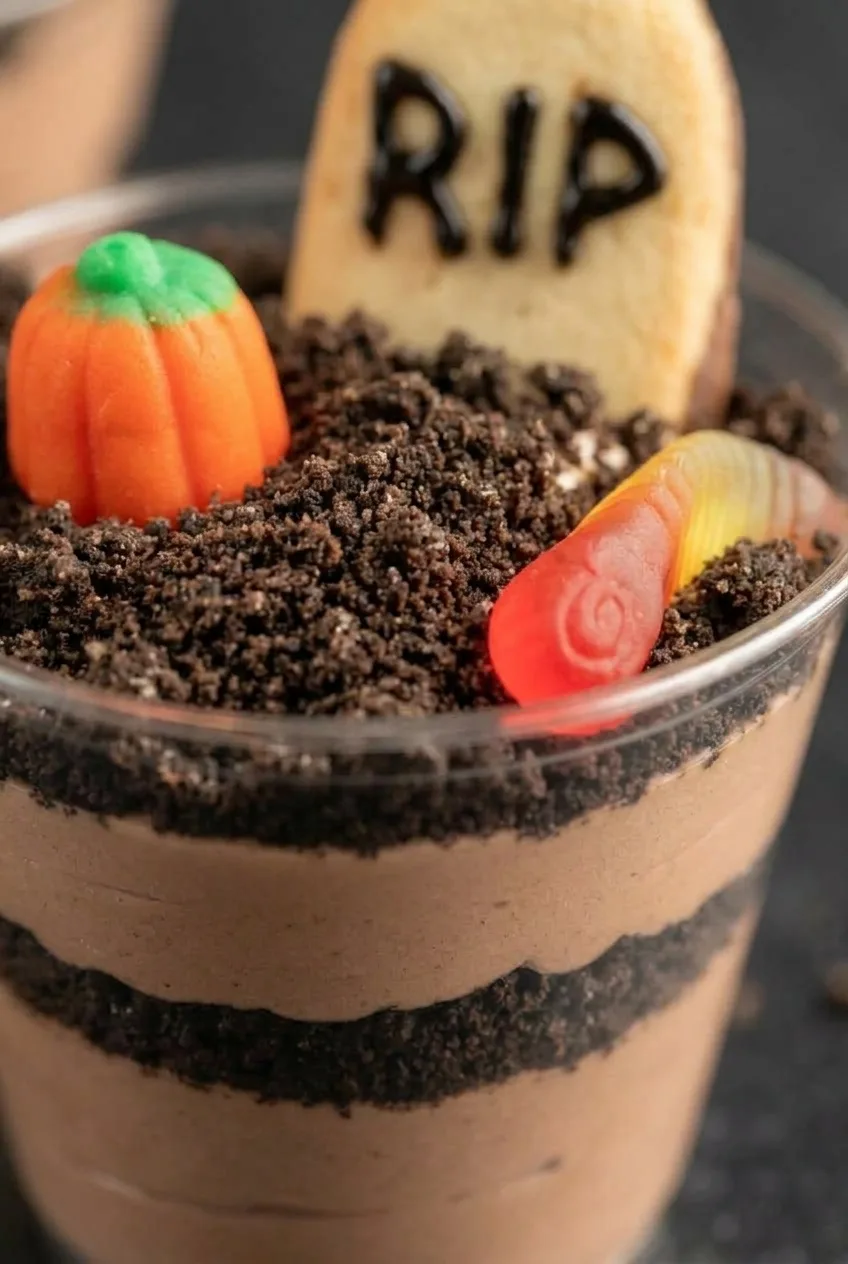
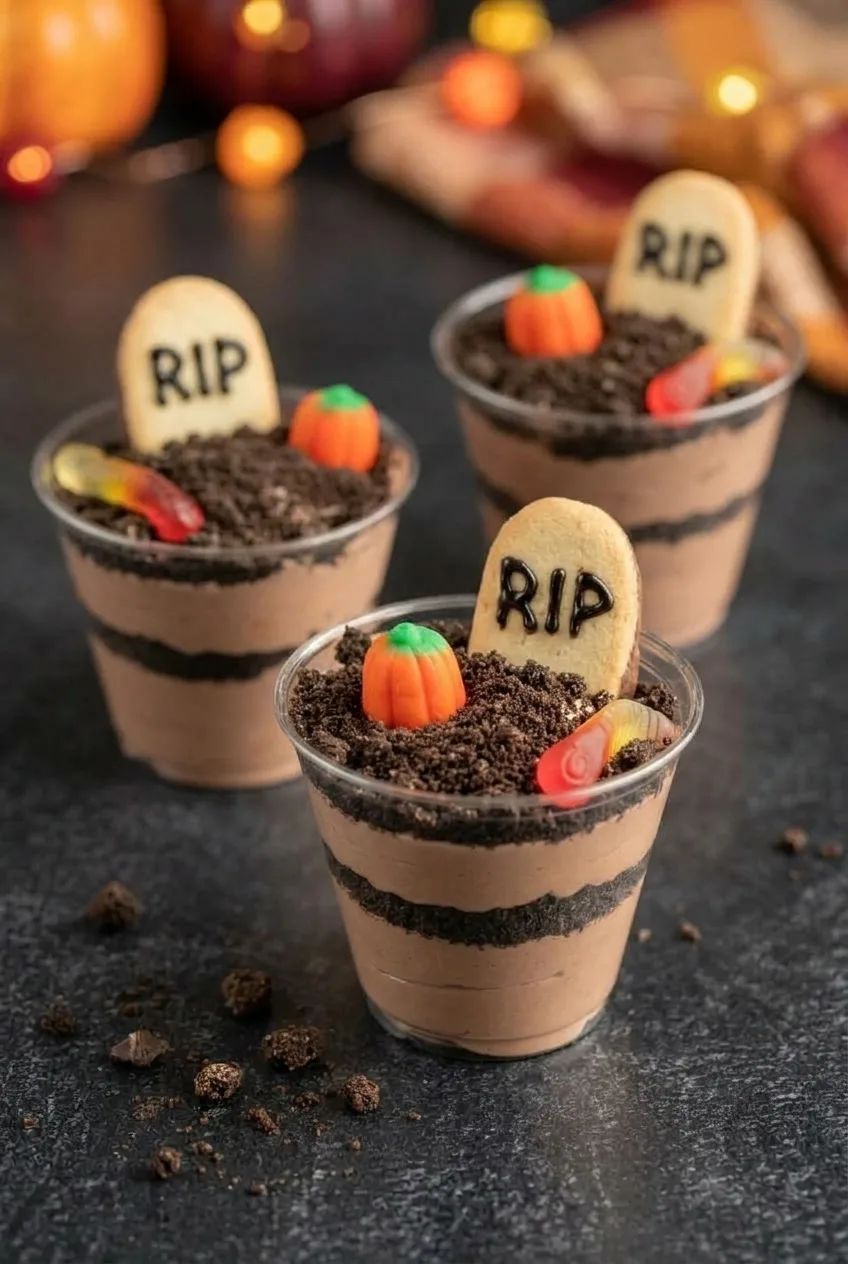
These clear-cup dirt puddings have two fluffy chocolate layers divided by a dark cookie-crumb stripe. A mound of cookie “dirt,” an upright RIP tombstone, a candy pumpkin, and a gummy worm turn each cup into an edible graveyard.

Instant pudding and whipped topping make the filling without cooking. Let the pudding thicken before folding in the topping so the layers stay distinct, then chill the cups before decorating. Save the exposed crumbs and candy for just before serving so the dirt looks loose and the tombstones stay firm.

Ingredients for 8 Dirt Pudding Cups

Close view of cookie crumb dirt and fluffy chocolate pudding layers in a Halloween graveyard pudding cup
  • 2 packages instant chocolate pudding mix (3.9 ounces each; about 220g total)
  • 3 cups cold whole milk (720g)
  • 1 tub frozen whipped topping (8 ounces), thawed (about 225g)
  • 30 chocolate sandwich cookies, finely crushed (about 3 cups crumbs; 360g), divided
  • 8 oval butter cookies or Milano-style cookies
  • About 2 tablespoons black decorating icing
  • 8 small edible orange pumpkin candies
  • 8 to 16 gummy worms

You’ll also need eight clear, straight-sided 8-ounce dessert cups. Use instant pudding mix; cook-and-serve pudding requires a different method and is not a direct substitute.

How to Make Halloween Dirt Pudding Cups

Overhead view of several Halloween dirt pudding cups with RIP cookies, pumpkin candies, and gummy worms
  1. Make the tombstones: Pipe “RIP” in black icing on the upper half of each oval cookie, leaving the lower half clear for inserting into the pudding. Set aside at room temperature until the icing is firm enough not to smear.
  2. Crush the cookies: Pulse the chocolate sandwich cookies in a food processor, or crush them in a sealed bag with a rolling pin, until mostly fine and dark. Reserve 1 cup of crumbs in an airtight container for the tops; use the rest for the middle layers.
  3. Thicken the pudding: Whisk the instant pudding mix with the cold milk for about 2 minutes. Let stand until thick, following the package setting time, usually about 5 minutes. The whisk should leave tracks in the pudding; it should not pour like a thin sauce.
  4. Fold in the whipped topping: Gently fold it into the thick pudding until no white streaks remain. If the filling is too soft to hold a layer, refrigerate it for 15 to 20 minutes before filling the cups.
  5. Build the layers: Pipe or carefully spoon pudding into each clear cup. Add a thin, even layer of the unreserved crumbs, then a second, taller pudding layer. Keep the dark stripe visible around the sides and leave about 3/4 inch of space at the top. A piping bag or zip-top bag with a corner snipped helps keep the cup walls clean.
  6. Chill: Loosely cover the undecorated cups and refrigerate for at least 1 hour, until the top pudding layer is firm enough to support a cookie.
  7. Finish the graveyards: Just before serving, spoon the reserved crumbs onto each cup in a loose, uneven mound. Insert a RIP cookie near the back, pushing its undecorated end about 1/2 inch into the chilled pudding beneath the crumbs rather than resting it on the loose dirt. Nestle a pumpkin candy and at least one visible gummy worm into each mound. Serve chilled.

Time: About 30 minutes of preparation, plus at least 1 hour of chilling. Yield: Eight individual 8-ounce cups.

Make-Ahead and Storage

Make the RIP cookies and crush the sandwich cookies up to 2 days ahead. Once the icing has set, keep the tombstones and crumbs separately airtight at room temperature. The layered pudding cups can be covered and refrigerated up to 1 day ahead; add the top crumbs, tombstones, pumpkins, and gummy worms just before serving.

Refrigerate finished leftovers, covered, for up to 3 days. The exposed crumbs will soften, and the gummy worms may become firmer. Do not reheat. Freezing is not recommended for these pudding-only cups because the filling and decorations may lose their intended texture.

Optional Brownie Mini Trifles

For a more substantial version, add up to 1 1/2 cups of small cubes of fudgy chocolate brownies beneath the middle crumb stripe. Keep the clear-cup layers and graveyard decorations, and assemble no more than a day ahead; the brownie pieces soften as they sit. Use only edible decorations, not plastic props.

Nutrition

Approximate per cup, based on 8 servings: 570 calories, 7g protein, 19g fat, and 95g carbohydrates. Approximate per 100g: 255 calories, 3g protein, 8g fat, and 42g carbohydrates. Values vary with the brands and sizes of the cookies, candy, pudding mix, and whipped topping.

Halloween Dirt Pudding Cups

Individual chocolate pudding cups layered with cookie crumbs and decorated as edible Halloween graveyards.
Course: Dessert
Cuisine: American
Prep: 30 min
Total: 90 min
Servings: 8 Calories: 570 kcal

Equipment

  • 8 clear 8-ounce dessert cups
  • Mixing bowl
  • Whisk
  • Rubber spatula
  • Food processor or rolling pin
  • Piping bag or zip-top bag
  • Spoon

Ingredients

Pudding Layers

  • 2 packages instant chocolate pudding mix (3.9 ounces each; about 220 g total)
  • 3 cups cold whole milk (720 g)
  • 1 tub frozen whipped topping (8 ounces; about 225 g), thawed
  • 30 chocolate sandwich cookies, finely crushed (about 3 cups crumbs; 360 g), divided

Graveyard Decorations

  • 8 oval butter cookies or Milano-style cookies
  • About 2 tablespoons black decorating icing
  • 8 small edible orange pumpkin candies
  • 8 to 16 gummy worms

Instructions

  1. Pipe “RIP” in black icing on the upper half of each oval cookie, leaving the lower half plain for inserting into the pudding. Let the icing set until firm.
  2. Finely crush the chocolate sandwich cookies. Reserve 1 cup of crumbs in an airtight container for topping the cups.
  3. Whisk the instant pudding mix and cold milk for about 2 minutes. Let stand for about 5 minutes, or until thickened.
  4. Gently fold the thawed whipped topping into the thick pudding until no white streaks remain. Refrigerate for 15 to 20 minutes if the filling is too soft to layer.
  5. Divide about half of the pudding among eight clear dessert cups, using a piping bag or spoon to keep the sides clean.
  6. Add a thin, even layer of the unreserved cookie crumbs to each cup.
  7. Top with the remaining pudding, leaving about 3/4 inch of space at the top and keeping the crumb stripe visible through the sides.
  8. Loosely cover the undecorated cups and refrigerate for at least 1 hour, until firm.
  9. Just before serving, mound the reserved cookie crumbs on top of each cup.
  10. Insert a RIP cookie near the back of each cup, pushing the plain end about 1/2 inch into the chilled pudding. Add a pumpkin candy and at least one gummy worm to each cup.
  11. Serve chilled.

Tips

  • Use instant pudding mix only; cook-and-serve pudding is not a direct substitute.
  • Let the pudding fully thicken before folding in the whipped topping for distinct layers.
  • Use a piping bag or snipped zip-top bag to keep the cup walls clean.
  • Add the top crumbs and candy decorations just before serving so they stay crisp and firm.
  • Push the tombstone cookie into the chilled pudding rather than resting it only on the loose crumbs.

Variations

  • Brownie Mini Trifles: Add up to 1 1/2 cups small cubes of fudgy chocolate brownies beneath the middle cookie-crumb stripe for a more substantial dessert.

Notes

Make tombstones and cookie crumbs up to 2 days ahead and store separately airtight at room temperature. Refrigerate undecorated layered cups for up to 1 day, then decorate before serving. Refrigerate leftovers for up to 3 days; freezing and reheating are not recommended.

Nutrition

Calories: 570 kcal | Protein: 7 g | Fat: 19 g | Carbohydrates: 95 g

Halloween Brownie Bites

Round, fudgy brownie bites become bats with a mound of chocolate frosting, dark cookie wings, and two white candy eyes. The frosting forms each bat’s body and holds its wings in place, so it needs to be thick enough to keep its shape. Purchased brownie bites make this a no-bake assembly recipe; a short chill firms the decorations before the bats are moved or served.

Ingredients for 12 Brownie Bats

Close view of a Halloween brownie bat showing glossy chocolate frosting, candy eyes, and embossed cookie wings.
  • 12 purchased round chocolate brownie bites (about 12 oz or 340g total)
  • 1 cup thick chocolate frosting (about 8 oz or 225g)
  • 6 thin chocolate sandwich cookies (about 70g)
  • 24 large edible candy eyes

Each cookie makes four wings: separate it into two wafers, then cut each wafer in half. Thin cookies are easier to fit onto small brownie bites without overwhelming them.

How to Make Halloween Brownie Bites

Overhead platter of Halloween brownie bites decorated as bats with chocolate cookie wings and candy eyes.
  1. Prepare the wings: Line a tray or platter with parchment. Carefully separate each sandwich cookie into two wafers, then cut each wafer into two semicircles to make 24 wings. Set out the candy eyes so they are ready to attach while the frosting is tacky.
  2. Arrange the brownies: Place the brownie bites upright on the tray, leaving room for wings on both sides. If the bites are very soft, refrigerate them for 10 minutes before decorating.
  3. Add the frosting: Pipe or spoon about 1 tablespoon of frosting onto each bite, making a generous, low mound with enough frosting at the sides to anchor the wings. It should hold its shape rather than spread. A piping bag or zip-top bag with a corner snipped gives you control, but a spoon works too.
  4. Make the bats: Gently press one cookie half into each side of the frosting, angling the wings slightly upward with the embossed sides facing out. Keep the inner edges close without overlapping. Press two candy eyes onto the front of each mound, above the brownie rim.
  5. Firm the decorations: Refrigerate the bats uncovered for 10 to 15 minutes, until the wings stay upright and the eyes remain in place when you gently move the tray. Lift each bat by its brownie base, not its wings.

How to Keep the Cookie Wings in Place

Use thick frosting rather than a thin glaze, and embed the inner edge of each wing firmly but gently so the cookie does not crack. If the frosting slumps or the eyes begin to slide, chill the assembled bats briefly before moving them again.

Using Baked Brownie Bites Instead

For a baked base, prepare brownie batter according to your mix package and bake it in a lightly greased mini-muffin pan, following the package’s baking guidance. Let the bites cool in the pan for 10 to 15 minutes, loosen them gently, and cool them completely before decorating. Warm brownies will soften the frosting and cause the wings to shift.

Serving and Storing Brownie Bats

Arrange the bats on a platter with room around their wings so they are easy to pick up. For a Halloween sweets tray, serve them alongside easy purple witch hat cookies or witch finger pretzel rods.

Decorate the bats up to 1 day ahead. Once the frosting has firmed, store them in an airtight container in a cool room for up to 2 days for the best cookie-wing texture. Keep them in a single layer if possible; if you must stack them, separate the layers with parchment and leave space to protect the wings.

Refrigerate if the room is warm, then let the bites stand for 10 to 15 minutes before serving for a softer brownie texture. Do not freeze assembled bats; plain brownie bites can be frozen, then thawed completely before decorating.

Nutrition

Approximate per brownie bat: 235 calories, 2g protein, 10g fat, and 34g carbohydrates. Approximate per 100g: 430 calories, 4g protein, 18g fat, and 62g carbohydrates. Values vary by brand of brownie bites, frosting, cookies, and candy eyes.

Halloween Brownie Bites

Fudgy brownie bites decorated as bats with thick chocolate frosting, cookie wings, and candy eyes.
Course: Dessert
Cuisine: American
Prep: 20 min
Total: 35 min
Servings: 12 Calories: 235 kcal

Equipment

  • Tray or platter
  • Parchment paper
  • Knife
  • Piping bag or zip-top bag

Ingredients

For the Brownie Bats

  • 12 purchased round chocolate brownie bites (about 12 oz or 340 g total)
  • 1 cup thick chocolate frosting (about 8 oz or 225 g)
  • 6 thin chocolate sandwich cookies (about 70 g)
  • 24 large edible candy eyes

Instructions

  1. Line a tray or platter with parchment paper.
  2. Separate each sandwich cookie into 2 wafers, then cut each wafer in half to make 24 semicircle wings.
  3. Set out the candy eyes so they are ready to attach.
  4. Arrange the brownie bites upright on the prepared tray, leaving space on both sides for the wings. Refrigerate for 10 minutes first if the brownie bites are very soft.
  5. Pipe or spoon about 1 tablespoon of thick chocolate frosting onto each brownie bite, forming a generous low mound.
  6. Gently press 1 cookie wing into each side of the frosting, angling the wings slightly upward with the embossed sides facing out.
  7. Press 2 candy eyes onto the front of each frosting mound above the brownie rim.
  8. Refrigerate the brownie bats uncovered for 10 to 15 minutes, until the wings and eyes are firmly in place.
  9. Lift and serve each bat by its brownie base rather than its wings.

Tips

  • Use thick frosting instead of a thin glaze so the wings stay upright.
  • Embed the inner edge of each cookie wing firmly but gently to prevent cracking.
  • Keep the candy eyes nearby and attach them while the frosting is still tacky.
  • Chill the assembled bats briefly if the frosting slumps or the eyes begin to slide.
  • Use thin sandwich cookies so the wings do not overwhelm the brownie bites.

Variations

  • Baked Brownie Bite Base: Prepare brownie batter according to a package and bake it in a lightly greased mini-muffin pan. Cool completely before decorating.

Notes

Decorate up to 1 day ahead. Store in an airtight container in a cool room for up to 2 days, preferably in a single layer. Refrigerate in warm weather and let stand for 10 to 15 minutes before serving. Do not freeze assembled bats.

Nutrition

Calories: 235 kcal | Protein: 2 g | Fat: 10 g | Carbohydrates: 34 g