Author

Julia

Browsing

Healthy Sesame Chicken

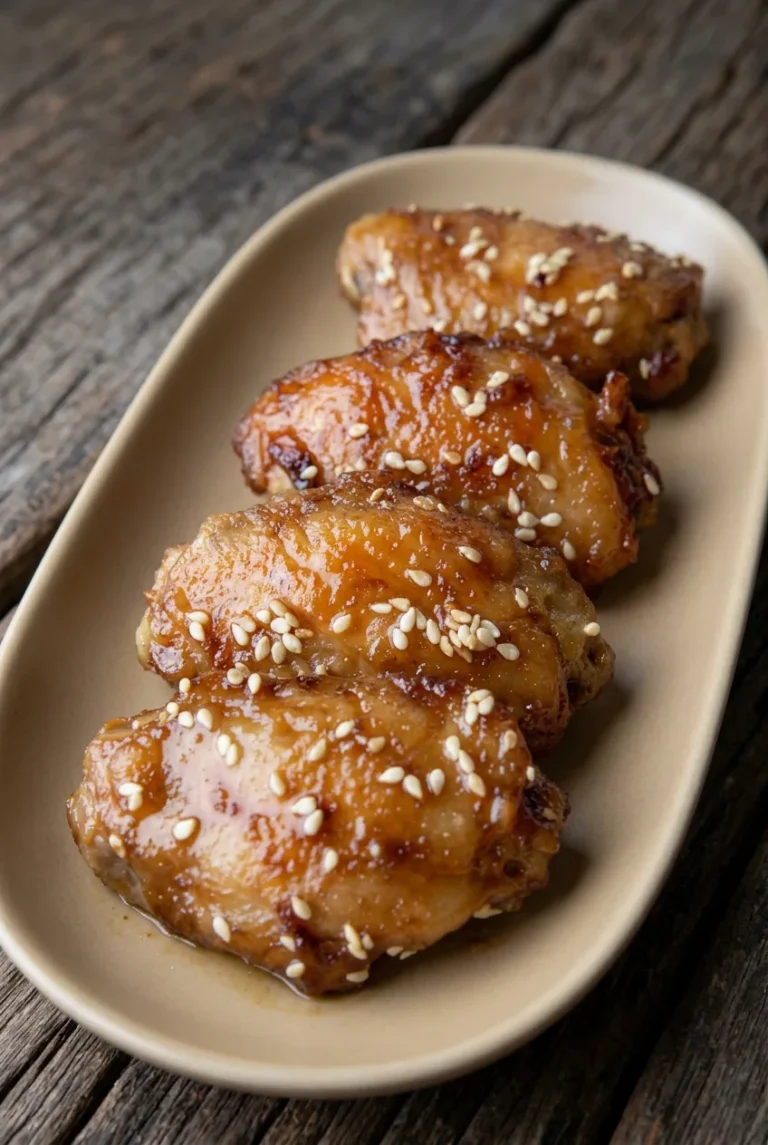
Whole chicken thighs give this skillet sesame chicken its substantial, platter-ready shape. They brown without batter, then get a glossy honey-soy glaze and a scattering of sesame seeds.

Cook the chicken before adding the sauce: honey can scorch over the higher heat needed for browning. Keep the skillet uncovered and leave room between the thighs so they brown instead of steam.

Ingredients for Healthy Sesame Chicken
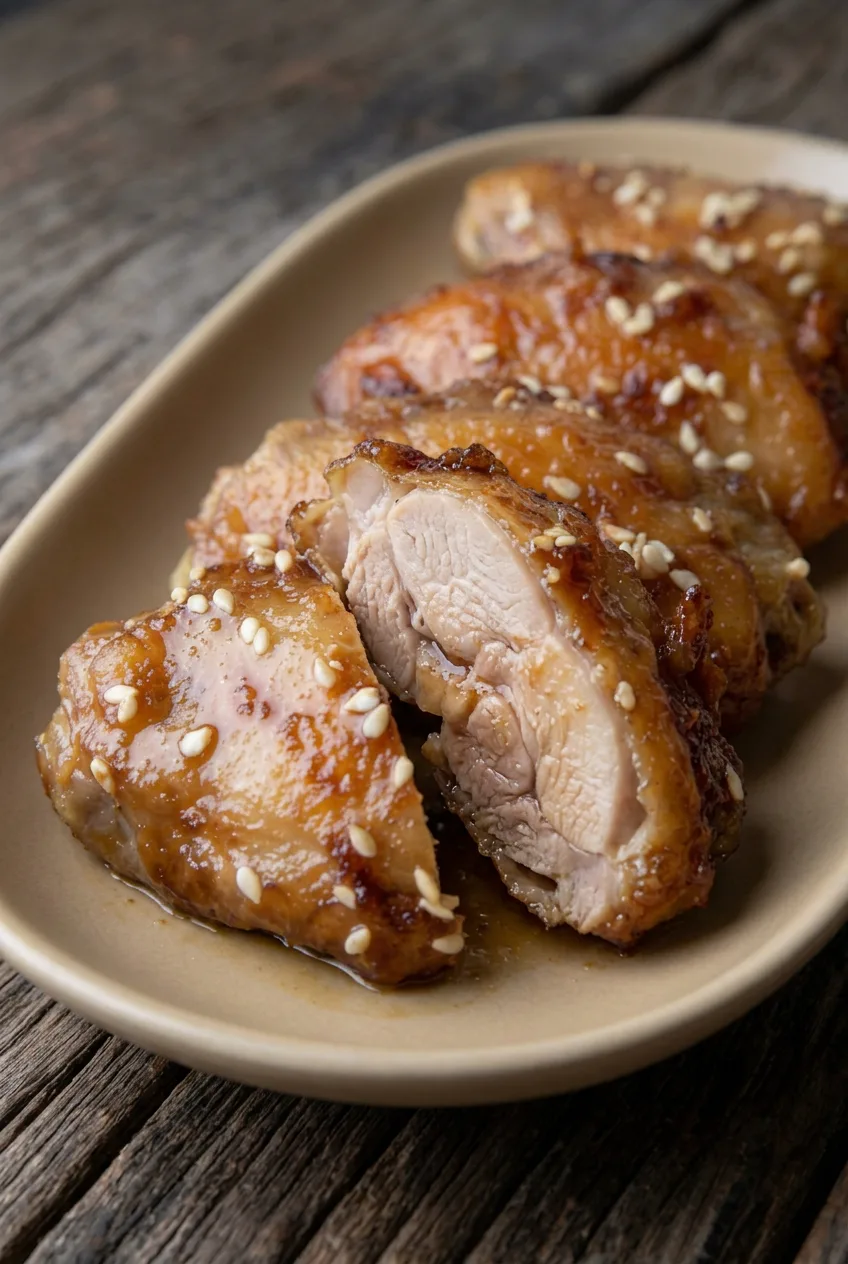
Close view of a cut sesame chicken thigh showing moist meat beneath its glossy glaze
  • 1½ pounds boneless, skinless chicken thighs, left whole (about 4 to 6 thighs; 680g)
  • 1 tablespoon neutral cooking oil
  • ¼ cup reduced-sodium soy sauce
  • 2 tablespoons honey
  • 1 tablespoon rice vinegar
  • 2 cloves garlic, minced
  • 1 teaspoon grated fresh ginger
  • 1 teaspoon toasted sesame oil
  • 2 tablespoons water, for the sauce
  • 1 teaspoon cornstarch
  • 1 tablespoon cold water, for the slurry
  • 2 teaspoons sesame seeds

For mild heat, add an optional pinch of red pepper flakes to the sauce. Tamari can replace the soy sauce; choose certified gluten-free tamari if needed.

How to Make Sesame Chicken in a Skillet
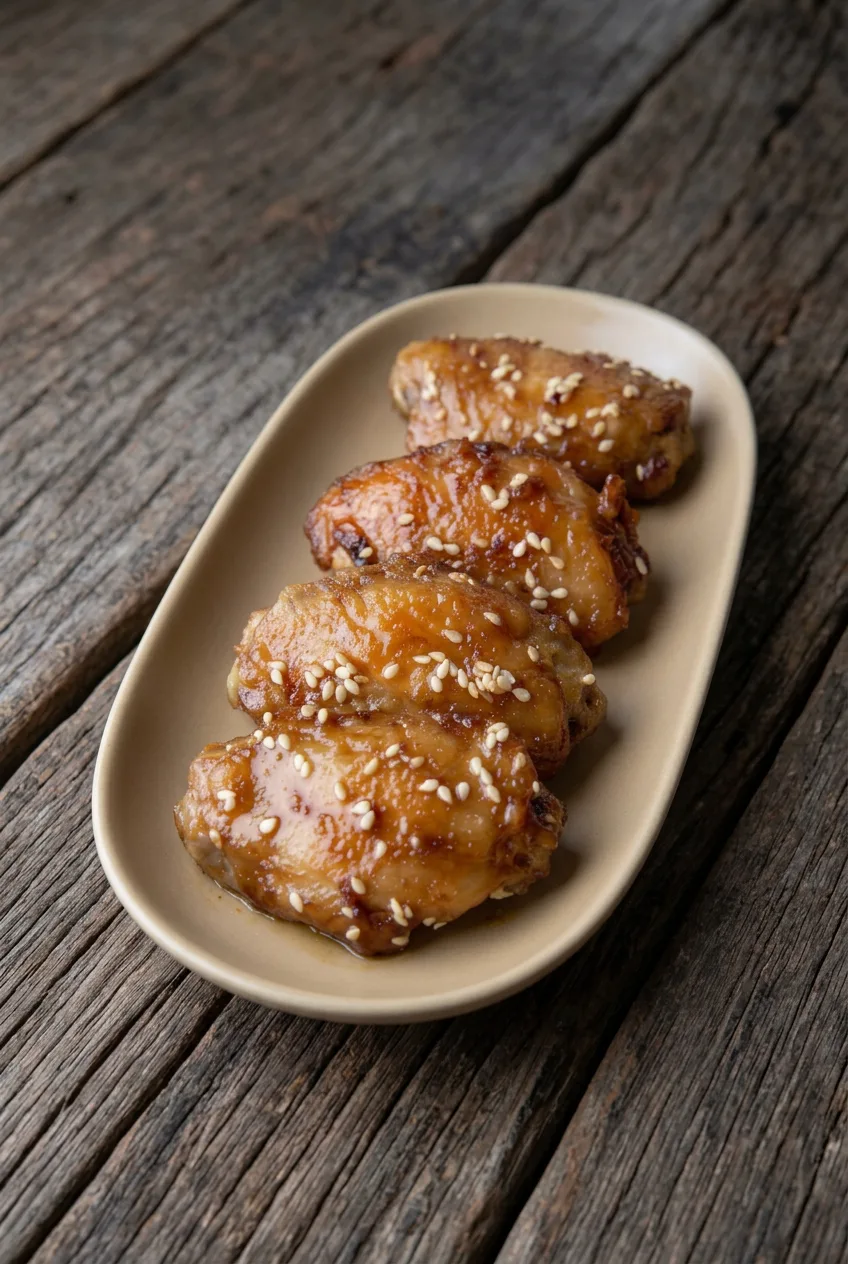
Full platter of glazed sesame chicken thighs on a dark wood table
  1. Mix the sauce: Whisk the soy sauce, honey, rice vinegar, garlic, ginger, sesame oil, and 2 tablespoons water in a bowl until the honey is dispersed. In a separate small bowl, stir the cornstarch with 1 tablespoon cold water until smooth.
  2. Brown the chicken: Pat the whole thighs dry. Heat the cooking oil in a 12-inch skillet over medium-high heat. Add the thighs with space between them, working in batches if needed. Cook uncovered and undisturbed for about 4 to 5 minutes on the first side, then turn and brown the second side for about 4 to 5 minutes.
  3. Cook through: Reduce the heat to medium as needed. Continue cooking uncovered, turning if necessary, for about 4 to 8 minutes more. Start checking the thickest thighs after roughly 12 to 14 minutes of chicken cooking. They should have browned patches without blackened edges and reach at least 165°F (75°C) at the thickest point. Transfer the cooked chicken to a plate. Thickness and batch size can change the cooking time, so use a thermometer rather than the clock alone.
  4. Thicken the sauce: Reduce the heat to medium-low. Pour the sauce mixture into the skillet and scrape up the browned bits. Let it simmer briefly, then re-stir the cornstarch slurry and pour it in. Stir for about 2 to 3 minutes, until the sauce is glossy and coats a spoon but still flows easily.
  5. Glaze and serve: Return the thighs and any juices from the plate to the skillet. Turn the chicken in the sauce for 1 to 2 minutes, until coated. Arrange the whole thighs on a platter and scatter the sesame seeds over the top.

How to Get a Glaze That Clings

Keep the cornstarch slurry separate until the chicken is cooked; starch settles as it sits, so stir it again just before adding it. A brief simmer thickens the sauce enough to cling to the thighs without turning stiff. Keep the heat at medium-low during glazing so the honey does not scorch.

Serving and Leftovers

Serve the glazed thighs whole, with brown or white rice and steamed broccoli alongside. For a separate bowl-style dinner, try these teriyaki chicken and broccoli bowls.

Refrigerate leftovers in an airtight container for 3 to 4 days. Reheat gently in a small covered saucepan over low heat, adding a splash of water if the glaze is too thick, or microwave in short intervals until thoroughly hot. Freezing is possible, though the sauce may thin after thawing; simmer it briefly during reheating if needed.

Nutrition

Approximate nutrition per serving, based on 4 servings of chicken and glaze without sides: 310 calories, 34g protein, 14g fat, and 12g carbohydrates. Per 100g of the finished dish: approximately 180 calories, 20g protein, 8g fat, and 7g carbohydrates. Values vary with chicken size and the amount of glaze served with each portion.

Healthy Sesame Chicken

Whole chicken thighs are browned in a skillet and coated in a glossy honey-soy sesame glaze.
Course: Main Course
Cuisine: Asian-inspired
Prep: 10 min
Cook: 20 min
Total: 30 min
Servings: 4 Calories: 310 kcal

Equipment

  • 12-inch skillet
  • Mixing bowl
  • Small bowl
  • Whisk
  • Instant-read thermometer

Ingredients

For the Chicken

  • 1.5 pounds boneless, skinless chicken thighs, left whole (about 4 to 6 thighs; 680 g)
  • 1 tablespoon neutral cooking oil

For the Sauce

  • 1/4 cup reduced-sodium soy sauce
  • 2 tablespoons honey
  • 1 tablespoon rice vinegar
  • 2 cloves garlic, minced
  • 1 teaspoon grated fresh ginger
  • 1 teaspoon toasted sesame oil
  • 2 tablespoons water
  • Optional: pinch of red pepper flakes

For the Slurry and Topping

  • 1 teaspoon cornstarch
  • 1 tablespoon cold water
  • 2 teaspoons sesame seeds

Instructions

  1. Whisk the soy sauce, honey, rice vinegar, garlic, ginger, sesame oil, and 2 tablespoons water in a bowl until the honey is dispersed.
  2. In a separate small bowl, stir the cornstarch and 1 tablespoon cold water until smooth.
  3. Pat the chicken thighs dry. Heat the cooking oil in a 12-inch skillet over medium-high heat.
  4. Add the thighs with space between them, working in batches if needed. Cook uncovered and undisturbed for 4 to 5 minutes, then turn and brown the other side for 4 to 5 minutes.
  5. Reduce the heat to medium as needed and continue cooking uncovered, turning if necessary, for 4 to 8 minutes more. Check the thickest thighs after about 12 to 14 minutes of total cooking; cook until they reach at least 165°F (75°C). Transfer the chicken to a plate.
  6. Reduce the heat to medium-low. Pour the sauce into the skillet and scrape up the browned bits. Let it simmer briefly.
  7. Stir the cornstarch slurry again, add it to the skillet, and stir for 2 to 3 minutes until the sauce is glossy and coats a spoon but still flows easily.
  8. Return the chicken and any plate juices to the skillet. Turn the thighs in the sauce for 1 to 2 minutes until coated.
  9. Arrange the whole thighs on a platter and scatter the sesame seeds over the top.

Tips

  • Pat the chicken dry and leave space between the thighs so they brown instead of steam.
  • Brown the chicken before adding the sauce to keep the honey from scorching.
  • Use a thermometer to check doneness, since thigh thickness and batch size affect cooking time.
  • Stir the cornstarch slurry again just before adding it because the starch settles.
  • Keep the heat at medium-low while glazing to prevent the honey from scorching.

Variations

  • Mildly Spicy Sesame Chicken: Add a pinch of red pepper flakes to the sauce.
  • Tamari Sesame Chicken: Replace the soy sauce with tamari; use certified gluten-free tamari if needed.
Notes

Refrigerate leftovers in an airtight container for 3 to 4 days. Reheat gently until thoroughly hot, adding a splash of water if the glaze is too thick. Freezing is possible, though the sauce may thin after thawing.

Nutrition

Calories: 310 kcal | Protein: 34 g | Fat: 14 g | Carbohydrates: 12 g

Teriyaki Chicken & Broccoli Bowl

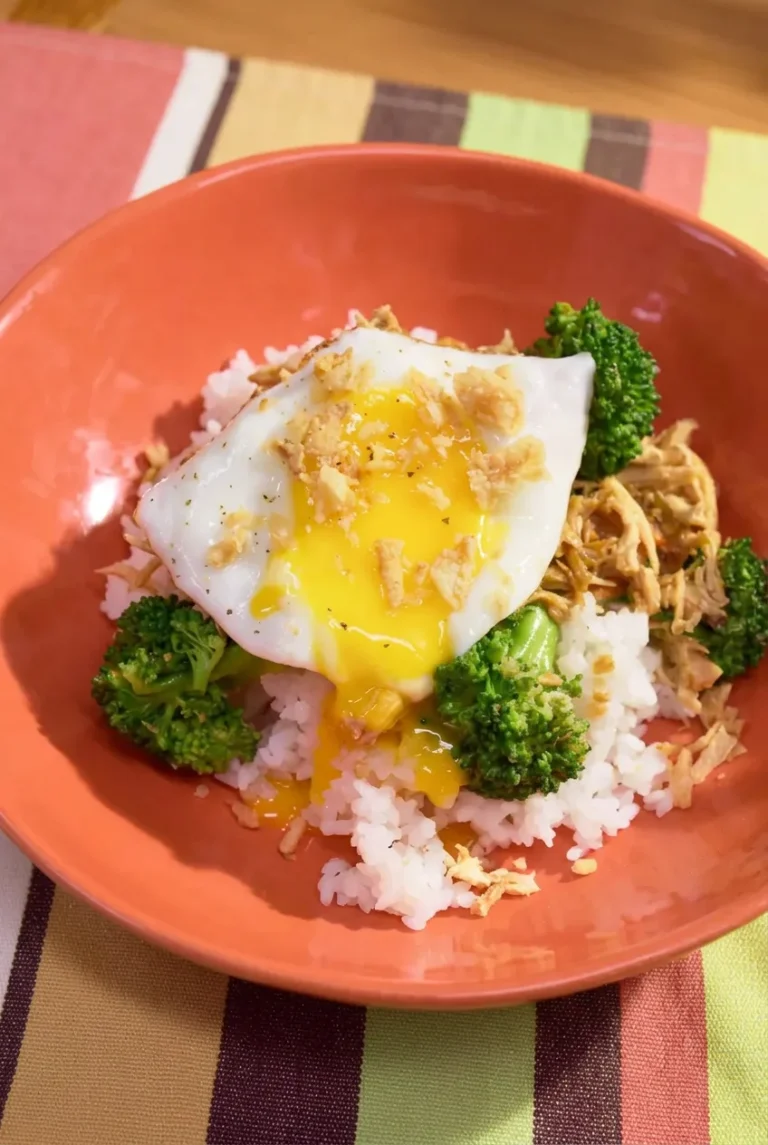
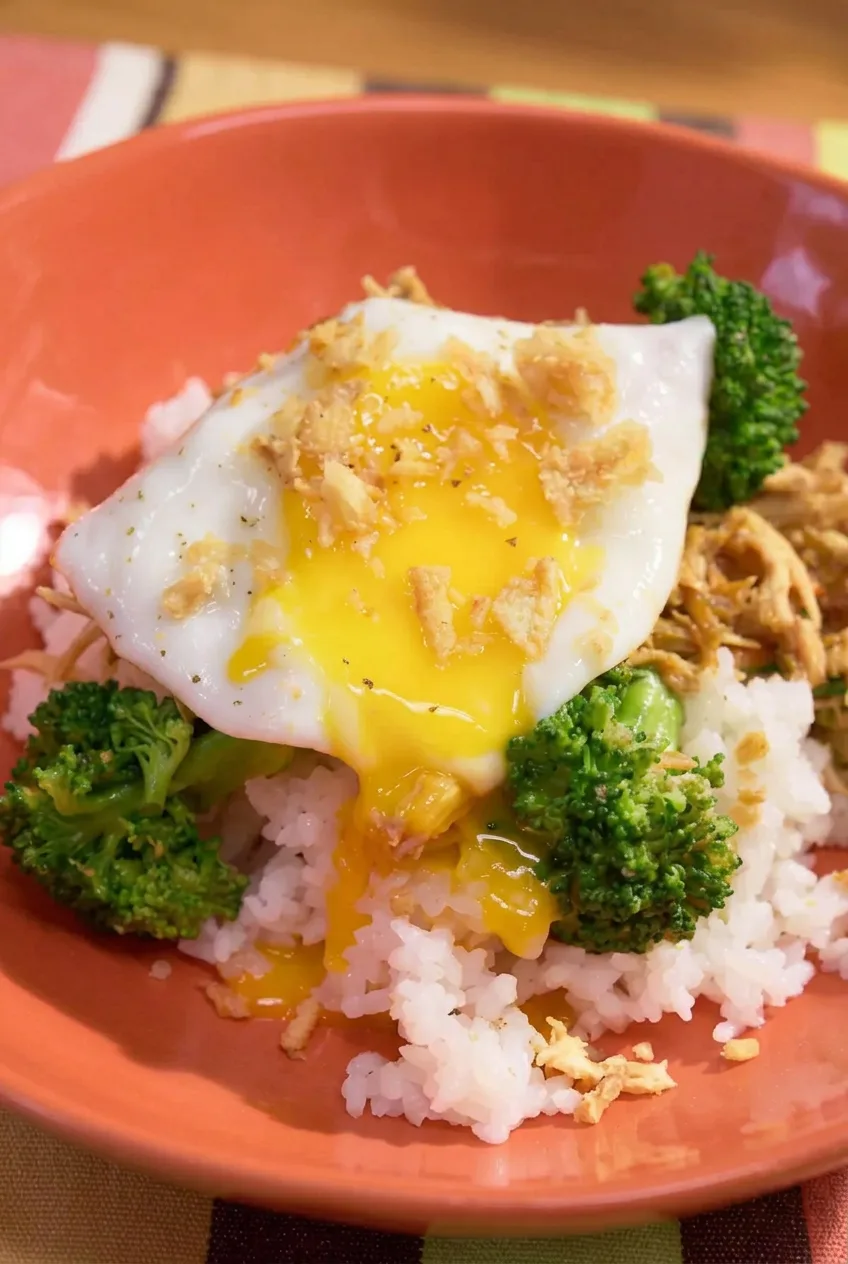
These bowls keep the rice, saucy chicken, and bright-green broccoli distinct, with a fried egg across the top. The chicken and rice share a pressure-cooker cycle, but the rice cooks in its own pan above the chicken rather than in the teriyaki sauce.

Water thins the bottled sauce to help prevent scorching. Steam the broccoli separately so it stays crisp-tender, then fry the eggs close to serving time and finish each bowl with a light scattering of crispy fried onions.

Ingredients for 4 Bowls

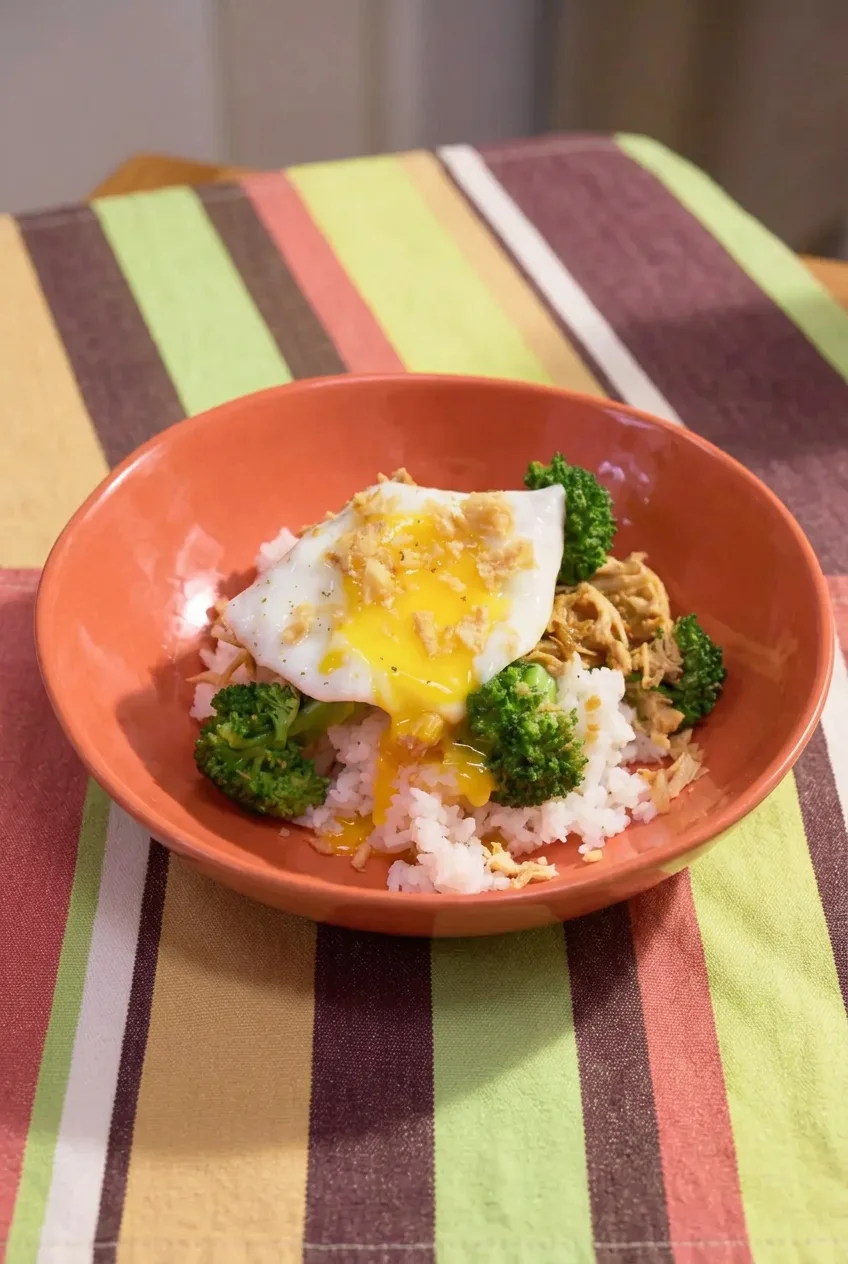
Soft egg yolk running over white rice beside teriyaki chicken and broccoli
  • 1 1/4 lb boneless, skinless chicken breasts, cut into roughly 1-inch pieces (575g)
  • 3/4 cup bottled teriyaki sauce (about 180g)
  • 1 cup water, for the pressure cooker
  • 1 cup uncooked plain white rice (about 185g)
  • 1 cup water, for the rice pan
  • About 4 cups broccoli florets, from roughly 1 lb broccoli (450g)
  • 4 large eggs
  • 2 teaspoons neutral cooking oil, plus a little for greasing the rice pan
  • About 1/4 cup crispy fried onions (15g)
  • Freshly ground black pepper, optional

Equipment: A 6-quart electric pressure cooker, trivet, pressure-safe pan that fits on the trivet, steamer or covered microwave-safe dish, nonstick skillet, and instant-read thermometer.

Time: About 15 minutes prep and 25–35 minutes cooking, including variable pressure buildup and natural release; about 40–50 minutes total.

How to Make Teriyaki Chicken & Broccoli Bowls

Complete teriyaki chicken and broccoli bowl with rice, fried egg, and crispy onions on a table
  1. Prepare the rice: Lightly grease the pressure-safe pan. Add the plain white rice and its separate 1 cup water.
  2. Set up the cooker: Pour the other 1 cup water into the inner pot, add the teriyaki sauce, and stir until no thick sauce is stuck to the bottom. Add the chicken and turn to coat. Set the trivet above the chicken and place the rice pan on it, making sure the pan does not block the lid. If condensation drips are a concern, cover the rice pan loosely with foil; do not seal it airtight.
  3. Pressure-cook: Seal the cooker and cook on high pressure for 4 minutes. Let the pressure release naturally until the valve drops, then open the cooker safely. The rice should be tender with its water absorbed. Check the thickest chicken pieces with a thermometer; they must reach 165°F (75°C). If needed, remove the rice pan and trivet, finish the chicken on the cooker’s sauté setting, and check again.
  4. Steam the broccoli: During the natural release, steam the florets with a small amount of water in a covered steamer or microwave-safe dish. Start checking after about 3 minutes. They should be bright green, with stems that yield to a fork but are not mushy; this generally takes 3–5 minutes, depending on floret size and equipment.
  5. Fry the eggs: Near the end of the release, heat the 2 teaspoons oil in an uncovered nonstick skillet over medium heat. Fry the eggs, in batches if needed, until no translucent white remains, about 3–5 minutes per batch. Leave the yolks soft for this presentation, or cook them firm for anyone who needs thoroughly cooked eggs.
  6. Assemble: Fluff the rice and divide it among four shallow bowls. Add the chicken with a modest spoonful of sauce, then arrange the broccoli so the rice, chicken, and florets remain visible. Place an egg across the center of each bowl. Scatter the crispy fried onions over the top and add black pepper, if using. Serve warm.

Why the Rice Cooks Above the Chicken

The trivet keeps the rice pan out of the chicken mixture, so the rice absorbs its own measured water while the chicken cooks in diluted teriyaki sauce below. Keep the two cups of water separate: one goes into the cooker with the sauce, and one goes into the rice pan. Check your cooker’s minimum-liquid requirement before starting; thick, sugary sauce alone may scorch against the pot bottom.

Which Rice Works for This Pressure Cycle?

The 4-minute setting is for plain white rice. Jasmine or basmati rice calls for a 6-minute high-pressure cycle and may leave the chicken more cooked. Brown rice is not a direct substitute in this shared setup.

Storing and Reheating Leftovers

Refrigerate leftover chicken, rice, and broccoli promptly in covered containers; cool and refrigerate the rice within 2 hours of cooking. Use within 3–4 days. Keep the crispy fried onions separate and fry fresh eggs for leftover bowls when practical.

Reheat the chicken and rice thoroughly to 165°F, adding a small splash of water if the rice has dried out. Chicken and rice can be frozen separately, though broccoli will soften after freezing. Make the fried eggs fresh.

Nutrition

Approximate per bowl, based on 4 bowls: 550 calories, 46g protein, 14g fat, and 60g carbohydrates. Approximate per 100g of finished food: 115 calories, 10g protein, 3g fat, and 13g carbohydrates. Values vary with the teriyaki sauce, the amount of sauce served, and the finished bowl weight.

Teriyaki Chicken & Broccoli Bowl

Pressure-cooked teriyaki chicken and rice are served with crisp-tender broccoli, a fried egg, and crispy onions.
Course: Main Course
Cuisine: Japanese
Prep: 15 min
Cook: 30 min
Total: 45 min
Servings: 4 Calories: 550 kcal

Equipment

  • 6-quart electric pressure cooker
  • Trivet
  • Pressure-safe pan
  • Steamer or covered microwave-safe dish
  • Nonstick skillet
  • Instant-read thermometer

Ingredients

For the Chicken and Rice

  • 1 1/4 lb boneless, skinless chicken breasts, cut into roughly 1-inch pieces (575 g)
  • 3/4 cup bottled teriyaki sauce (about 180 g)
  • 1 cup water for the pressure cooker
  • 1 cup uncooked plain white rice (about 185 g)
  • 1 cup water for the rice pan
  • A little neutral cooking oil for greasing the rice pan

For Serving

  • About 4 cups broccoli florets, from roughly 1 lb broccoli (450 g)
  • 4 large eggs
  • 2 teaspoons neutral cooking oil
  • About 1/4 cup crispy fried onions (15 g)
  • Freshly ground black pepper, optional

Instructions

  1. Lightly grease a pressure-safe pan. Add the rice and the separate 1 cup of water.
  2. Pour the other 1 cup of water into the pressure cooker. Add the teriyaki sauce and stir, scraping any thick sauce from the bottom.
  3. Add the chicken and turn to coat. Set the trivet above the chicken and place the rice pan on the trivet without blocking the lid. Loosely cover the rice pan with foil if desired; do not seal it airtight.
  4. Seal the cooker and cook on high pressure for 4 minutes. Let the pressure release naturally until the valve drops, then open the cooker safely.
  5. Check that the rice is tender and its water is absorbed. Check the thickest chicken pieces with an instant-read thermometer; they must reach 165°F (75°C). If needed, remove the rice pan and trivet, sauté the chicken until done, and check again.
  6. During the natural release, steam the broccoli in a covered steamer or microwave-safe dish with a small amount of water. Start checking after about 3 minutes; cook until bright green and fork-tender but not mushy, usually 3–5 minutes.
  7. Near the end of the release, heat the 2 teaspoons of oil in an uncovered nonstick skillet over medium heat. Fry the eggs, in batches if needed, until no translucent white remains, about 3–5 minutes per batch. Keep the yolks soft or cook them firm.
  8. Fluff the rice and divide it among four shallow bowls. Add the chicken with a modest spoonful of sauce, then arrange the broccoli so the components remain visible.
  9. Place an egg across the center of each bowl. Top with crispy fried onions and black pepper, if using. Serve warm.

Tips

  • Keep the pressure-cooker water and rice-pan water separate.
  • Check your cooker’s minimum-liquid requirement; diluted teriyaki sauce helps prevent scorching.
  • The 4-minute pressure cycle is for plain white rice; brown rice is not a direct substitute.
  • Start checking the broccoli after 3 minutes to keep it crisp-tender.
  • Verify the chicken reaches 165°F (75°C) at its thickest point.

Variations

  • Jasmine or Basmati Rice: Use a 6-minute high-pressure cycle for jasmine or basmati rice; the chicken may cook more during the longer cycle.

Notes

Refrigerate chicken, rice, and broccoli promptly; cool and refrigerate rice within 2 hours and use leftovers within 3–4 days. Reheat chicken and rice thoroughly to 165°F. Store crispy onions separately and fry fresh eggs for leftovers when practical.

Nutrition

Calories: 550 kcal | Protein: 46 g | Fat: 14 g | Carbohydrates: 60 g | Per 100 G Calories: 115 kcal | Per 100 G Protein: 10 g | Per 100 G Fat: 3 g | Per 100 G Carbohydrates: 13 g

Chicken Zucchini-Feta Meatballs

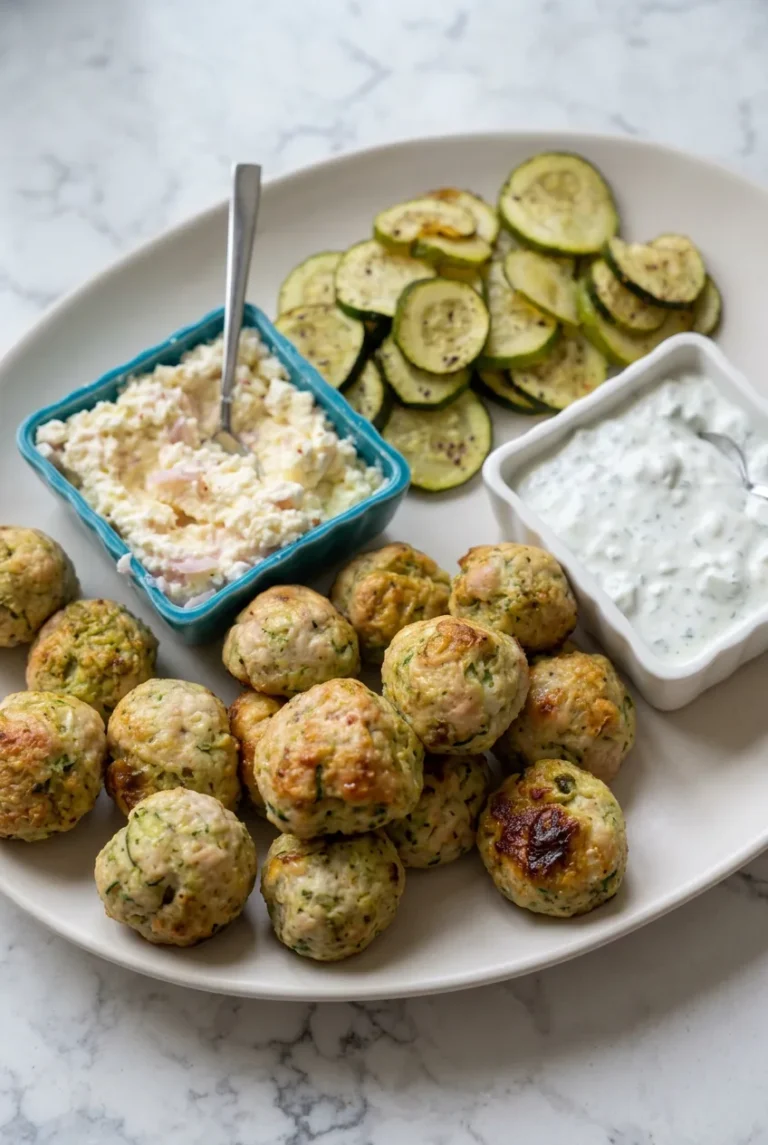
Grated zucchini and panko help keep these baked chicken meatballs tender, while a second portion of zucchini roasts in rounds beside them. The meatballs get an eight-minute head start so both components can finish together. Serve them on a platter with chunky lemon-feta and a thick dill-yogurt dip in separate bowls; the feta goes on after baking, not into the chicken mixture.

This recipe makes 4 servings, or about 14 to 16 meatballs. Allow 20 to 25 minutes to prep and about 22 to 28 minutes of baking. Meatball size and pan crowding affect the timing, so check the centers with a thermometer.

Ingredients for Chicken Zucchini-Feta Meatballs

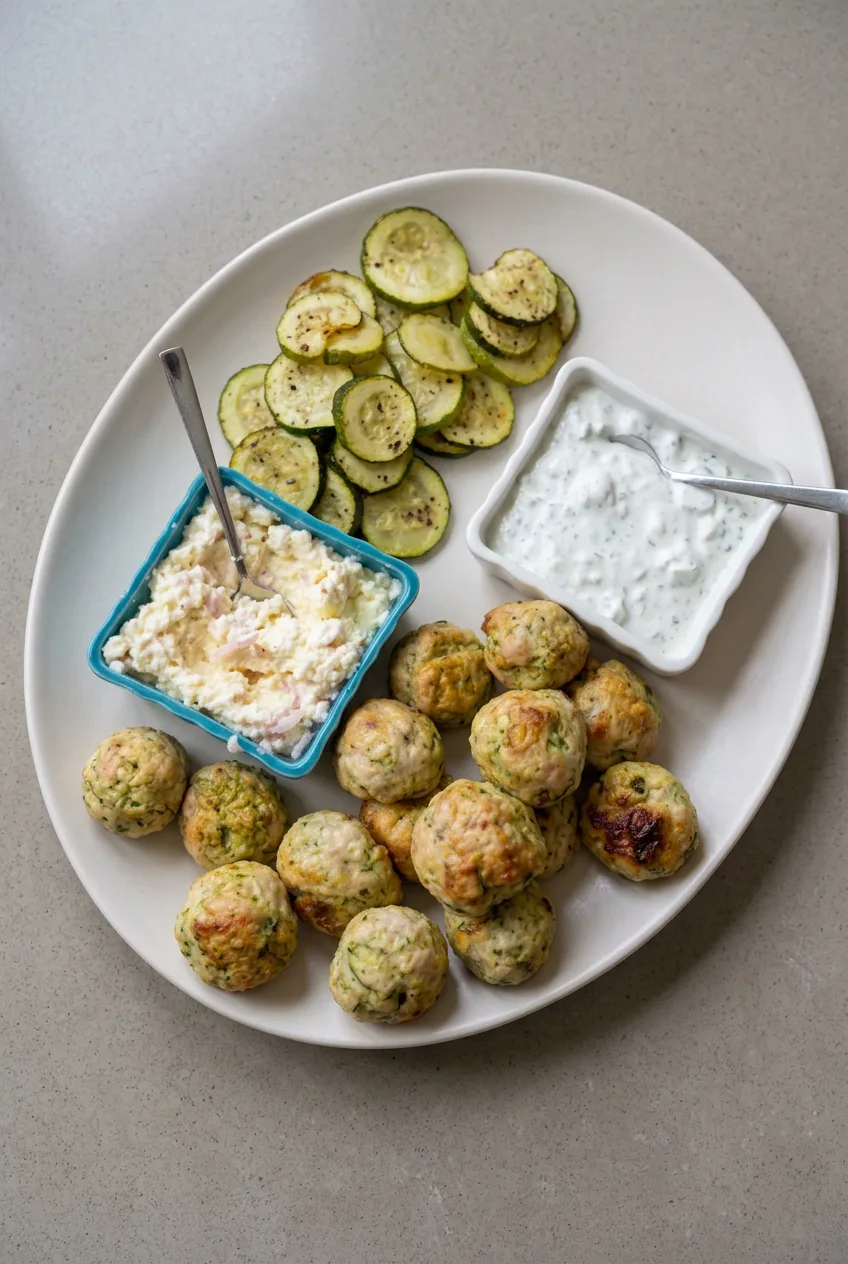
Wide view of a platter of chicken-zucchini meatballs, roasted zucchini and two separate topping bowls

Meatballs and roasted zucchini

  • 2 medium zucchini (about 400g total), divided
  • 1 lb ground chicken (about 450g)
  • 1/2 cup panko breadcrumbs (30g)
  • 2 tablespoons finely minced shallot
  • 2 tablespoons chopped fresh parsley
  • 1/2 teaspoon ground cumin
  • 1 teaspoon kosher salt, divided
  • 1/2 teaspoon freshly ground black pepper, divided
  • 2 tablespoons olive oil, divided

Lemon-feta topping

  • 4 oz feta, crumbled into coarse pieces (about 115g)
  • 1 tablespoon finely minced shallot
  • 1 tablespoon lemon juice
  • 1 tablespoon olive oil

Herbed yogurt dip

  • 1/2 cup plain thick Greek yogurt (120g)
  • 1/4 cup grated cucumber, measured after squeezing dry (about 35g)
  • 1 tablespoon finely chopped fresh dill
  • 1 small garlic clove, finely grated
  • 1 teaspoon lemon juice
  • Pinch of kosher salt
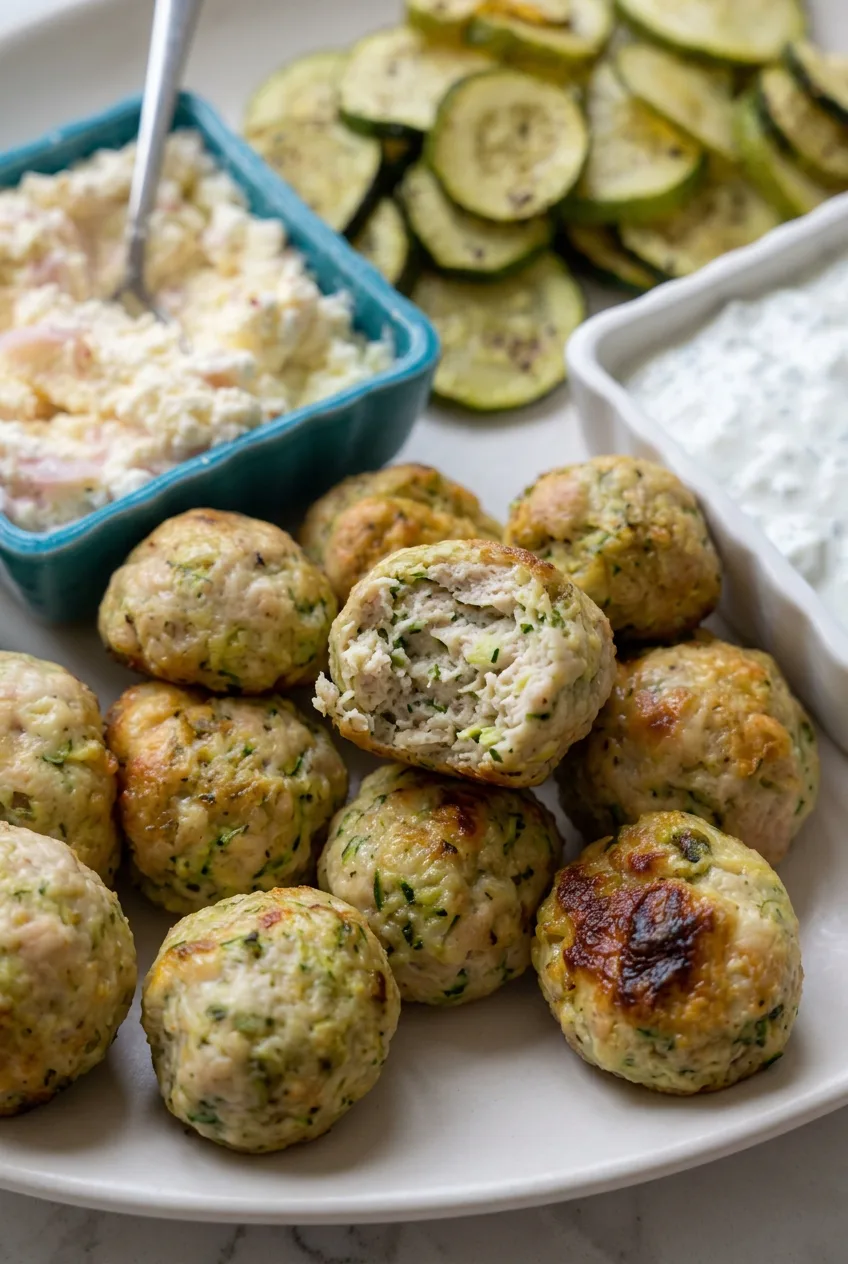
Cut-open chicken-zucchini meatball showing its tender, green-flecked interior beside roasted zucchini

How to Bake the Meatballs and Zucchini

  1. Preheat and prepare the zucchini: Set a rack in the middle of the oven and preheat to 425°F (220°C). Grate enough zucchini for 1 packed cup. Cut the rest into 1/3-inch rounds, sprinkle the rounds with 1/4 teaspoon of the salt, and set aside. If the grated zucchini is dripping, blot it lightly; do not wring it dry.
  2. Mix and shape: Gently combine the chicken, grated zucchini, panko, 2 tablespoons shallot, parsley, cumin, remaining 3/4 teaspoon salt, and 1/4 teaspoon pepper. With damp hands or a 2-tablespoon scoop, form 14 to 16 roughly equal meatballs. Space them about 1 inch apart on a parchment-lined, approximately 18-by-13-inch rimmed baking sheet. Drizzle with 1 tablespoon olive oil. If the mixture is difficult to shape, let the panko absorb moisture briefly rather than packing the meatballs tightly.
  3. Give the meatballs a head start: Bake uncovered for about 8 minutes, until the meatballs begin to set. They will not be cooked through.
  4. Add the zucchini rounds: Pat the salted rounds dry and toss with the remaining 1 tablespoon olive oil and 1/4 teaspoon pepper. Spread them beside the meatballs in a mostly single layer. Use a second sheet if they would be crowded; rotate the pans midway through the remaining bake.
  5. Make the toppings: While the pan bakes, gently toss the feta with the remaining 1 tablespoon shallot, 1 tablespoon lemon juice, and 1 tablespoon olive oil. Keep it in coarse, spoonable pieces. In a second bowl, stir together the yogurt, squeezed cucumber, dill, garlic, 1 teaspoon lemon juice, and a pinch of salt.
  6. Check for doneness: Bake the meatballs for about 14 to 20 minutes more, or roughly 22 to 28 minutes total. Start checking the thickest meatball around 20 minutes of total baking time. It is done when the center reaches 165°F (75°C) on an instant-read thermometer. The surfaces should be pale golden with a few deeper brown patches, and the zucchini should be tender with some browned areas. Rest the meatballs for about 3 minutes.
  7. Serve: Arrange the warm meatballs and roasted zucchini rounds on a shared platter. Set the lemon-feta and yogurt dip alongside in separate small bowls so diners can add them without covering the meatballs.

Why the Zucchini Gets Two Treatments

The grated zucchini retains moisture to help tenderize the lean chicken; blot it only if it is dripping. The rounds need drier surfaces to roast. Salting them briefly, patting them dry, and leaving space around them helps prevent a watery pan.

Meatball Size and Pan Spacing

Keep the meatballs similar in size so they cook at about the same rate. A second sheet is better than squeezing the zucchini between them: crowding limits browning, and a fuller pan can change the bake time. Surface color alone cannot tell you whether the chicken is cooked through.

Ingredient Swaps

Ground turkey can replace the chicken; cook the meatballs to the same 165°F center temperature. Gluten-free panko can replace regular panko.

Serving and Leftovers

Serve with bread or a simple salad, letting diners spoon on the lemon-feta or dip the meatballs into the yogurt sauce. For another chicken, zucchini, and feta dinner, try this Mediterranean chicken zucchini bake.

Refrigerate leftovers promptly in airtight containers for up to 3 days. Keep the cold toppings separate when practical. Reheat the meatballs until hot throughout, warming the zucchini alongside or separately, then add the cold toppings.

Nutrition

Approximate per serving, based on 4 servings: 405 calories, 30g protein, 25g fat, and 12g carbohydrates. Approximate per 100g of finished dish: 145 calories, 11g protein, 9g fat, and 4g carbohydrates. Values vary with the ground chicken, yogurt, and moisture lost during cooking.

Chicken Zucchini-Feta Meatballs

Baked chicken meatballs with grated zucchini are served with roasted zucchini rounds, lemon-feta, and a herbed yogurt dip.
Course: Main Course
Cuisine: Mediterranean
Prep: 25 min
Cook: 28 min
Total: 56 min
Servings: 4 Calories: 405 kcal

Equipment

  • Oven
  • Rimmed baking sheet
  • Parchment paper
  • Box grater
  • Instant-read thermometer
  • Mixing bowls

Ingredients

Meatballs and Roasted Zucchini

  • 2 medium zucchini (about 400 g total), divided
  • 1 lb ground chicken (about 450 g)
  • 1/2 cup panko breadcrumbs (30 g)
  • 2 tablespoons finely minced shallot
  • 2 tablespoons chopped fresh parsley
  • 1/2 teaspoon ground cumin
  • 1 teaspoon kosher salt, divided
  • 1/2 teaspoon freshly ground black pepper, divided
  • 2 tablespoons olive oil, divided

Lemon-Feta Topping

  • 4 oz feta, crumbled into coarse pieces (about 115 g)
  • 1 tablespoon finely minced shallot
  • 1 tablespoon lemon juice
  • 1 tablespoon olive oil

Herbed Yogurt Dip

  • 1/2 cup plain thick Greek yogurt (120 g)
  • 1/4 cup grated cucumber, squeezed dry (about 35 g)
  • 1 tablespoon finely chopped fresh dill
  • 1 small garlic clove, finely grated
  • 1 teaspoon lemon juice
  • Pinch of kosher salt

Instructions

  1. Set a rack in the middle of the oven and preheat to 425°F (220°C).
  2. Grate enough zucchini to make 1 packed cup. Cut the remaining zucchini into 1/3-inch rounds, sprinkle with 1/4 teaspoon salt, and set aside.
  3. Blot the grated zucchini lightly if it is dripping, but do not wring it dry.
  4. Gently combine the chicken, grated zucchini, panko, 2 tablespoons shallot, parsley, cumin, remaining 3/4 teaspoon salt, and 1/4 teaspoon pepper.
  5. With damp hands or a 2-tablespoon scoop, form 14 to 16 similar-sized meatballs. Arrange them about 1 inch apart on a parchment-lined rimmed baking sheet and drizzle with 1 tablespoon olive oil.
  6. Bake the meatballs uncovered for about 8 minutes, until they begin to set but are not cooked through.
  7. Pat the zucchini rounds dry and toss them with the remaining 1 tablespoon olive oil and 1/4 teaspoon pepper. Arrange them beside the meatballs in a mostly single layer. Use a second sheet if needed to avoid crowding.
  8. While the pan bakes, gently toss the feta with 1 tablespoon shallot, 1 tablespoon lemon juice, and 1 tablespoon olive oil. Keep the feta in coarse pieces.
  9. In a separate bowl, stir together the yogurt, squeezed cucumber, dill, garlic, 1 teaspoon lemon juice, and a pinch of salt.
  10. Bake the meatballs and zucchini for about 14 to 20 minutes more, or 22 to 28 minutes total. If using two pans, rotate them midway through the remaining bake.
  11. Check the thickest meatball with an instant-read thermometer; it is done when the center reaches 165°F (75°C). Rest the meatballs for about 3 minutes.
  12. Arrange the meatballs and roasted zucchini on a platter. Serve the lemon-feta and yogurt dip in separate bowls.

Tips

  • Blot grated zucchini only if it is dripping; keeping some moisture helps tenderize the chicken.
  • Salt the zucchini rounds briefly and pat them dry to help them roast rather than steam.
  • Keep meatballs similar in size and avoid packing them tightly.
  • Use a second baking sheet rather than crowding the zucchini, and rotate pans midway through baking if needed.
  • Check doneness with a thermometer rather than relying on surface color.

Variations

  • Ground Turkey Meatballs: Replace the ground chicken with ground turkey and cook to the same 165°F (75°C) center temperature.
  • Gluten-Free Meatballs: Use gluten-free panko in place of regular panko.

Notes

Refrigerate leftovers promptly in airtight containers for up to 3 days. Keep toppings separate when practical and reheat the meatballs until hot throughout. Nutrition is approximate and varies with ingredients and moisture loss.

Nutrition

Calories: 405 kcal | Protein: 30 g | Fat: 25 g | Carbohydrates: 12 g | Per 100g Calories: 145 kcal | Per 100g Protein: 11 g | Per 100g Fat: 9 g | Per 100g Carbohydrates: 4 g

Mediterranean Chicken Zucchini Bake

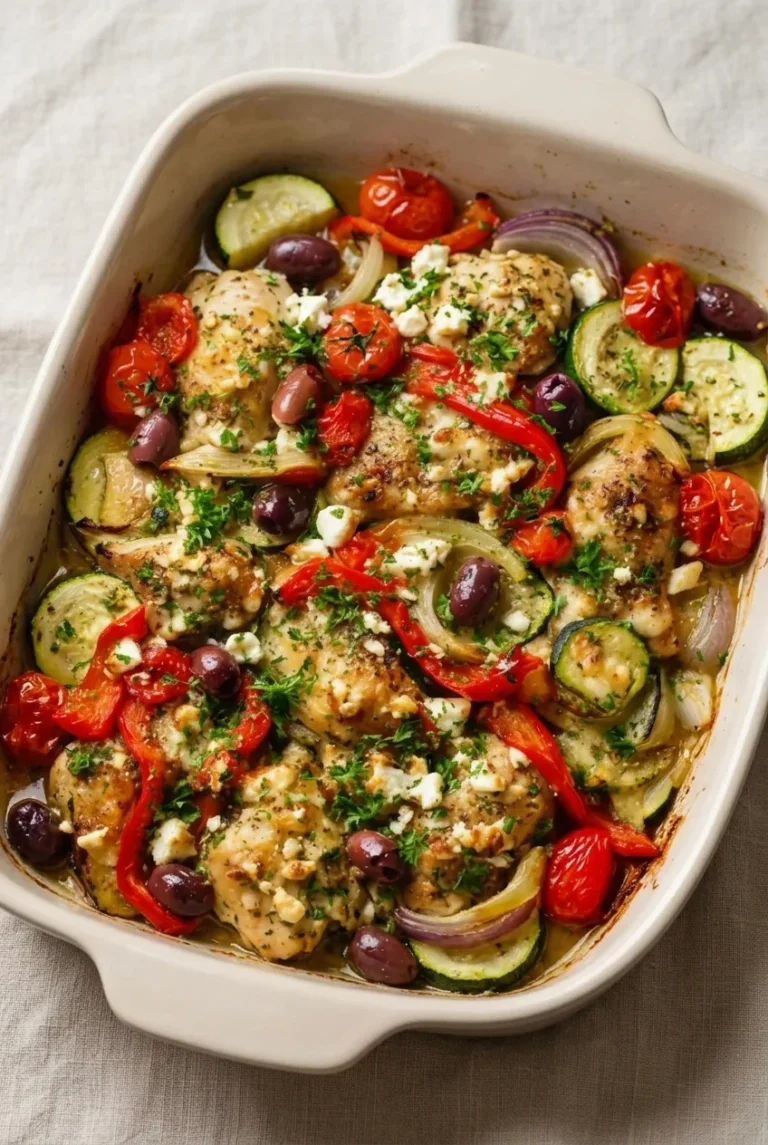
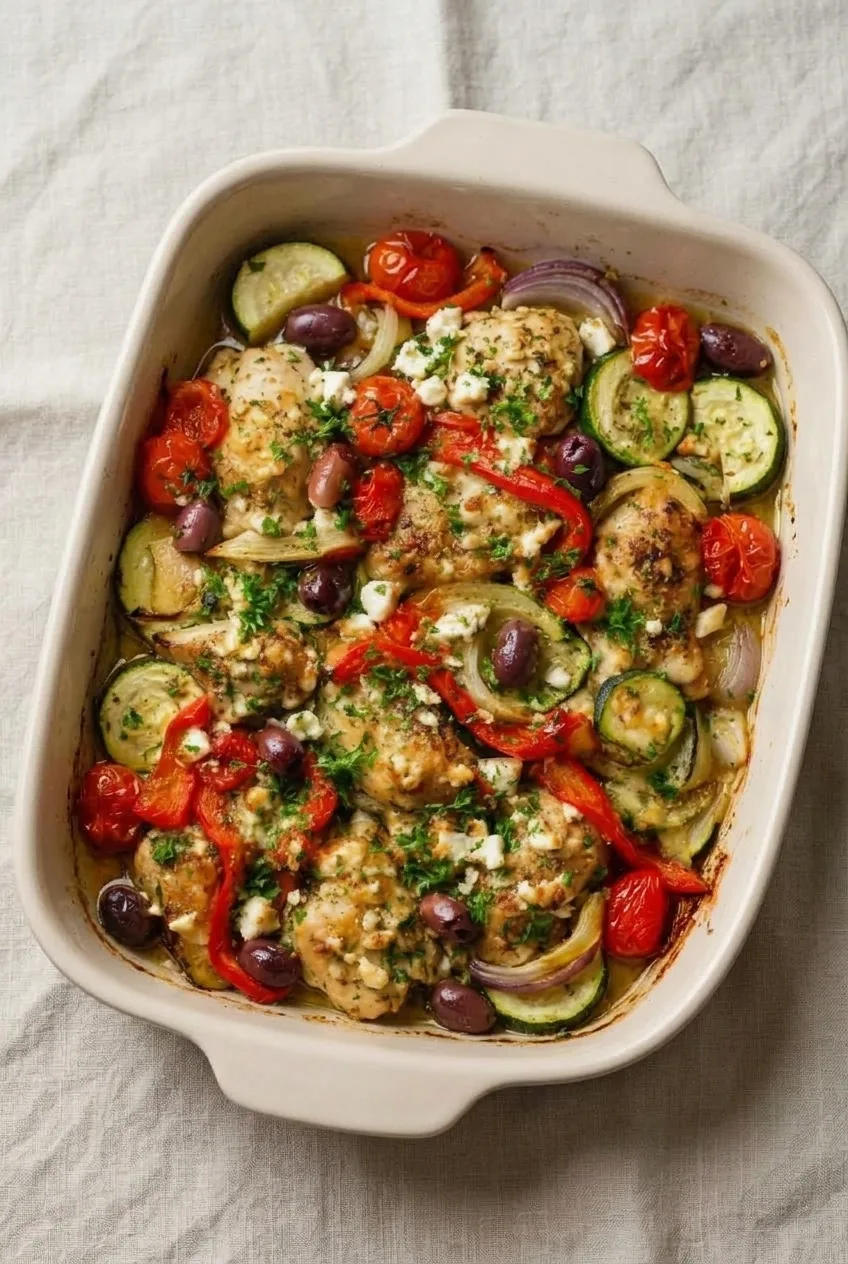
Chunks of chicken breast bake with thick zucchini half-moons, cherry tomatoes, red pepper, onion, and Kalamata olives. The vegetables soften without losing their shape, while feta added near the end stays in distinct crumbles. A handful of parsley finishes the dish.

Keep the mixture in a shallow layer so it bakes rather than steams, and check the thickest chicken pieces with a thermometer. Their size matters more than the estimated bake time.

Serves 4. Prep time: about 15 minutes. Cook time: about 25 to 35 minutes, plus a 5-minute rest.

Full baking dish of Mediterranean chicken and zucchini with feta on a neutral tabletop

Ingredients for Mediterranean Chicken Zucchini Bake

  • 1½ pounds boneless, skinless chicken breasts, cut into roughly 1½-inch pieces (680g)
  • 2 medium zucchini, cut into ½-inch half-moons (about 400g)
  • 2 cups cherry tomatoes (about 280g)
  • 1 medium red bell pepper, sliced into strips (about 150g)
  • 1 medium red onion, cut into thin wedges (about 150g)
  • ½ cup pitted Kalamata olives (about 70g)
  • 3 garlic cloves, minced
  • 2 tablespoons olive oil
  • 1 teaspoon dried oregano
  • ¾ teaspoon kosher salt, or to taste
  • ¼ teaspoon freshly ground black pepper
  • ¾ cup crumbled feta, preferably in larger crumbles (about 85g)
  • 2 tablespoons chopped fresh parsley

For an optional extra herb note, add ½ teaspoon dried basil with the oregano. Olives and feta vary in saltiness, so adjust the salt to taste.

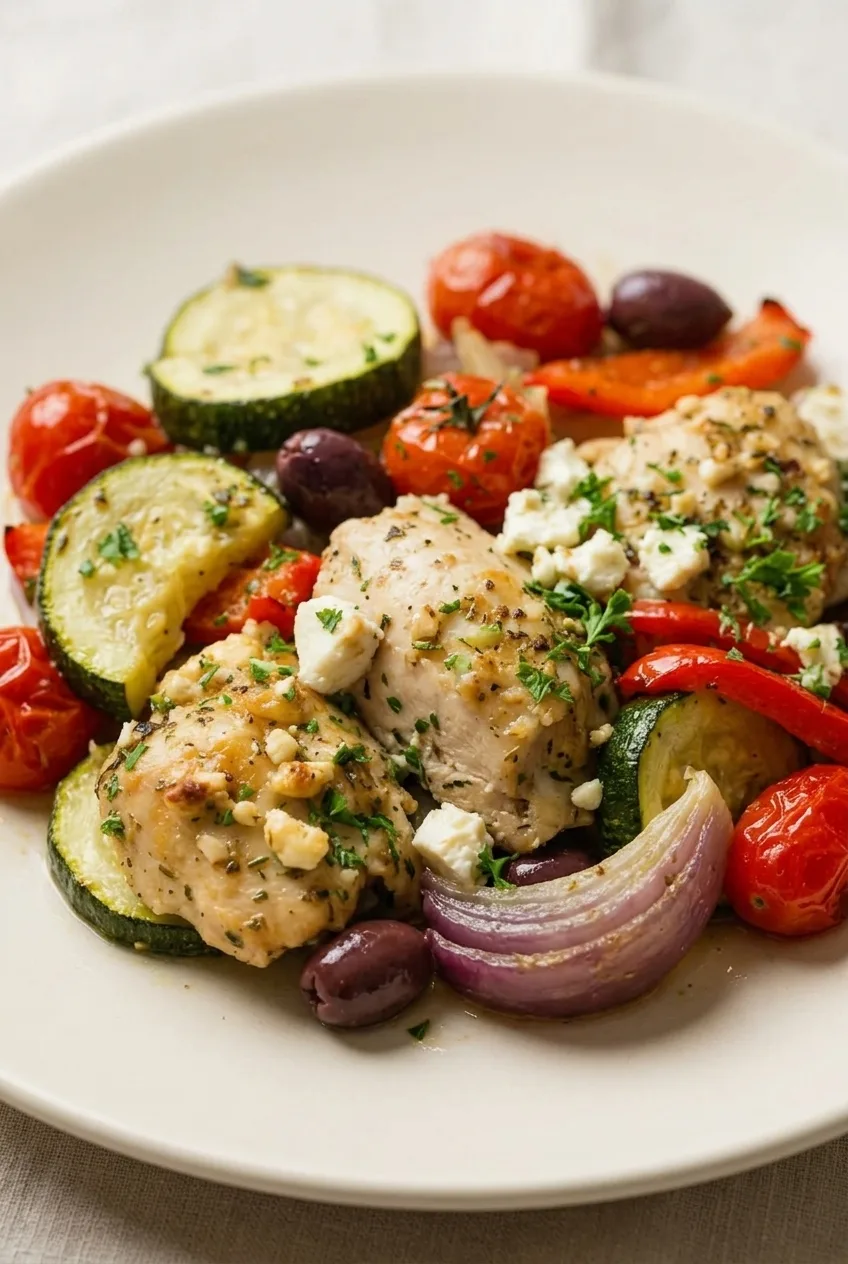
Close view of baked chicken, zucchini, olives, and distinct feta crumbles on a plate

How to Bake Chicken and Zucchini

  1. Preheat and cut: Set a rack near the center of the oven and fully preheat to 400°F (205°C). Cut the chicken into similar-sized pieces and prepare the vegetables as listed above.
  2. Season the chicken: In a mixing bowl, toss the chicken with 1 tablespoon olive oil, the oregano, garlic, salt, and pepper until coated.
  3. Fill the baking dish: In a 9-by-13-inch baking dish, toss the zucchini, tomatoes, bell pepper, onion, and olives with the remaining 1 tablespoon olive oil. Nestle the chicken among the vegetables, leaving some pieces exposed. Keep the mixture fairly shallow; do not add water or broth.
  4. Bake and check: Bake uncovered. Starting at 20 minutes, check the centers of several of the thickest chicken pieces with an instant-read thermometer. Continue baking until the chicken reaches 165°F (75°C) and the zucchini is tender but still holds its shape, about 25 to 35 minutes total. Rotate the dish if it browns unevenly.
  5. Add the feta: When the chicken is approaching 165°F and the vegetables are nearly tender, scatter the feta over the dish. Bake for about 5 more minutes, until the feta is warm but still in distinct crumbles. Check that the chicken has reached 165°F before serving.
  6. Rest and serve: Let the bake rest for 5 minutes, then scatter the parsley over the top. Serve from the dish, using a slotted spoon if you want to leave excess juices behind.

Chicken Size and Bake Time

Aim for roughly 1½-inch chicken pieces. Smaller pieces can finish before the vegetables; larger ones can take longer. Timing for thin chicken cutlets does not apply to these chunks, so begin checking at 20 minutes rather than waiting for the end of the estimated range.

If the chicken reaches 165°F while the vegetables are still firm, remove the cooked pieces and return the vegetables to the oven until tender.

How to Keep the Bake From Getting Watery

Zucchini and tomatoes release juice as they bake. A roomy 9-by-13-inch dish keeps them in a loose layer instead of a mound that steams. Some glossy cooking juice is expected; leave any excess in the dish when serving.

Serving and Leftovers

Serve as-is or spoon over rice, cauliflower rice, or couscous. Refrigerate leftovers promptly in a covered container for up to 3 to 4 days.

Reheat covered in the microwave or gently in the oven until the chicken reaches 165°F. The zucchini will soften further. Freezing is not recommended for the best texture because the zucchini and tomatoes can become wetter after thawing.

Nutrition

Approximate nutrition per serving (¼ of the recipe): 410 calories, 44g protein, 19g fat, and 14g carbohydrates. Approximate per 100g: 90 calories, 9g protein, 4g fat, and 3g carbohydrates, estimated using ingredient weights before cooking. Values vary with the chicken, feta, olives, and moisture lost during baking.

Mediterranean Chicken Zucchini Bake

Chicken, zucchini, tomatoes, peppers, onion, and Kalamata olives bake together with oregano and a finish of feta and parsley.
Course: Main Course
Cuisine: Mediterranean
Prep: 15 min
Cook: 35 min
Total: 55 min
Servings: 4 Calories: 410 kcal

Equipment

  • 9-by-13-inch baking dish
  • Mixing bowl
  • Instant-read thermometer

Ingredients

For the Bake

  • 1.5 lb (680 g) boneless, skinless chicken breasts, cut into roughly 1.5-inch pieces
  • 2 medium zucchini (about 400 g), cut into 1/2-inch half-moons
  • 2 cups cherry tomatoes (about 280 g)
  • 1 medium red bell pepper (about 150 g), sliced into strips
  • 1 medium red onion (about 150 g), cut into thin wedges
  • 1/2 cup pitted Kalamata olives (about 70 g)
  • 3 garlic cloves, minced
  • 2 tablespoons olive oil, divided
  • 1 teaspoon dried oregano
  • 3/4 teaspoon kosher salt, or to taste
  • 1/4 teaspoon freshly ground black pepper
  • 1/2 teaspoon dried basil (optional)

For Finishing

  • 3/4 cup crumbled feta (about 85 g)
  • 2 tablespoons chopped fresh parsley

Instructions

  1. Set a rack near the center of the oven and preheat to 400°F (205°C).
  2. Toss the chicken in a mixing bowl with 1 tablespoon olive oil, oregano, garlic, salt, and pepper until coated.
  3. Toss the zucchini, tomatoes, bell pepper, onion, and olives in a 9-by-13-inch baking dish with the remaining 1 tablespoon olive oil.
  4. Nestle the chicken among the vegetables, leaving some pieces exposed. Keep the mixture in a shallow layer and do not add water or broth.
  5. Bake uncovered. Starting at 20 minutes, check the centers of several of the thickest chicken pieces with an instant-read thermometer.
  6. Continue baking until the chicken reaches 165°F (75°C) and the zucchini is tender but still holds its shape, about 25 to 35 minutes total. Rotate the dish if it browns unevenly.
  7. When the chicken is approaching 165°F and the vegetables are nearly tender, scatter the feta over the dish and bake for about 5 more minutes, until warm but still in distinct crumbles.
  8. Confirm the chicken has reached 165°F (75°C). Rest for 5 minutes, scatter parsley over the top, and serve. Use a slotted spoon if you want to leave excess juices behind.

Tips

  • Cut the chicken into similar-sized pieces, roughly 1.5 inches, for more even cooking.
  • Keep the ingredients in a shallow layer so they bake rather than steam.
  • Begin checking the chicken at 20 minutes; piece size matters more than the estimated bake time.
  • If the chicken reaches 165°F before the vegetables are tender, remove the cooked pieces and return the vegetables to the oven.
  • Some cooking juice is expected; use a slotted spoon to leave excess juice in the dish.

Variations

  • Dried Basil Variation: Add 1/2 teaspoon dried basil with the oregano for an extra herb note.

Notes

Refrigerate leftovers promptly in a covered container for 3 to 4 days. Reheat covered in the microwave or oven until the chicken reaches 165°F (75°C). Freezing is not recommended because the vegetables may become watery after thawing.

Nutrition

Calories: 410 kcal | Protein: 44 g | Fat: 19 g | Carbohydrates: 14 g

Lemon Garlic Shrimp and Asparagus

Whole asparagus spears and lightly seared shrimp finish together in this lemon-garlic skillet. The asparagus cooks first, then leaves the pan while the shrimp get a brief sear. That way, the spears stay tender-crisp and the shrimp can come off the heat as soon as they turn pink and opaque.

Garlic goes in near the end so it stays fragrant. Lemon juice brightens the dish off heat, while wedges tucked into the skillet let everyone add another squeeze at the table.

Ingredients for Lemon Garlic Shrimp and Asparagus

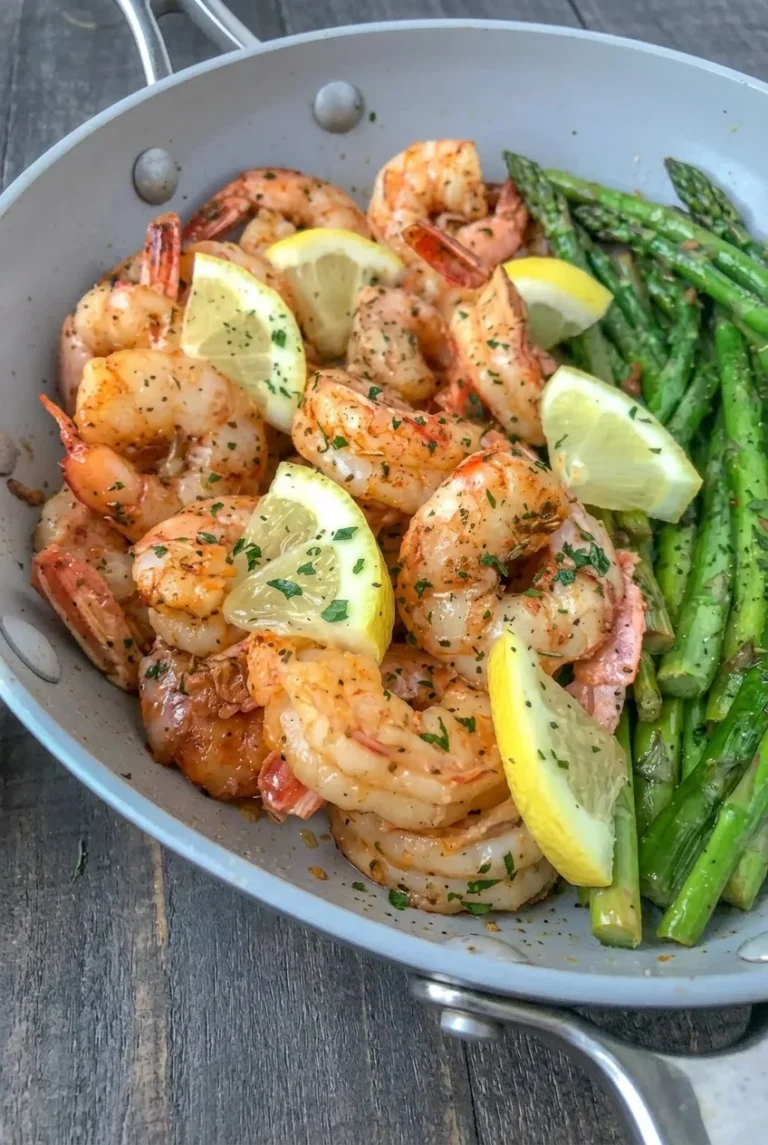
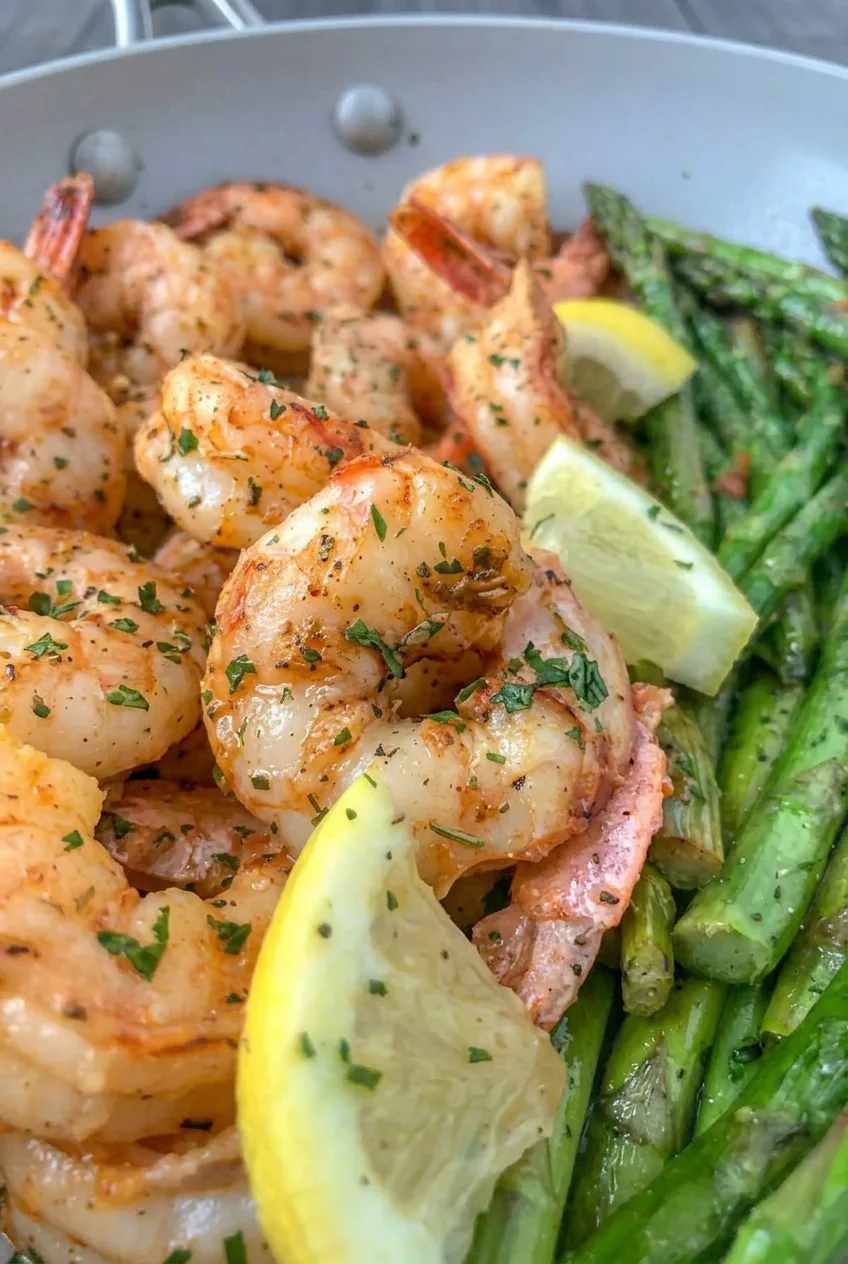
Close view of lightly seared shrimp beside whole asparagus, with parsley and lemon wedges
  • 1 lb large raw shrimp, peeled and deveined, tails on, thawed (450g)
  • 1 lb fresh asparagus, woody ends trimmed, spears left whole (450g)
  • 2 tablespoons olive oil, divided
  • 3 garlic cloves, minced
  • 2 medium lemons, one juiced and one cut into wedges
  • 3/4 teaspoon kosher salt, divided, or to taste
  • 1/4 teaspoon freshly ground black pepper, divided, or to taste
  • 2 tablespoons chopped fresh parsley

Optional: Add 1/4 teaspoon crushed red pepper flakes with the garlic for mild heat. For a richer finish, melt 1 tablespoon unsalted butter into the skillet over low heat just before adding the lemon juice.

How to Make Lemon Garlic Shrimp and Asparagus

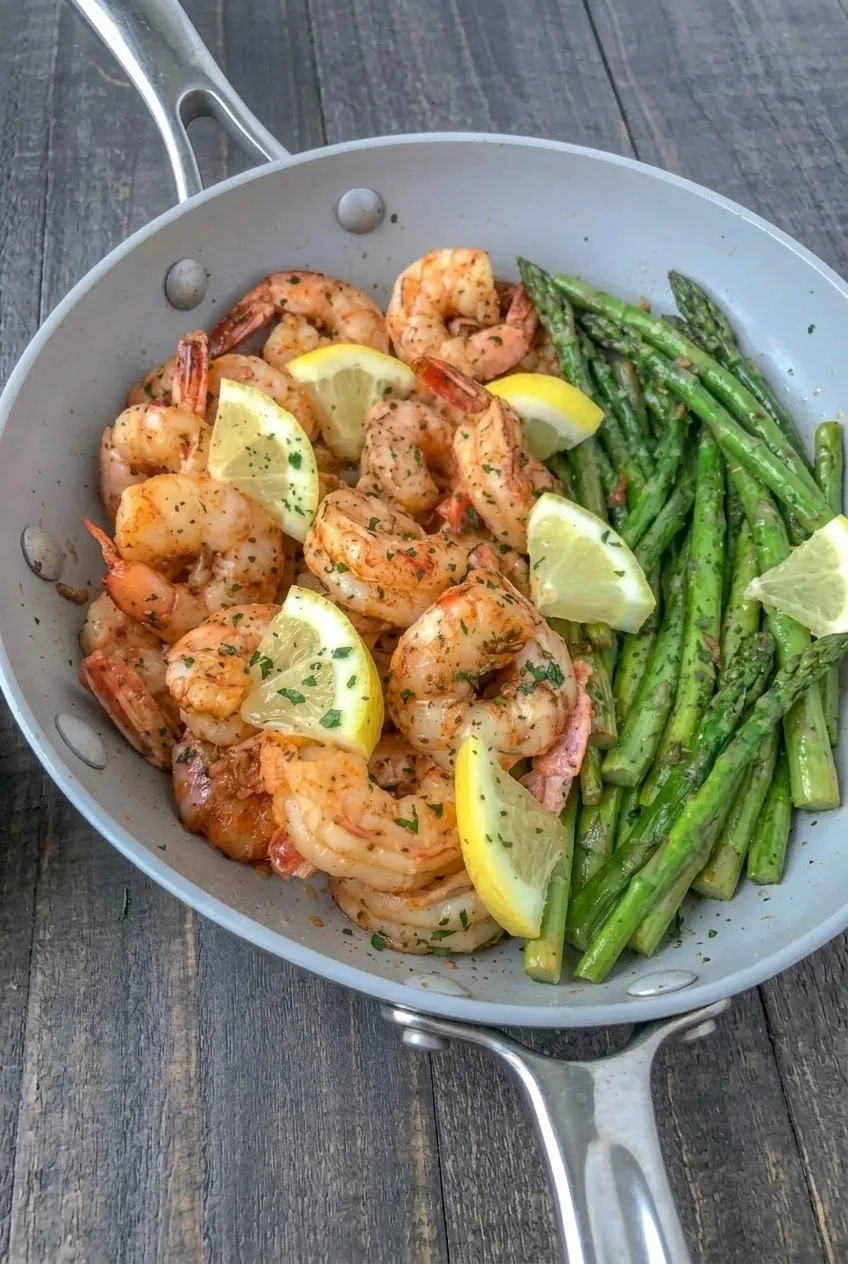
Full skillet of lemon garlic shrimp and asparagus on a dark tabletop

Prep: 10 minutes. Cook: about 12–16 minutes, depending on asparagus thickness and whether the shrimp need two batches. Total: about 25–30 minutes. Serves: 4 light dinner portions.

  1. Prepare the ingredients: Leave the trimmed asparagus spears whole. Pat the thawed shrimp thoroughly dry. Mince the garlic, juice one lemon, cut the other into wedges, and chop the parsley.
  2. Cook the asparagus: Warm a 12-inch skillet over medium-high heat, then add 1 tablespoon olive oil. Add the asparagus, season with about 1/4 teaspoon salt and some pepper, and turn occasionally. Cook uncovered for about 4–7 minutes, checking thin spears after 3–4 minutes. The spears should be bright green and lightly seared, with a slight snap when pierced with a fork. Transfer them to a plate; especially thick spears may need more time before they reach that point.
  3. Sear the shrimp: Add the remaining 1 tablespoon olive oil to the skillet. Season the shrimp with the remaining salt and pepper and arrange them in a single layer. Cook over medium-high heat for about 2–3 minutes per side, turning once and checking the first side after about 2 minutes. Remove the shrimp as soon as they are pink and opaque, with a few light golden spots. If they do not fit in one layer, cook in batches and transfer each finished batch to the plate.
  4. Add the garlic and lemon: Return any shrimp batches to the skillet. Reduce the heat to medium, or medium-low if the pan is very hot. Add the garlic and optional red pepper flakes; toss for about 30 seconds, until fragrant but not browned. If using butter, reduce the heat to low and melt it in briefly. Turn off the heat and toss with the juice of one lemon.
  5. Finish and serve: Return the asparagus to the skillet off heat, gathering the whole spears along one side with the shrimp beside them. Scatter parsley over both and tuck the lemon wedges among them. Serve promptly.

How to Keep the Shrimp Tender and the Asparagus Crisp

Asparagus needs a longer cook than shrimp, so remove it as soon as it reaches tender-crisp. Thin spears may be ready early; thicker ones may need more time. Return them only after the heat is off so they do not soften while the shrimp finish.

For lightly browned shrimp, start with a dry surface and enough room in the skillet for moisture to escape. Cook in batches if necessary, but do not keep the shrimp on the heat to chase a deeper crust once they are pink and opaque.

Serving and Make-Ahead

Serve from the skillet with the lemon wedges for squeezing. Cooked quinoa or a green salad can round out the meal. You can trim the asparagus, chop the parsley, and cut the serving wedges ahead; cook the shrimp close to serving. If reheating leftovers, avoid prolonged heat, which can toughen the shrimp.

For another shrimp dinner, try these Shrimp Avocado Mango Bowls.

Nutrition

Approximate nutrition per serving, based on 4 light dinner servings: 195 calories, 27g protein, 8g fat, and 7g carbohydrates. Approximate values per 100g of the finished dish: 90 calories, 12g protein, 4g fat, and 3g carbohydrates. Values vary with shrimp size, lemon yield, and finished weight.

Lemon Garlic Shrimp and Asparagus

Shrimp and whole asparagus spears are seared in a skillet and finished with garlic, lemon, and parsley.
Course: Main Course
Cuisine: American
Prep: 10 min
Cook: 16 min
Total: 30 min
Servings: 4 Calories: 195 kcal

Equipment

  • 12-inch skillet
  • Tongs

Ingredients

Main ingredients

  • 1 lb large raw shrimp, peeled and deveined, tails on, thawed (450 g)
  • 1 lb fresh asparagus, woody ends trimmed, spears left whole (450 g)
  • 2 tablespoons olive oil, divided
  • 3 garlic cloves, minced
  • 2 medium lemons, one juiced and one cut into wedges
  • 3/4 teaspoon kosher salt, divided, or to taste
  • 1/4 teaspoon freshly ground black pepper, divided, or to taste
  • 2 tablespoons chopped fresh parsley

Optional

  • 1/4 teaspoon crushed red pepper flakes
  • 1 tablespoon unsalted butter

Instructions

  1. Pat the thawed shrimp thoroughly dry. Mince the garlic, juice one lemon, cut the other into wedges, and chop the parsley.
  2. Warm a 12-inch skillet over medium-high heat and add 1 tablespoon olive oil.
  3. Add the asparagus, season with about 1/4 teaspoon salt and some pepper, and cook uncovered for 4–7 minutes, turning occasionally. Check thin spears after 3–4 minutes. Transfer the tender-crisp asparagus to a plate.
  4. Add the remaining 1 tablespoon olive oil to the skillet. Season the shrimp with the remaining salt and pepper, then arrange them in a single layer. Cook over medium-high heat for 2–3 minutes per side, turning once, until pink and opaque. Cook in batches if needed and transfer the shrimp to the plate as they finish.
  5. Return any shrimp batches to the skillet and reduce the heat to medium, or medium-low if the pan is very hot. Add the garlic and, if using, red pepper flakes. Toss for about 30 seconds, until fragrant but not browned.
  6. If using butter, reduce the heat to low and melt it into the skillet. Turn off the heat and toss the shrimp with the lemon juice.
  7. Return the asparagus to the skillet off heat. Scatter parsley over the shrimp and asparagus, tuck in the lemon wedges, and serve promptly.

Tips

  • Pat the shrimp dry before searing so moisture can escape and the shrimp can brown lightly.
  • Cook the asparagus before the shrimp; thin spears may be ready in 3–4 minutes, while thicker spears need longer.
  • Cook the shrimp in batches if they do not fit in a single layer.
  • Remove shrimp from the heat as soon as they are pink and opaque to keep them tender.
  • Return the asparagus to the skillet only after the heat is off to help it stay crisp.

Variations

  • Mildly spicy: Add 1/4 teaspoon crushed red pepper flakes with the garlic.
  • Buttery finish: Melt 1 tablespoon unsalted butter into the skillet over low heat just before adding the lemon juice.

Notes

Reheat leftovers gently and avoid prolonged heat, which can toughen the shrimp.

Nutrition

Calories: 195 kcal | Protein: 27 g | Fat: 8 g | Carbohydrates: 7 g

BBQ Chicken Sweet Potato Bowl

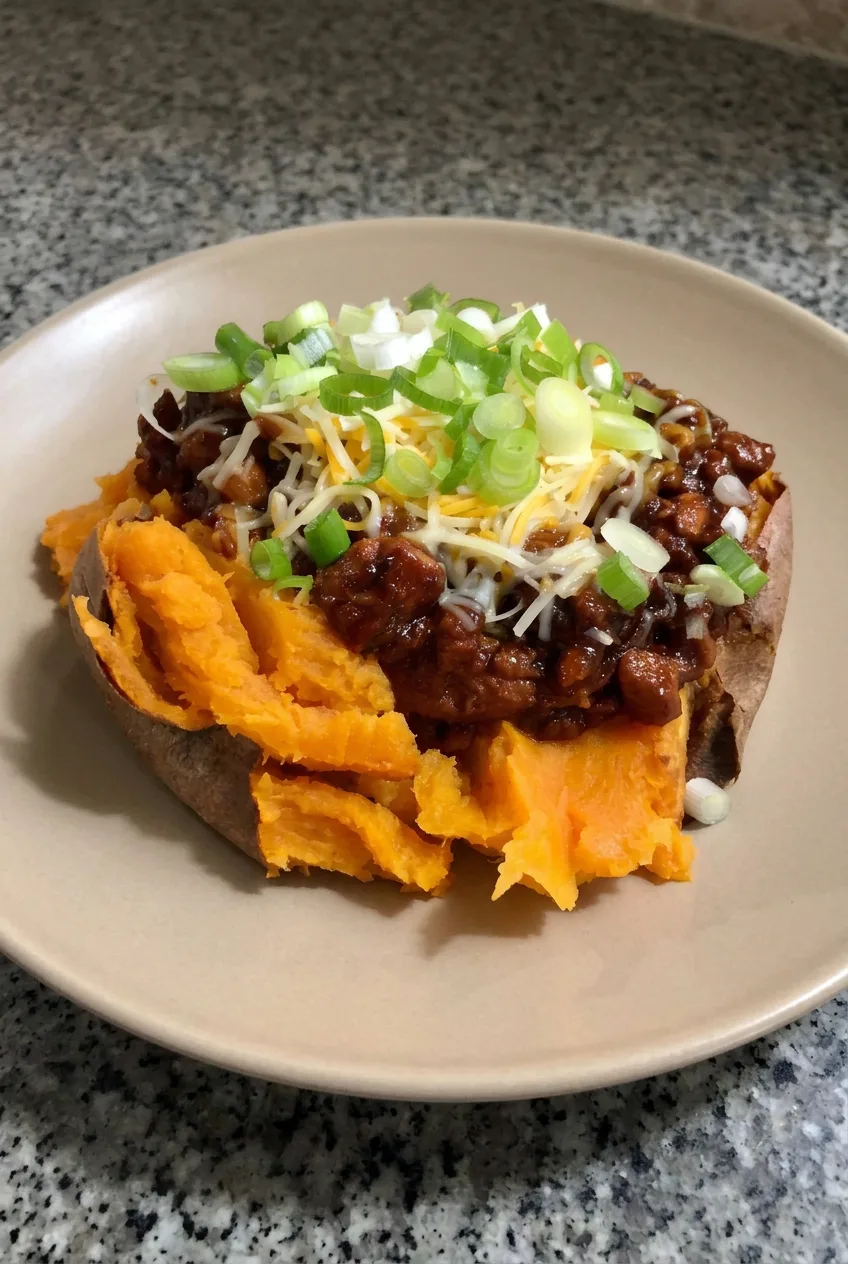
Each serving starts with a whole baked sweet potato, split open so its fluffy orange flesh surrounds a generous mound of BBQ chicken. The chicken browns in a skillet before a short uncovered simmer turns the barbecue sauce into a thick coating. Add shredded cheese while the filling is hot, then finish with fresh green onions.

Ingredients for BBQ Chicken Sweet Potato Bowls

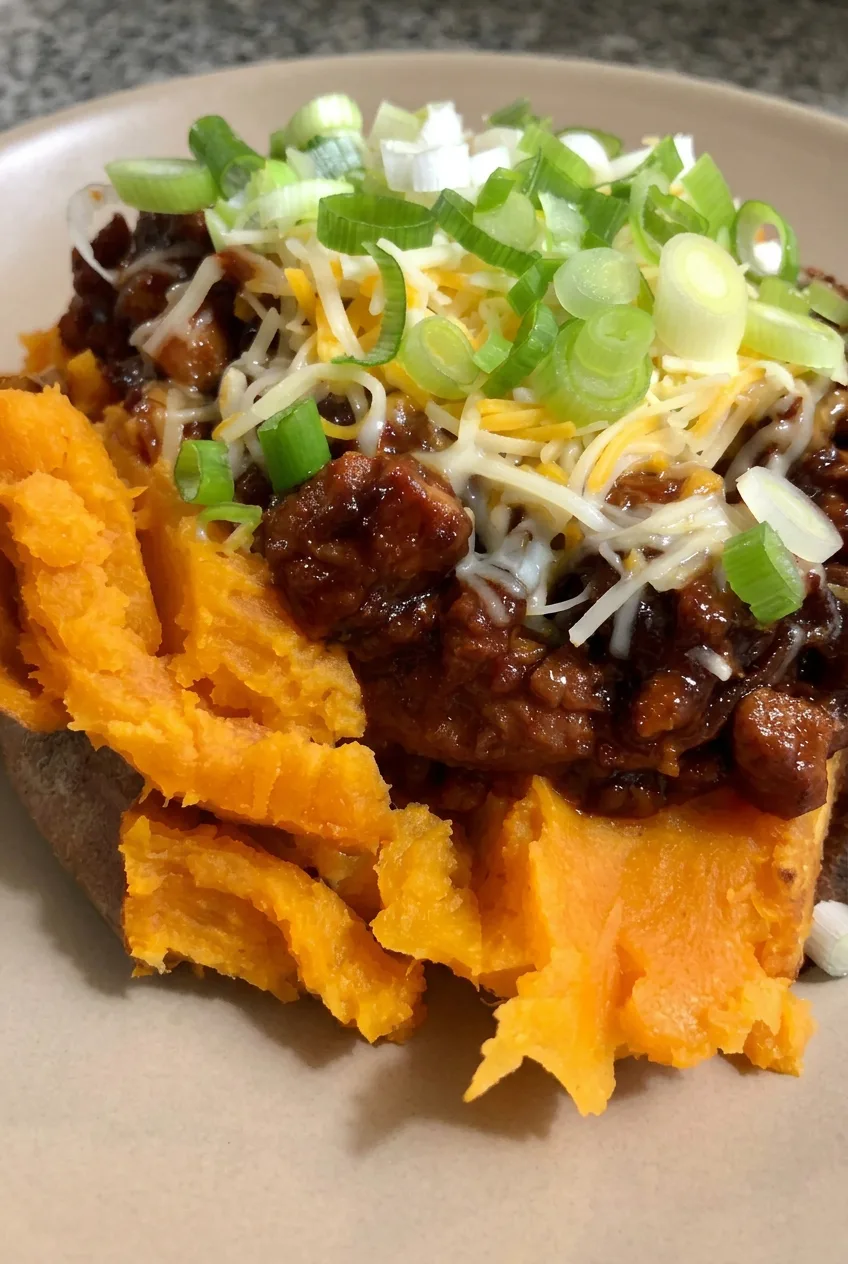
Close view of fluffy orange sweet potato topped with glossy BBQ chicken, melted cheese, and scallions
  • 4 large sweet potatoes, about 10 to 12 ounces each (about 1,250g total)
  • 2 tablespoons olive oil or avocado oil, divided
  • 1 teaspoon kosher salt, divided
  • 1/2 teaspoon black pepper, divided
  • 1 1/2 pounds boneless skinless chicken thighs or breasts, cut into 1-inch pieces (about 675g)
  • 1 teaspoon garlic powder
  • 1 teaspoon smoked paprika
  • 1 cup barbecue sauce (about 240g)
  • 1 cup shredded cheddar-Jack cheese (about 115g)
  • 4 green onions, thinly sliced

Choose similarly sized sweet potatoes so they finish baking together. Chicken thighs stay juicier; if using breasts, check their temperature promptly to avoid overcooking.

How to Make BBQ Chicken Sweet Potato Bowls

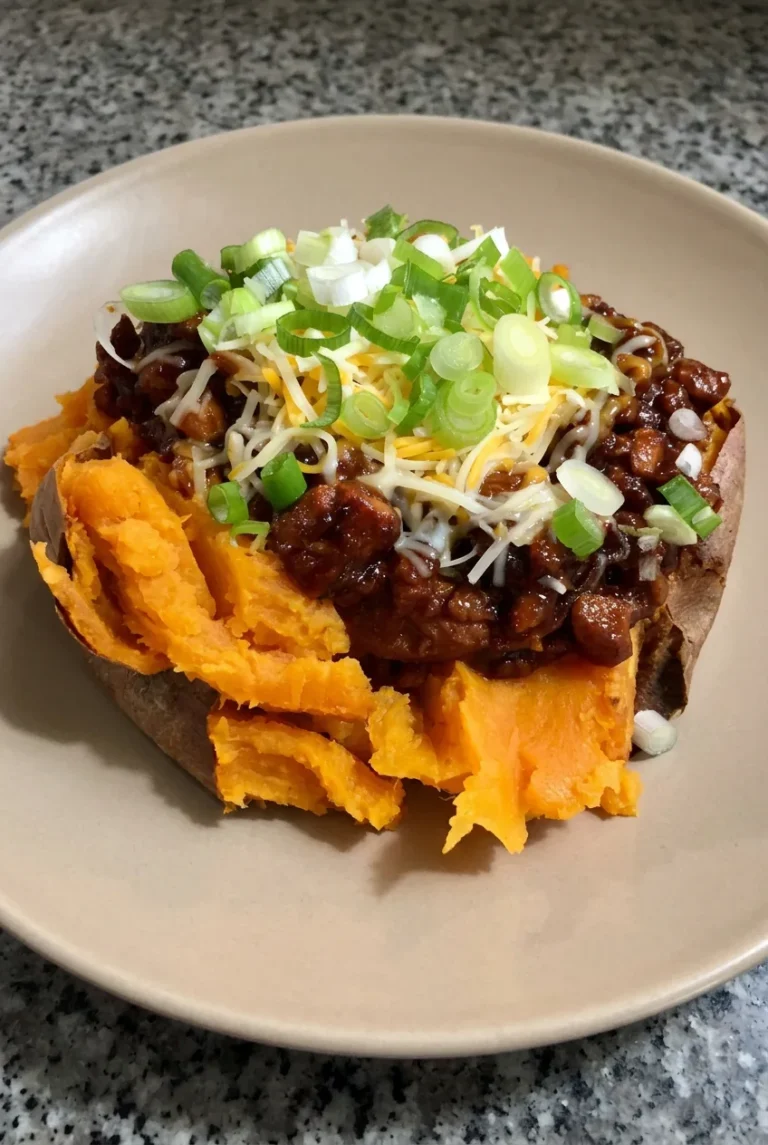
Wider view of a loaded BBQ chicken sweet potato with cheese and green onions on a neutral plate

Servings: 4   Prep: 15 minutes   Cook: 50 to 65 minutes

  1. Prepare the potatoes: Heat the oven to 425°F (220°C). Scrub and dry the sweet potatoes, then pierce each several times with a fork. Rub with 1 tablespoon oil and season with 1/2 teaspoon salt and 1/4 teaspoon pepper. Space them apart on a parchment-lined rimmed baking sheet.
  2. Bake until tender: Bake uncovered for 45 to 60 minutes. Start checking at 45 minutes. A fork should slide easily through the thickest center, and each potato should yield when gently squeezed with an oven mitt. Larger potatoes may need more time.
  3. Brown the chicken: When the potatoes are nearly tender, toss the chicken with the remaining 1/2 teaspoon salt, 1/4 teaspoon pepper, garlic powder, and smoked paprika. Heat the remaining tablespoon of oil in a 12-inch skillet over medium-high heat. Add the chicken in an even layer, working in batches if needed so it browns instead of steaming. Cook for 7 to 10 minutes, turning after the first side browns, until nearly cooked through.
  4. Glaze the chicken: Reduce the heat to medium and add the barbecue sauce. Simmer uncovered for 2 to 4 minutes, stirring occasionally, until the sauce looks glossy and clings to the chicken rather than pooling in the skillet. The thickest pieces must reach 165°F (75°C). If the sauce gets too thick before the chicken is done, stir in 1 to 2 tablespoons water.
  5. Split and fill: Let the potatoes rest for 5 minutes. Cut a deep lengthwise slit in each and press the ends inward to open them wide, keeping the skins attached. Fluff the flesh with a fork, leaving visible ridges and chunks, then spoon the BBQ chicken over the centers.
  6. Melt the cheese: Sprinkle the cheese over the hot chicken. Return the potatoes to the baking sheet and oven for 1 to 2 minutes, just until the cheese softens but individual shreds remain visible. Top generously with green onions and serve.

How to Tell When Sweet Potatoes Are Done

Whole sweet potatoes vary in size, so use tenderness rather than the clock alone. If a fork meets resistance at the center, bake for another 5 to 10 minutes and check again. Fully tender potatoes open easily and have a fluffy interior.

Keep the BBQ Chicken Thick and Saucy

Give the chicken room to brown before adding the sauce. The uncovered simmer then lets excess moisture evaporate so the sauce coats the pieces without soaking the potato. If the filling still looks loose, simmer it briefly longer, stirring often. Watch closely with a very sweet sauce, which can darken quickly.

Optional Toppings

Cheese and green onions are the main finish. For a cool or tangy contrast, serve sour cream, dill pickles, or creamy coleslaw alongside the loaded potatoes. Add hot sauce at the table if desired.

Make-Ahead, Storage, and Reheating

Bake the potatoes and cook the BBQ chicken up to 3 days ahead. Refrigerate them separately in airtight containers, with the sliced green onions in their own container. Reheat the potato and chicken until hot, add the cheese and heat briefly until softened, then finish with green onions. Fully assembled potatoes are best eaten promptly.

Freeze cooled BBQ chicken in an airtight container for up to 2 months. For the best texture, bake fresh sweet potatoes rather than freezing assembled, cheese-topped servings.

Nutrition

Approximate per serving, based on 1 of 4 loaded sweet potatoes made with chicken thighs: 760 calories, 47g protein, 25g fat, and 89g carbohydrates. Approximate per 100g: 150 calories, 9g protein, 5g fat, and 18g carbohydrates. Values vary with potato size, chicken cut, and barbecue sauce; optional toppings are not included.

BBQ Chicken Sweet Potato Bowl

Baked sweet potatoes are filled with thick, saucy BBQ chicken, melted cheddar-Jack cheese, and fresh green onions.
Course: Main Course
Cuisine: American
Prep: 15 min
Cook: 65 min
Total: 80 min
Servings: 4 Calories: 760 kcal

Equipment

  • Rimmed baking sheet
  • Parchment paper
  • 12-inch skillet
  • Fork
  • Chef's knife

Ingredients

For the Sweet Potatoes

  • 4 large sweet potatoes, about 10 to 12 ounces each (about 1,250g total)
  • 1 tablespoon olive oil or avocado oil
  • 1/2 teaspoon kosher salt
  • 1/4 teaspoon black pepper

For the BBQ Chicken Filling

  • 1 1/2 pounds boneless skinless chicken thighs or breasts, cut into 1-inch pieces (about 675g)
  • 1 tablespoon olive oil or avocado oil
  • 1/2 teaspoon kosher salt
  • 1/4 teaspoon black pepper
  • 1 teaspoon garlic powder
  • 1 teaspoon smoked paprika
  • 1 cup barbecue sauce (about 240g)

For Serving

  • 1 cup shredded cheddar-Jack cheese (about 115g)
  • 4 green onions, thinly sliced

Instructions

  1. Preheat the oven to 425°F (220°C). Line a rimmed baking sheet with parchment paper.
  2. Scrub and dry the sweet potatoes, then pierce each several times with a fork. Rub with 1 tablespoon oil and season with 1/2 teaspoon salt and 1/4 teaspoon pepper.
  3. Arrange the potatoes apart on the prepared baking sheet and bake uncovered for 45 to 60 minutes, until a fork easily reaches the center and the potatoes yield when gently squeezed.
  4. When the potatoes are nearly tender, toss the chicken with the remaining 1/2 teaspoon salt, 1/4 teaspoon pepper, garlic powder, and smoked paprika.
  5. Heat the remaining 1 tablespoon oil in a 12-inch skillet over medium-high heat. Add the chicken in an even layer, working in batches if needed, and cook for 7 to 10 minutes, turning after the first side browns, until nearly cooked through.
  6. Reduce the heat to medium and stir in the barbecue sauce. Simmer uncovered for 2 to 4 minutes, stirring occasionally, until the sauce is glossy and coats the chicken. Cook until the thickest chicken pieces reach 165°F (75°C).
  7. Rest the baked sweet potatoes for 5 minutes. Cut a deep lengthwise slit in each potato, press the ends inward to open, and fluff the flesh with a fork.
  8. Spoon the BBQ chicken over the potatoes and sprinkle with cheddar-Jack cheese.
  9. Return the potatoes to the oven for 1 to 2 minutes, until the cheese softens. Top with green onions and serve.

Tips

  • Choose similarly sized sweet potatoes so they finish baking at the same time.
  • Use tenderness rather than baking time alone; add 5 to 10 minutes if a fork meets resistance at the center.
  • Avoid overcrowding the skillet so the chicken browns instead of steaming.
  • Simmer the barbecue sauce uncovered so it thickens and coats the chicken.
  • If the sauce thickens before the chicken is done, stir in 1 to 2 tablespoons water.
  • Chicken thighs stay juicier, while chicken breasts should be checked promptly to prevent overcooking.

Variations

  • Tangy Toppings: Serve with sour cream, dill pickles, or creamy coleslaw for a cool or tangy contrast.
  • Spicy BBQ Chicken: Add hot sauce at the table for extra heat.

Notes

Refrigerate baked potatoes and BBQ chicken separately in airtight containers for up to 3 days. Reheat until hot, then add cheese and warm briefly before topping with green onions. Freeze cooled BBQ chicken for up to 2 months; bake fresh sweet potatoes for the best texture.

Nutrition

Calories: 760 kcal | Protein: 47 g | Fat: 25 g | Carbohydrates: 89 g

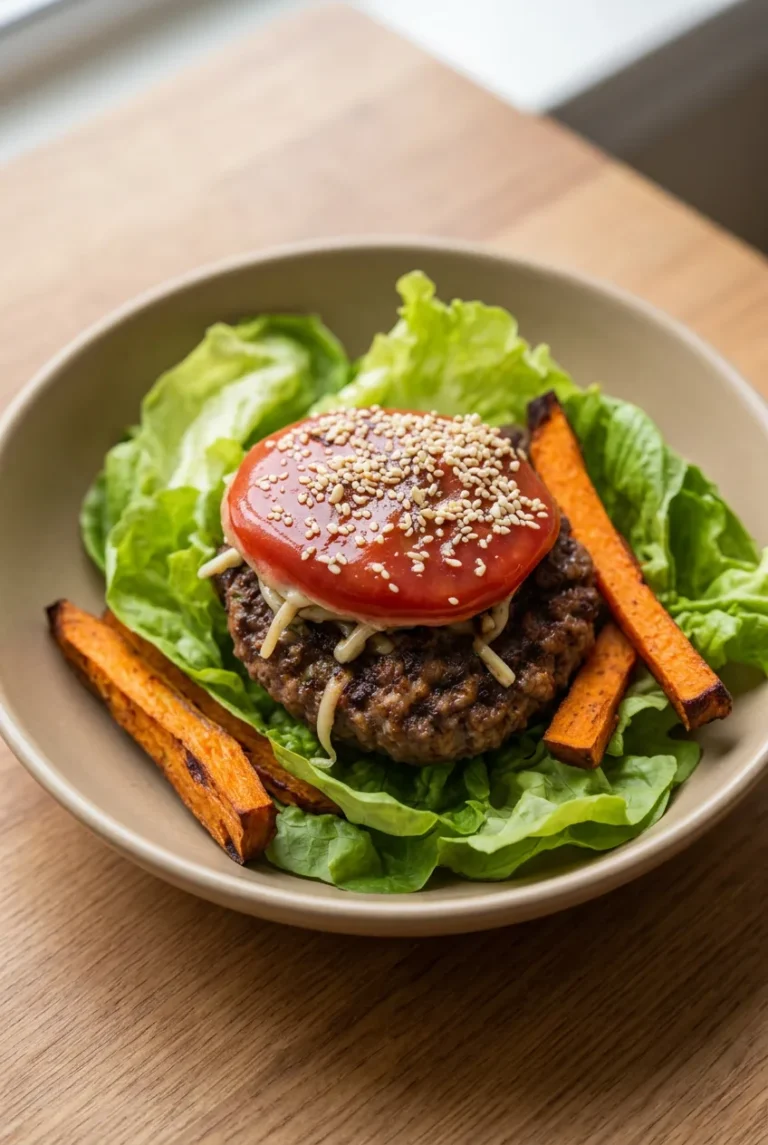
Sweet Potato Burger Bowl with Ground Beef

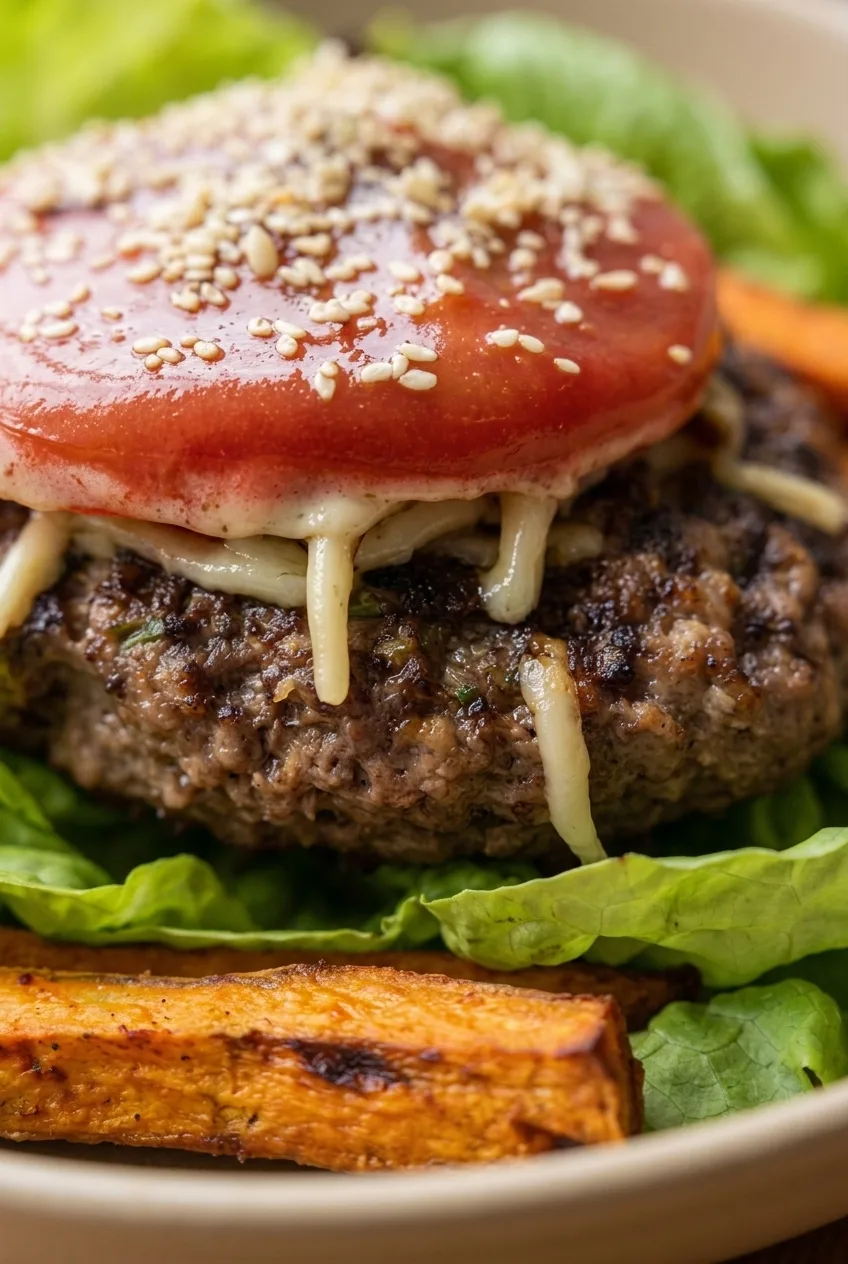
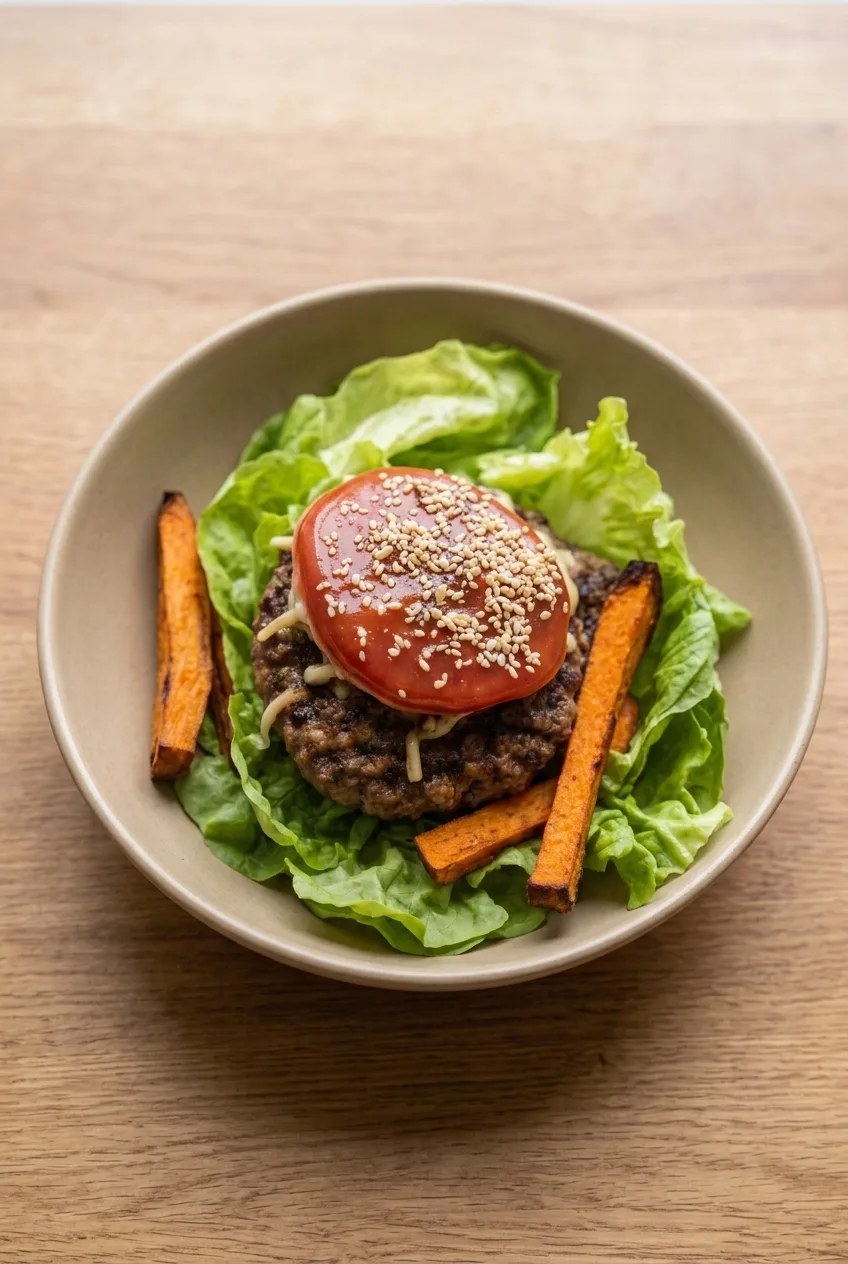
A browned beef patty, melted cheddar, and a thick tomato slice give each bowl the shape of a bunless cheeseburger. Sesame seeds finish the tomato, while roasted sweet potato wedges sit around the patty on a bed of crisp lettuce.

Roast the wedges in one uncrowded layer so they brown instead of steam, then assemble the bowls just before serving. Keeping the warm ingredients separate from the greens also makes this a practical meal to prep ahead.

Ingredients for Sweet Potato Burger Bowls

Close view of seared beef patty with melted cheddar, sesame-topped tomato, and browned sweet potato wedge.

Serves: 4 bowls | Prep: 20 minutes | Cook: 25–30 minutes | Total: 45–50 minutes

  • 2 medium-large sweet potatoes, about 1 1/2 lb (680g), scrubbed and cut lengthwise into wedges about 3/4 inch thick
  • 1 1/2 tablespoons olive oil
  • 1 teaspoon garlic powder, divided
  • 1 teaspoon smoked paprika
  • 1 1/4 teaspoons kosher salt, divided
  • 3/4 teaspoon black pepper, divided
  • 1 1/4 lb ground beef, 85% to 90% lean (about 565g)
  • 1 teaspoon Worcestershire sauce
  • 1 cup shredded cheddar cheese (about 115g)
  • 8 cups loosely packed leaf lettuce or butter lettuce, washed and dried (about 200g)
  • 1 large tomato, cut into 4 thick crosswise slices
  • 2 teaspoons sesame seeds

Optional for serving: Up to 1/3 cup burger sauce or Thousand Island dressing, dill pickle chips, thinly sliced red onion, or avocado. Keep 1 teaspoon oil available for the skillet if the beef is very lean or the pan needs it.

Leave the sweet potato skins on if they are well scrubbed, or peel them for smoother-looking wedges.

How to Make Sweet Potato Burger Bowls

Complete sweet potato burger bowl with beef patty, lettuce, tomato cap, cheddar, and roasted wedges in a shallow bowl.
  1. Season the wedges: Preheat the oven to 425°F (220°C). Toss the sweet potato wedges with the olive oil, smoked paprika, 1/2 teaspoon garlic powder, 3/4 teaspoon salt, and 1/4 teaspoon pepper. Coat them lightly rather than leaving oil pooled in the bowl.
  2. Roast the sweet potatoes: Arrange the wedges on a large rimmed sheet pan in one layer, with space between them and a broad cut side against the pan. Roast uncovered for 15 minutes, turn, then roast for 10–15 minutes more. Start checking around 22 minutes total; they are done when a fork slides through the centers and the edges have browned. Thicker wedges may need a few extra minutes.
  3. Form the patties: While the wedges roast, gently combine the ground beef, Worcestershire sauce, remaining 1/2 teaspoon garlic powder, remaining 1/2 teaspoon salt, and remaining 1/2 teaspoon pepper. Form four loose patties about 3/4 inch thick. Press a shallow dimple into the center of each without tightly packing the meat.
  4. Sear and add cheese: Heat a 10- to 12-inch skillet over medium-high heat. Add the optional teaspoon of oil only if needed. Cook the patties without pressing for 4–5 minutes, until deeply browned on the first side and easy to release. Flip once and cook for 3–5 minutes more, reducing the heat to medium if the pan gets too hot. Start checking after about 7 minutes total; cook until the thickest center reaches 160°F (70°C). Cook in batches if the patties do not fit without touching, and carefully drain excess rendered fat if needed. Add 1/4 cup cheddar to each patty during the last minute, briefly covering the skillet if needed to melt it. Rest the patties for 3 minutes.
  5. Prepare the bowls: Divide the dry lettuce among four shallow bowls. If the tomato slices are very wet, briefly blot the cut surfaces. Sprinkle each slice with sesame seeds and gently press them into place.
  6. Assemble and serve: Center a cheese-topped patty on the lettuce in each bowl. Add a sesame-topped tomato slice, then arrange the roasted wedges around the patty. Serve immediately, with sauce and any extra toppings on the side.

How to Get Browned Sweet Potato Wedges

Evenly cut wedges finish roasting at roughly the same time. Give them room on the sheet pan: overlapping traps moisture, while placing a cut side against the hot metal helps it brown. If the wedges are tender but pale, leave them in the oven a few minutes longer, checking the edges so they do not burn.

How to Keep the Burger Patties Tender

Gently mixing and loosely forming the beef helps prevent dense patties. The shallow center dimple limits doming, and leaving the patties alone as they sear builds a browned crust. Use the thermometer to check doneness rather than cooking them well past 160°F.

Burger Bowl Toppings and Variations

Cheddar, tomato, and sesame seeds are part of the main bowl. Pickles and red onion add a sharper burger flavor; avocado or a little shredded cabbage can add creaminess or crunch. Colby Jack can replace cheddar, and romaine can replace leaf lettuce. Serve sauce on the side or add it just before eating to keep the greens crisp.

For a less composed variation, brown the seasoned beef in larger crumbles instead of forming patties. For another burger-style meal, try these juicy grilled turkey burger sliders.

Meal Prep and Storage

Let the cooked patties and wedges cool before sealing them in an airtight container. Refrigerate for up to 3–4 days, keeping the lettuce, tomato, sauce, and other fresh toppings separate. Add the tomato slices and sesame seeds when serving.

Reheat the patties and wedges in a 350°F (175°C) oven or toaster oven until hot, then assemble over cold lettuce. A microwave works for convenience, but the wedges will soften. Do not reheat a fully assembled bowl.

Nutrition

Approximate nutrition per bowl, based on 4 bowls without optional oil, sauce, or toppings: 620 calories, 38g protein, 36g fat, and 39g carbohydrates. Per 100g of finished bowl: approximately 160 calories, 10g protein, 9g fat, and 10g carbohydrates. Values vary with the leanness of the beef, fat left in the skillet, and moisture lost during cooking.

Sweet Potato Burger Bowl with Ground Beef

Bunless cheeseburger bowls with cheddar-topped beef patties, roasted sweet potato wedges, lettuce, tomato, and sesame seeds.
Course: Main Course
Cuisine: American
Prep: 20 min
Cook: 30 min
Total: 50 min
Servings: 4 Calories: 620 kcal

Equipment

  • Large rimmed sheet pan
  • 10- to 12-inch skillet
  • Mixing bowl
  • Meat thermometer
  • 4 shallow bowls

Ingredients

For the Sweet Potato Wedges

  • 2 medium-large sweet potatoes, about 1 1/2 lb (680g), scrubbed and cut into 3/4-inch wedges
  • 1 1/2 tablespoons olive oil
  • 1 teaspoon garlic powder, divided
  • 1 teaspoon smoked paprika
  • 1 1/4 teaspoons kosher salt, divided
  • 3/4 teaspoon black pepper, divided

For the Burger Bowls

  • 1 1/4 lb ground beef, 85% to 90% lean (about 565g)
  • 1 teaspoon Worcestershire sauce
  • 1 cup shredded cheddar cheese (about 115g)
  • 8 cups loosely packed leaf lettuce or butter lettuce, washed and dried (about 200g)
  • 1 large tomato, cut into 4 thick slices
  • 2 teaspoons sesame seeds

Optional for Serving

  • 1 teaspoon oil for the skillet, if needed
  • Up to 1/3 cup burger sauce or Thousand Island dressing
  • Dill pickle chips
  • Thinly sliced red onion
  • Avocado

Instructions

  1. Preheat the oven to 425°F (220°C).
  2. Toss the sweet potato wedges with olive oil, smoked paprika, 1/2 teaspoon garlic powder, 3/4 teaspoon salt, and 1/4 teaspoon black pepper.
  3. Arrange the wedges in a single uncrowded layer on a large rimmed sheet pan, placing a cut side against the pan.
  4. Roast for 15 minutes, turn the wedges, and roast for 10 to 15 minutes more, until fork-tender and browned at the edges.
  5. Combine the ground beef with Worcestershire sauce, the remaining 1/2 teaspoon garlic powder, remaining 1/2 teaspoon salt, and remaining 1/2 teaspoon black pepper. Gently form into 4 loose patties about 3/4 inch thick and press a shallow dimple in each center.
  6. Heat a 10- to 12-inch skillet over medium-high heat. Add oil only if needed.
  7. Cook the patties without pressing for 4 to 5 minutes, until deeply browned and easy to release. Flip and cook for 3 to 5 minutes more, reducing the heat to medium if needed.
  8. Cook the patties until the thickest center reaches 160°F (70°C). Add 1/4 cup cheddar to each patty during the last minute and briefly cover the skillet to melt the cheese. Rest for 3 minutes.
  9. Divide the lettuce among 4 shallow bowls. Blot the tomato slices if wet, then sprinkle each slice with sesame seeds and gently press them into place.
  10. Place a cheese-topped patty in each bowl, top with a sesame-covered tomato slice, and arrange the roasted sweet potato wedges around the patty. Serve with optional sauce and toppings.

Tips

  • Roast the sweet potatoes in one uncrowded layer so they brown instead of steam.
  • Place a broad cut side of each wedge against the sheet pan for better browning.
  • Gently mix and loosely form the beef to keep the patties tender.
  • Do not press the patties while they sear, which helps build a browned crust.
  • Use a thermometer and cook the beef to 160°F (70°C) rather than overcooking it.
  • Keep warm ingredients separate from the lettuce until serving for meal prep.

Variations

  • Burger Crumble Bowls: Brown the seasoned beef in larger crumbles instead of forming patties for a less composed bowl.
  • Colby Jack Burger Bowls: Replace the cheddar cheese with Colby Jack.
  • Romaine Burger Bowls: Use romaine lettuce in place of leaf lettuce or butter lettuce.

Notes

Refrigerate cooked patties and wedges separately from lettuce, tomato, sauce, and fresh toppings for up to 3 to 4 days. Reheat patties and wedges at 350°F (175°C) until hot, then assemble over cold lettuce. Do not reheat fully assembled bowls.

Nutrition

Calories: 620 kcal | Protein: 38 g | Fat: 36 g | Carbohydrates: 39 g

Shrimp Avocado Mango Bowls

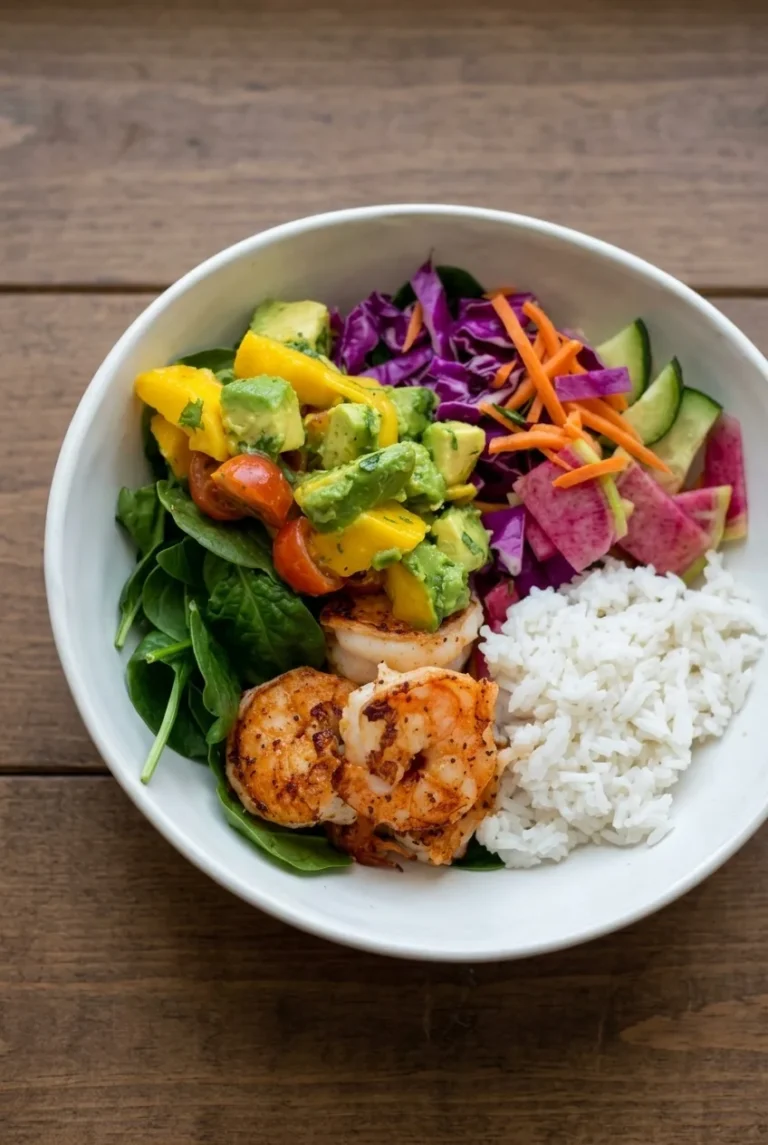
Warm, smoky skillet shrimp and white rice sit alongside cool avocado-mango salsa, spinach, and crisp vegetables in these composed bowls. Keep the ingredients in separate sections so the rice stays fluffy and the salsa does not soak the crunchy toppings. The chunky salsa brings enough lime and moisture that no separate dressing is needed.

Prepare the rice, salsa, and vegetables before heating the skillet. Large shrimp cook in just a few minutes, so the bowls should be ready to assemble as soon as the shrimp turn opaque and lightly browned.

Ingredients for Shrimp Avocado Mango Bowls

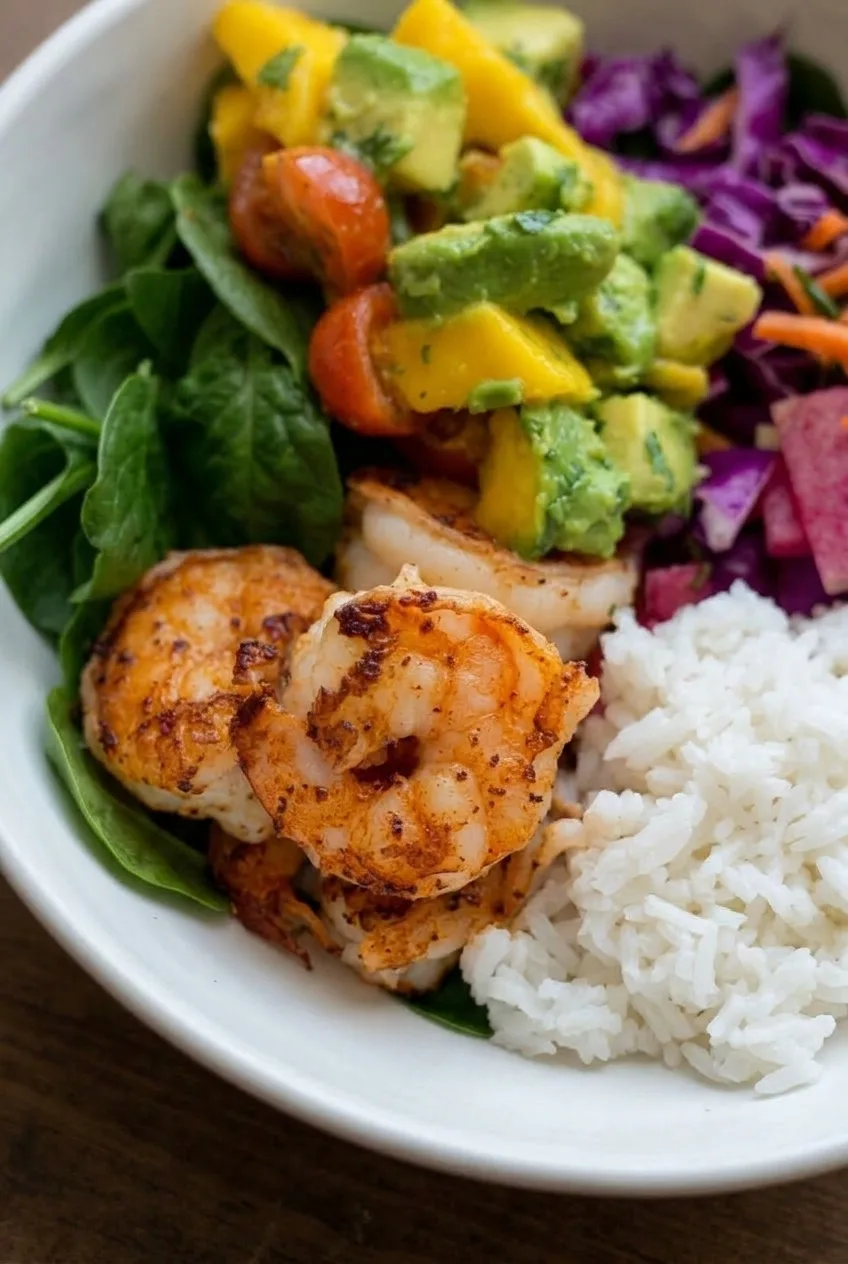
Close view of browned skillet shrimp, fluffy rice grains, and chunky avocado mango salsa in a composed bowl.

Serves: 4 bowls | Prep: 25 minutes with cooked rice | Cook: about 5 minutes | Total: about 30 minutes

For the shrimp and rice

  • 1 1/4 lb large raw shrimp, peeled and deveined (about 575g)
  • 3 cups cooked white rice (about 475g)
  • 1 1/2 tablespoons olive oil
  • 2 garlic cloves, finely grated or minced
  • 3 tablespoons lime juice, divided
  • 1 teaspoon smoked paprika
  • 1/2 teaspoon ground cumin
  • 1/2 teaspoon chili powder
  • 1 teaspoon kosher salt, plus more to taste
  • 1/2 teaspoon black pepper

For the salsa and bowls

  • 1 large ripe mango, diced, about 1 1/2 cups (250g)
  • 2 medium ripe avocados, diced (about 300g)
  • 1/4 cup finely diced red onion (40g)
  • 1 small jalapeño, finely minced; remove the seeds and ribs for less heat
  • 1/4 cup chopped fresh cilantro
  • 1 cup cherry tomatoes, halved (150g)
  • 4 packed cups baby spinach (120g)
  • 2 cups shredded purple cabbage (140g)
  • 1 small cucumber, thinly sliced
  • 1 carrot, cut into matchsticks
  • 2 small watermelon radishes or red radishes, thinly sliced

Optional for serving: Lime wedges.

How to Make Shrimp Avocado Mango Bowls

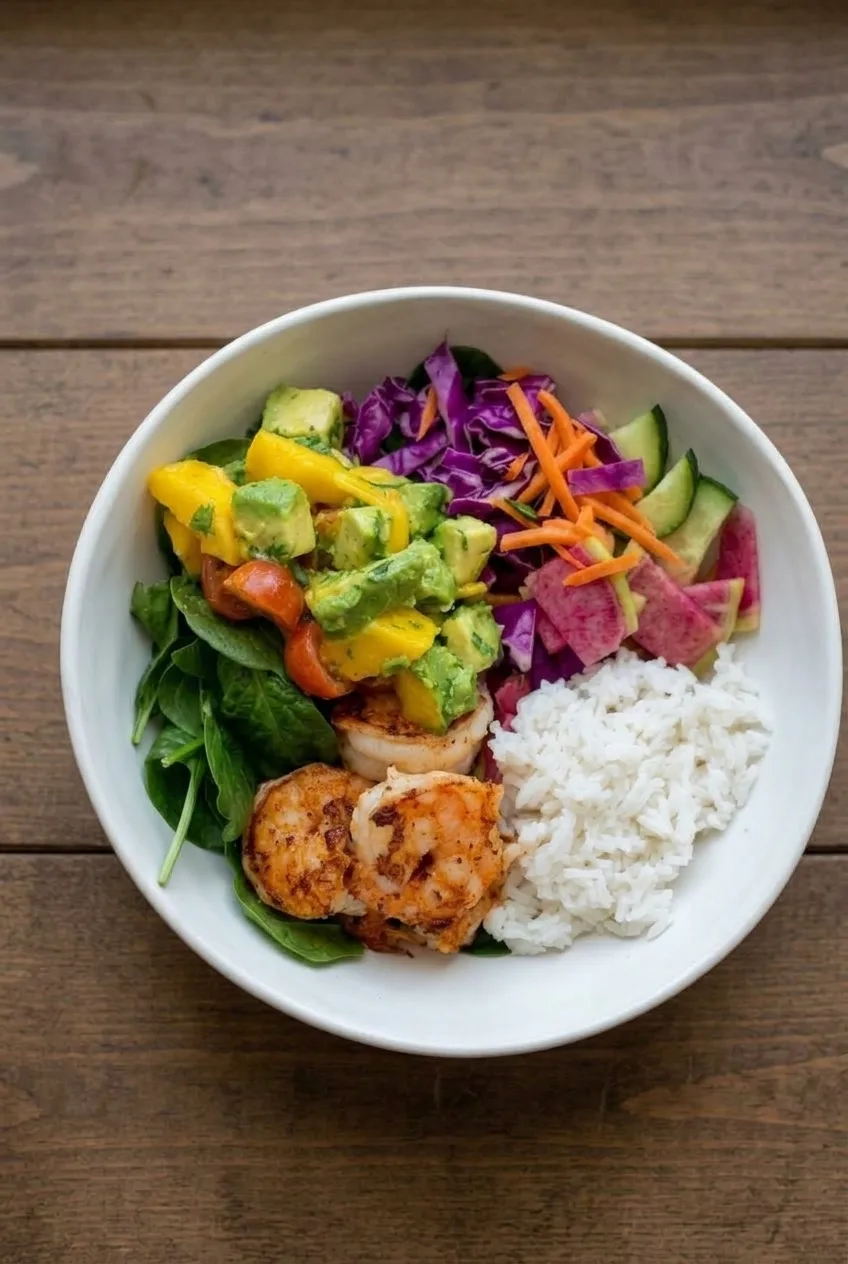
Wider view of a complete shrimp avocado mango rice bowl with colorful vegetables arranged in separate sections.
  1. Prepare the rice and vegetables: Cook or reheat the rice until warm and fluffy. Wash and dry the spinach and crisp vegetables. Keep the spinach, cabbage, cucumber, carrot, and radish in separate piles for assembly.
  2. Make the salsa: Gently combine the mango, red onion, jalapeño, cilantro, and tomatoes with 1 tablespoon lime juice and a pinch of the measured salt. Taste and adjust the salt; a squeeze from a serving lime wedge can brighten a flat-tasting mango. Toss the avocado with another tablespoon of lime juice, then fold it into the salsa shortly before cooking the shrimp. Keep the pieces chunky and drain off excess liquid if needed.
  3. Season the shrimp: Pat the shrimp thoroughly dry. Toss with the olive oil, garlic, remaining 1 tablespoon lime juice, smoked paprika, cumin, chili powder, remaining measured salt, and pepper. Coat the shrimp evenly without leaving liquid pooled around them.
  4. Sear the shrimp: Preheat a dry 12-inch skillet or grill pan over medium-high heat until hot. Add the oiled shrimp in one uncrowded layer, working in batches if needed. Cook uncovered and undisturbed for about 90 seconds, until the undersides are lightly browned and the edges begin turning opaque. Turn once and cook for about 90 seconds more. Remove as soon as the shrimp are opaque through the thickest part and curled into loose C shapes, about 3 to 4 minutes per batch.
  5. Assemble the bowls: Let the shrimp sit for 2 minutes while you divide the rice among four wide bowls, leaving a visible mound along one side of each. Arrange the spinach, shrimp, salsa, cabbage, cucumber, carrot, and radish in separate neighboring sections. Spoon the salsa over the greens or beside the shrimp rather than across the whole bowl. Serve with lime wedges, if desired.

How to Keep the Shrimp Tender

Drying the shrimp and leaving space between them helps moisture escape so the seasoning browns instead of steaming. Use the cooking time as a guide: shrimp size, skillet material, and burner strength can change how quickly they finish. Remove them when the thickest part is opaque and each shrimp forms a loose C; a tight circle can signal overcooking.

Swaps and Serving Ideas

For a different base, use quinoa, farro, cauliflower rice, or greens. White rice gives the main version its distinct rice section. Well-drained thawed frozen mango can replace fresh mango, and parsley can replace cilantro. For a heartier bowl, add black beans or corn in their own section.

For another colorful component-based meal, try this Anti-Inflammatory Harvest Glow Bowl.

Meal Prep and Storage

Prepare the rice, chopped vegetables, and mango salsa ahead, but add the lime-coated avocado close to serving. Cool cooked rice and shrimp before refrigerating. Store the rice, shrimp, salsa, greens, and crunchy vegetables separately in airtight containers for up to 3 days. Keep cut avocado separate and use it promptly for the best color and texture.

Drain any liquid the salsa releases before assembling. Warm leftover shrimp gently in a skillet over low heat or in short microwave bursts, then add the cool toppings. Do not heat the avocado, greens, or crunchy vegetables.

Nutrition

Approximate nutrition per bowl, based on 4 bowls: 530 calories, 35g protein, 18g fat, and 63g carbohydrates. Per 100g: approximately 90 calories, 6g protein, 3g fat, and 11g carbohydrates. Values vary with the size of the produce and shrimp.

Shrimp Avocado Mango Bowls

Smoky skillet shrimp, warm white rice, and chunky avocado-mango salsa are arranged with fresh vegetables in colorful composed bowls.
Course: Main Course
Cuisine: Global
Prep: 25 min
Cook: 5 min
Total: 30 min
Servings: 4 Calories: 530 kcal

Equipment

  • 12-inch skillet or grill pan
  • mixing bowls
  • cutting board
  • chef's knife

Ingredients

For the Shrimp and Rice

  • 1 1/4 lb large raw shrimp, peeled and deveined (about 575 g)
  • 3 cups cooked white rice (about 475 g)
  • 1 1/2 tablespoons olive oil
  • 2 garlic cloves, finely grated or minced
  • 3 tablespoons lime juice, divided
  • 1 teaspoon smoked paprika
  • 1/2 teaspoon ground cumin
  • 1/2 teaspoon chili powder
  • 1 teaspoon kosher salt, plus more to taste
  • 1/2 teaspoon black pepper

For the Salsa and Bowls

  • 1 large ripe mango, diced, about 1 1/2 cups (250 g)
  • 2 medium ripe avocados, diced (about 300 g)
  • 1/4 cup finely diced red onion (40 g)
  • 1 small jalapeño, finely minced
  • 1/4 cup chopped fresh cilantro
  • 1 cup cherry tomatoes, halved (150 g)
  • 4 packed cups baby spinach (120 g)
  • 2 cups shredded purple cabbage (140 g)
  • 1 small cucumber, thinly sliced
  • 1 carrot, cut into matchsticks
  • 2 small watermelon radishes or red radishes, thinly sliced
  • Lime wedges, optional for serving

Instructions

  1. Cook or reheat the rice until warm and fluffy. Wash and dry the spinach, cabbage, cucumber, carrot, and radishes, keeping them separate for assembly.
  2. Combine the mango, red onion, jalapeño, cilantro, and tomatoes with 1 tablespoon lime juice and a pinch of the measured salt. Taste and adjust the salt as needed.
  3. Toss the avocado with 1 tablespoon lime juice, then gently fold it into the mango salsa shortly before cooking the shrimp. Drain excess salsa liquid if needed.
  4. Pat the shrimp thoroughly dry. Toss with the olive oil, garlic, remaining 1 tablespoon lime juice, smoked paprika, cumin, chili powder, remaining salt, and black pepper.
  5. Preheat a dry 12-inch skillet or grill pan over medium-high heat. Add the shrimp in a single uncrowded layer, working in batches if needed.
  6. Cook the shrimp undisturbed for about 90 seconds, until lightly browned underneath and beginning to turn opaque. Turn and cook for about 90 seconds more, until opaque through the thickest part and curled into loose C shapes, about 3 to 4 minutes per batch.
  7. Let the shrimp rest for 2 minutes. Divide the rice among 4 bowls and arrange the spinach, shrimp, salsa, cabbage, cucumber, carrot, and radish in separate sections.
  8. Serve with lime wedges, if desired.

Tips

  • Pat the shrimp dry before seasoning so they brown instead of steam.
  • Do not overcrowd the skillet; cook the shrimp in batches if necessary.
  • Remove shrimp when they form loose C shapes and are opaque in the center; tightly curled shrimp may be overcooked.
  • Keep the salsa and crunchy vegetables separate from the rice until serving to prevent sogginess.
  • Drain excess liquid from the salsa before assembling the bowls.

Variations

  • Alternative Grain Bowl: Replace the white rice with quinoa, farro, cauliflower rice, or extra greens.
  • Frozen Mango Salsa: Use well-drained thawed frozen mango in place of fresh mango.
  • Heartier Bowl: Add black beans or corn in a separate section of each bowl.
  • Cilantro Substitute: Replace the cilantro with chopped parsley.

Notes

Store cooled rice, shrimp, salsa, greens, and vegetables separately in airtight containers for up to 3 days. Add avocado close to serving, drain salsa before assembling, and reheat shrimp gently without heating the fresh toppings.

Nutrition

Calories: 530 kcal | Protein: 35 g | Fat: 18 g | Carbohydrates: 63 g

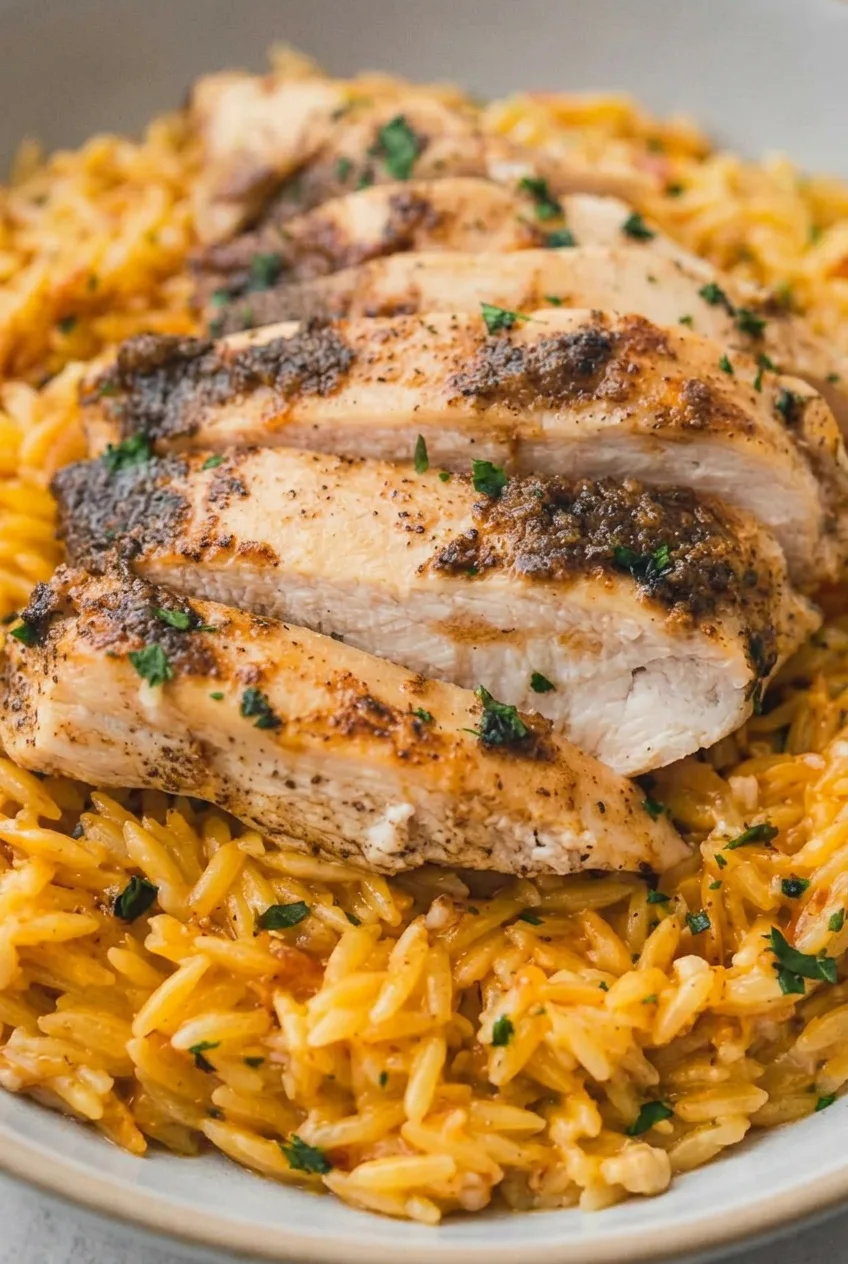
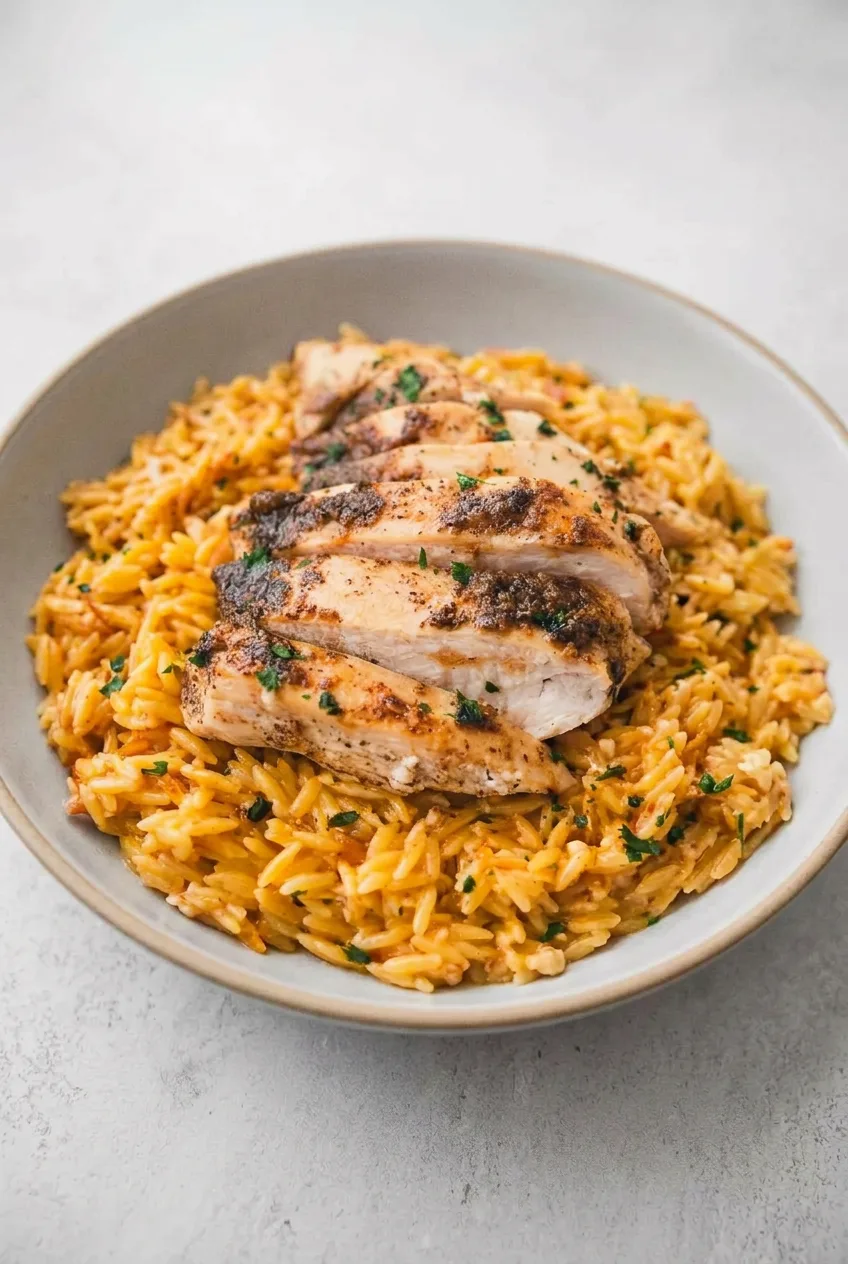
Lemon Chicken Orzo

This one-skillet dinner pairs creamy lemon-Parmesan orzo with thick slices of seared chicken breast. Cooking the breasts whole gives them a browned, pepper-speckled crust; resting them while the orzo simmers keeps them out of the pan once they are done.

Toast the orzo in the chicken skillet before adding broth, then finish it with cream and lemon juice. The pasta should be glossy and spoonable, with distinct grains. Keep a little warm broth nearby: orzo continues to absorb liquid even after the heat is off.

Ingredients for Lemon Chicken Orzo

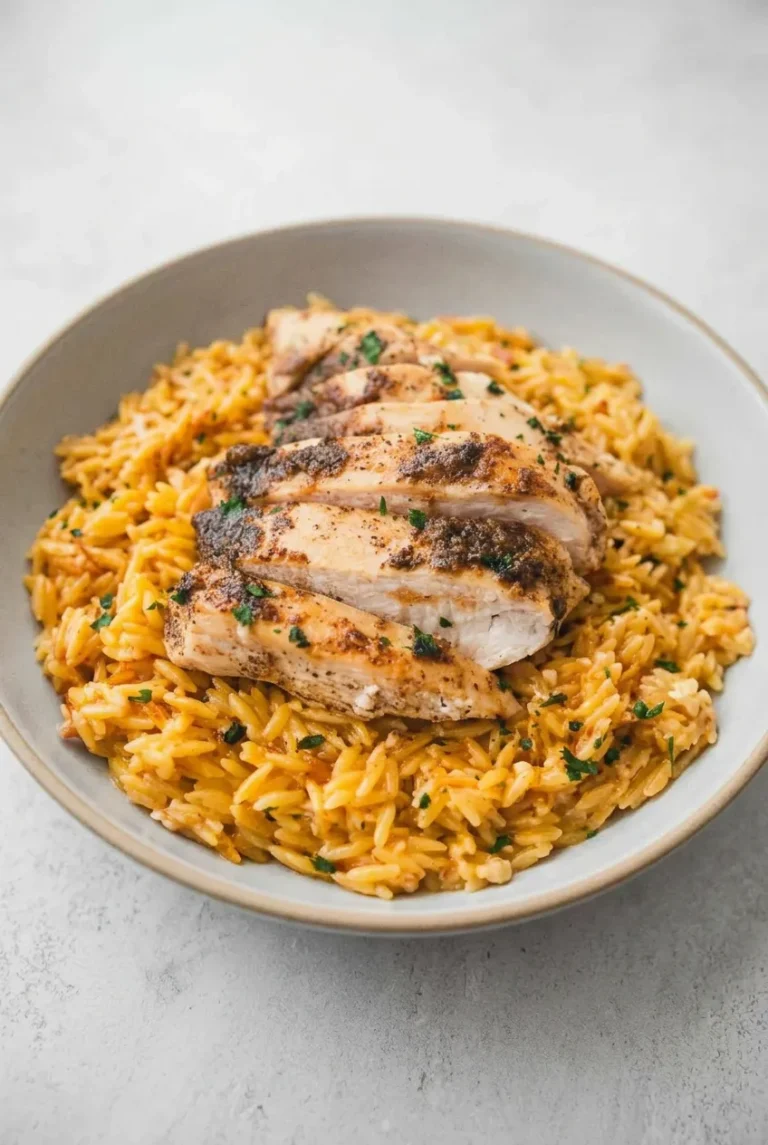
Close view of juicy sliced seared chicken over glossy Parmesan lemon orzo with parsley and black pepper.
  • 2 medium boneless, skinless chicken breasts, about 1 1/4 pounds (570g)
  • 1 teaspoon kosher salt, divided
  • 3/4 teaspoon freshly ground black pepper, plus more for serving
  • 1 tablespoon olive oil
  • 1 tablespoon unsalted butter
  • 1 1/2 cups dry orzo (285g)
  • 3 garlic cloves, finely minced
  • 3 cups low-sodium chicken broth, plus up to 1/2 cup additional warm broth as needed
  • 1 large lemon, zested and juiced, about 3 tablespoons juice
  • 1/3 cup heavy cream
  • 1/2 cup finely grated Parmesan (45g), plus more for serving
  • 2 tablespoons finely chopped fresh parsley

Yield: 4 servings. Prep: 10 minutes. Cook: about 25 minutes. Total: about 35 minutes.

How to Make Lemon Chicken Orzo

Wide shallow bowl of creamy lemon chicken orzo with sliced seared chicken on a pale stone surface.
  1. Sear the chicken: Pat the breasts dry and season both sides with 3/4 teaspoon of the salt and 1/2 teaspoon of the pepper. Preheat a 12-inch deep skillet over medium-high heat for 2 to 3 minutes, then add the olive oil. Cook the chicken in one layer for 5 to 7 minutes per side, turning once when it releases easily. Begin checking after 5 minutes on the second side; the thickest part should reach 165°F (75°C). If the breasts do not fit without crowding, sear them in batches.
  2. Rest the chicken: Transfer it to a plate and loosely tent it for at least 5 minutes while you make the orzo. Leave the browned bits in the skillet.
  3. Toast the orzo: Reduce the heat to medium and melt the butter in the skillet. Add the dry orzo and stir for 2 to 3 minutes, until lightly golden and nutty-smelling. Add the garlic and lemon zest for the last 30 seconds, stirring until fragrant but not browned.
  4. Simmer: Pour in 3 cups of broth and scrape up the browned bits. Reduce the heat to medium-low and maintain a gentle bubble. Simmer partially covered or uncovered for 8 to 10 minutes, stirring every minute or two rather than constantly. Start tasting at 8 minutes; the grains should be tender with a slight bite. If the broth disappears before the orzo is tender, lower the heat, cover briefly, and add a splash of the extra broth.
  5. Finish the orzo: If the orzo is tender but still very loose, simmer it uncovered for 1 to 2 minutes before adding the dairy. Turn the heat to low or off. Stir in the cream, Parmesan, remaining 1/4 teaspoon salt and 1/4 teaspoon pepper, and 2 tablespoons lemon juice. Taste before adding more lemon juice or seasoning. Rest off heat for 2 minutes, then stir in warm broth a tablespoon or two at a time if the orzo needs loosening.
  6. Slice and serve: Slice the chicken crosswise into thick pieces. Spoon the orzo into shallow bowls and overlap the chicken slices on top. Scatter with parsley, black pepper, and more Parmesan if desired.

How to Keep the Orzo Creamy

Orzo absorbs broth at different rates depending on the pasta and how quickly liquid evaporates from the skillet. A gentle simmer and occasional stirring help keep the grains intact. At serving time, the orzo should spread gently in the bowl, not sit in a stiff mound or pool in broth.

If it thickens while resting, stir in a little warm broth. Add it gradually so the orzo stays creamy rather than turning soupy.

Why Sear and Slice the Chicken?

Whole breasts have room to form a visible browned crust. Pat them dry and leave them undisturbed until they release from the skillet; a crowded pan will steam them instead. Resting the cooked chicken while the orzo simmers lets you slice it just before serving rather than leaving it in the pan to overcook.

Swaps and Optional Additions

  • Chicken: Boneless, skinless thighs can replace breasts, though they may need a longer sear. Cook to 165°F, rest, and slice. For a shortcut, skip the sear and fold about 3 cups cooked shredded chicken into the finished orzo just until warm; it will not have the same sliced, browned presentation.
  • Dairy and broth: Half-and-half makes a less rich finish than heavy cream. Vegetable broth can replace chicken broth, though the flavor will be less chicken-forward.
  • Vegetables: Stir 2 packed cups baby spinach into the tender orzo until wilted, before adding the cream and Parmesan. Add 1 cup halved cherry tomatoes with the broth, or during the final few minutes for firmer tomatoes.
  • Gentle heat: Add 1/4 teaspoon crushed red pepper flakes with the garlic.

Serve with a simple green salad or green beans.

How to Store and Reheat Lemon Chicken Orzo

Cool leftovers promptly and refrigerate in an airtight container for 3 to 4 days. Store extra parsley or lemon wedges separately if possible.

The orzo absorbs liquid as it sits. Reheat it gently in a skillet over medium-low heat with a splash of broth or water, stirring until loosened and hot. To microwave, add a splash of liquid and stir every minute for even warming.

Freezing is not preferred because creamy orzo may soften after thawing. If necessary, freeze for up to 2 months, thaw overnight in the refrigerator, and reheat gently with broth.

Nutrition

Approximate per serving (1/4 of the recipe): 610 calories, 46g protein, 22g fat, and 55g carbohydrates. Approximate per 100g: 160 calories, 12g protein, 6g fat, and 15g carbohydrates. Values exclude optional additions and extra Parmesan and vary with chicken size, broth absorption, and evaporation.

Lemon Chicken Orzo

Seared chicken breast is served over creamy lemon-Parmesan orzo cooked in the same skillet.
Course: Main Course
Cuisine: Mediterranean
Prep: 10 min
Cook: 25 min
Total: 35 min
Servings: 4 Calories: 610 kcal

Equipment

  • 12-inch deep skillet
  • instant-read thermometer
  • tongs
  • zester
  • cutting board
  • chef's knife

Ingredients

For the Chicken

  • 2 medium boneless, skinless chicken breasts, about 1 1/4 lb (570g)
  • 3/4 teaspoon kosher salt
  • 1/2 teaspoon freshly ground black pepper
  • 1 tablespoon olive oil

For the Lemon Parmesan Orzo

  • 1 tablespoon unsalted butter
  • 1 1/2 cups dry orzo (285g)
  • 3 garlic cloves, finely minced
  • 3 cups low-sodium chicken broth, plus up to 1/2 cup warm broth as needed
  • 1 large lemon, zested and juiced
  • 1/3 cup heavy cream
  • 1/2 cup finely grated Parmesan (45g)
  • 1/4 teaspoon kosher salt
  • 1/4 teaspoon freshly ground black pepper
  • 2 tablespoons lemon juice

For Serving

  • 2 tablespoons finely chopped fresh parsley
  • Freshly ground black pepper, optional
  • Grated Parmesan, optional

Instructions

  1. Pat the chicken dry and season both sides with 3/4 teaspoon salt and 1/2 teaspoon pepper.
  2. Heat a 12-inch deep skillet over medium-high heat for 2 to 3 minutes. Add the olive oil.
  3. Sear the chicken in a single layer for 5 to 7 minutes per side, turning once when it releases easily. Cook until the thickest part reaches 165°F (75°C).
  4. Transfer the chicken to a plate and loosely tent with foil. Rest for at least 5 minutes, leaving the browned bits in the skillet.
  5. Reduce the heat to medium and melt the butter in the skillet. Add the orzo and cook, stirring, for 2 to 3 minutes until lightly golden.
  6. Add the garlic and lemon zest and cook for 30 seconds, stirring until fragrant.
  7. Pour in 3 cups chicken broth and scrape up the browned bits. Reduce the heat to medium-low and simmer gently for 8 to 10 minutes, stirring every minute or two.
  8. Taste the orzo starting at 8 minutes. If it becomes dry before tender, add warm broth a splash at a time and briefly cover the skillet if needed.
  9. When the orzo is tender, simmer uncovered for 1 to 2 minutes if it is very loose. Turn the heat to low or off.
  10. Stir in the cream, Parmesan, remaining 1/4 teaspoon salt, remaining 1/4 teaspoon pepper, and 2 tablespoons lemon juice. Adjust lemon juice and seasoning to taste.
  11. Rest the orzo off the heat for 2 minutes, then stir in additional warm broth as needed to loosen it.
  12. Slice the chicken crosswise into thick pieces. Spoon the orzo into bowls, top with chicken, and garnish with parsley, black pepper, and Parmesan if desired.

Tips

  • Pat the chicken dry and avoid crowding the skillet so it develops a browned crust.
  • Use an instant-read thermometer and remove chicken when it reaches 165°F (75°C).
  • Stir the orzo occasionally rather than constantly to keep the grains intact.
  • Keep warm broth nearby because the orzo continues absorbing liquid as it rests.
  • Add extra broth gradually at the end so the orzo stays creamy instead of becoming soupy.

Variations

  • Chicken Thigh Orzo: Use boneless, skinless chicken thighs in place of breasts; sear until they reach 165°F (75°C), allowing extra time if needed.
  • Shredded Chicken Shortcut: Skip searing and fold about 3 cups cooked shredded chicken into the finished orzo until warmed through.
  • Spinach Lemon Orzo: Stir 2 packed cups of baby spinach into the tender orzo until wilted before adding the cream and Parmesan.
  • Tomato Lemon Orzo: Add 1 cup halved cherry tomatoes with the broth, or add them during the last few minutes for firmer tomatoes.
  • Spicy Lemon Orzo: Add 1/4 teaspoon crushed red pepper flakes with the garlic.
  • Lighter Dairy Option: Replace the heavy cream with half-and-half for a less rich finish.

Notes

Refrigerate leftovers in an airtight container for 3 to 4 days. Reheat gently with a splash of broth or water, stirring until loose and hot. Freezing is not preferred, but leftovers can be frozen for up to 2 months if needed.

Nutrition

Calories: 610 kcal | Protein: 46 g | Fat: 22 g | Carbohydrates: 55 g

Anti-Inflammatory Harvest Glow Bowl

Chewy black rice gives this warm harvest bowl a dark base for golden squash, green asparagus, browned mushrooms, and a savory smashed-chickpea crumble. Cool cucumber, tangy kimchi, and microgreens go on last, with a light drizzle of ginger vinaigrette.

Keep the ingredients in separate sections rather than tossing them together: the warm vegetables stay distinct, and the fresh toppings keep their crunch. “Anti-inflammatory” describes the ingredient style, not a medical benefit.

Ingredients for 4 Bowls

Close view of craggy spiced chickpeas, glossy mushrooms, black rice, roasted squash, and microgreens in the harvest bowl.
  • 1 cup black rice, rinsed (185g)
  • 2 cups water, or the amount directed on the rice package
  • 1/2 teaspoon kosher salt for the rice, plus more to taste
  • 1 small delicata squash, seeded, or 3 cups peeled butternut squash, cut into 3/4-inch pieces (about 425g)
  • 1 bunch asparagus, trimmed and cut into 2-inch pieces (about 340g)
  • 5 tablespoons extra-virgin olive oil, divided
  • 1/2 teaspoon ground turmeric, divided
  • 8 ounces shiitake or cremini mushrooms, sliced (225g)
  • 1 (15-ounce) can chickpeas, rinsed, drained, and dried thoroughly (about 240g drained)
  • 1 teaspoon smoked paprika
  • 1 tablespoon finely grated fresh ginger
  • 2 tablespoons apple cider vinegar
  • 1 teaspoon Dijon mustard
  • 2 teaspoons maple syrup
  • 1 cup diced English cucumber (150g)
  • 1 cup kimchi, chopped if needed (150g)
  • 1 loosely packed cup microgreens (about 25g)
  • Black pepper, to taste

Optional toppings: 1/4 cup toasted pumpkin seeds, 2 tablespoons chopped parsley or cilantro, sliced avocado, or a few edible flowers.

How to Make the Harvest Glow Bowls

Wide serving view of a composed black rice harvest bowl with colorful vegetable sections and ginger vinaigrette.
  1. Start the rice and oven: Preheat the oven to 425°F (220°C). Put the rice, water, and 1/2 teaspoon salt in a medium saucepan. Bring to a boil, cover, and reduce to a gentle low simmer. Cook according to the package directions, about 30 to 35 minutes, until tender and pleasantly chewy with the liquid absorbed. Start checking at the earliest package time. Rest covered for 5 to 10 minutes, then fluff.
  2. Roast the vegetables: Spread the squash on a large rimmed sheet pan and toss with 1 tablespoon olive oil, 1/4 teaspoon turmeric, salt, and pepper. Roast uncovered, turning once about halfway through. After about 15 minutes, add the asparagus to a separate side of the pan with 1 teaspoon olive oil, salt, and pepper. Leave space around both vegetables so they brown rather than steam; use a second pan if needed. Start checking the asparagus after 8 minutes and remove it when bright green and tender-crisp, about 10 to 14 minutes after adding it. Start checking the squash at 22 minutes; it should be fork-tender with browned edges after about 25 to 30 minutes total.
  3. Brown the mushrooms: Heat 1 teaspoon olive oil in a 12-inch skillet over medium heat. Add the mushrooms, season lightly with salt and pepper, and cook uncovered for 6 to 8 minutes, until browned and their released moisture has evaporated. Transfer to a plate.
  4. Make the chickpea crumble: In the same skillet, heat 1 tablespoon olive oil over medium-high heat. Add the dried chickpeas and lightly smash about two-thirds of them with a spatula. Season with the smoked paprika, remaining 1/4 teaspoon turmeric, salt, and pepper. Cook uncovered for 8 to 10 minutes, leaving them undisturbed for 2 to 3 minutes between stirs, until craggy and browned in spots.
  5. Whisk the dressing: Whisk the remaining 2 tablespoons plus 1 teaspoon olive oil with the ginger, vinegar, Dijon, maple syrup, and a little salt and pepper. Taste and adjust the seasoning. Drain the kimchi briefly if it has enough liquid to pool in the bowls.
  6. Compose the bowls: Let the hot vegetables stand for 3 to 5 minutes. Divide the black rice among four wide, shallow bowls. Arrange the chickpeas, squash, asparagus, mushrooms, cucumber, and kimchi in distinct sections over the rice. Drizzle lightly with dressing, then add the microgreens at the center. Add any optional toppings just before serving.

How to Get Browned, Craggy Chickpeas

Dry the rinsed chickpeas thoroughly before they reach the skillet. A wide pan lets moisture evaporate, while leaving the smashed pieces undisturbed between stirs gives their uneven edges time to brown. Keep some chickpeas whole for a mix of textures.

Grain Swaps and Dietary Notes

Black rice gives the main bowl its dark, chewy base. For a lighter-looking bowl, use 2 1/2 to 3 cups cooked farro instead; farro contains gluten. Cooked brown rice or quinoa are other grain options. Check kimchi and condiment labels if you need the finished bowl to be vegan or gluten-free, since ingredients vary.

For a cold version, cool the cooked grain and roasted vegetables before assembling. Cooked, cooled farro works particularly well here; toss it lightly with the ginger vinaigrette, then add the crisp toppings near serving. If kimchi is unavailable, quick-pickled cabbage or sauerkraut can provide tang, though the flavor will differ.

Meal Prep and Storage

Cook the rice, roast the vegetables, brown the mushrooms and chickpeas, and whisk the dressing ahead. Cool the cooked components before refrigerating them in covered containers. Keep the dressing, cucumber, kimchi, microgreens, and crunchy toppings separate so the rice stays dry and the greens stay fresh.

For a warm bowl, gently rewarm the rice, roasted vegetables, mushrooms, and chickpeas before adding the cool ingredients and dressing. Do not reheat the cucumber or microgreens. Freezing assembled bowls is not recommended because the fresh ingredients lose their texture; plain cooked rice can be frozen separately.

Nutrition

Approximate nutrition per bowl, based on 4 bowls without optional toppings: 485 calories, 14g protein, 19g fat, and 72g carbohydrates. Per 100g of the assembled recipe, approximately 95 calories, 3g protein, 4g fat, and 14g carbohydrates. Values vary with the squash, kimchi, and amount of dressing served.

Anti-Inflammatory Harvest Glow Bowl

A warm black rice bowl with roasted squash, asparagus, mushrooms, crispy smashed chickpeas, kimchi, cucumber, microgreens, and ginger vinaigrette.
Course: Main Course
Cuisine: Global
Prep: 25 min
Cook: 40 min
Total: 50 min
Servings: 4 Calories: 485 kcal

Equipment

  • Medium saucepan
  • Large rimmed baking sheet
  • 12-inch skillet
  • Mixing bowl
  • Whisk
  • Spatula

Ingredients

For the Black Rice

  • 1 cup black rice, rinsed (185g)
  • 2 cups water, or amount directed on the rice package
  • 1/2 teaspoon kosher salt

For the Roasted Vegetables

  • 1 small delicata squash, seeded and cut into 3/4-inch pieces, or 3 cups peeled butternut squash (about 425g)
  • 1 bunch asparagus, trimmed and cut into 2-inch pieces (about 340g)
  • 1 tablespoon extra-virgin olive oil
  • 1 teaspoon extra-virgin olive oil
  • 1/4 teaspoon ground turmeric
  • Salt and black pepper, to taste

For the Mushrooms and Chickpeas

  • 8 ounces shiitake or cremini mushrooms, sliced (225g)
  • 1 teaspoon extra-virgin olive oil
  • 1 (15-ounce) can chickpeas, rinsed, drained, and dried thoroughly (about 240g drained)
  • 1 tablespoon extra-virgin olive oil
  • 1 teaspoon smoked paprika
  • 1/4 teaspoon ground turmeric
  • Salt and black pepper, to taste

For the Ginger Vinaigrette

  • 2 tablespoons plus 1 teaspoon extra-virgin olive oil
  • 1 tablespoon finely grated fresh ginger
  • 2 tablespoons apple cider vinegar
  • 1 teaspoon Dijon mustard
  • 2 teaspoons maple syrup
  • Salt and black pepper, to taste

For Assembly

  • 1 cup diced English cucumber (150g)
  • 1 cup kimchi, chopped if needed (150g)
  • 1 loosely packed cup microgreens (about 25g)

Optional Toppings

  • 1/4 cup toasted pumpkin seeds
  • 2 tablespoons chopped parsley or cilantro
  • Sliced avocado
  • Edible flowers

Instructions

  1. Preheat the oven to 425°F (220°C).
  2. Combine the black rice, water, and 1/2 teaspoon salt in a medium saucepan. Bring to a boil, cover, reduce to a low simmer, and cook according to package directions, about 30 to 35 minutes, until the liquid is absorbed and the rice is tender. Rest covered for 5 to 10 minutes, then fluff.
  3. Toss the squash with 1 tablespoon olive oil, 1/4 teaspoon turmeric, salt, and pepper on a large rimmed baking sheet. Roast for about 15 minutes.
  4. Add the asparagus to a separate area of the pan and toss with 1 teaspoon olive oil, salt, and pepper. Roast until bright green and tender-crisp, about 10 to 14 minutes. Continue roasting the squash until fork-tender and browned at the edges, about 25 to 30 minutes total.
  5. Heat 1 teaspoon olive oil in a 12-inch skillet over medium heat. Add the mushrooms, season with salt and pepper, and cook uncovered for 6 to 8 minutes until browned and dry. Transfer to a plate.
  6. Heat 1 tablespoon olive oil in the same skillet over medium-high heat. Add the chickpeas and lightly smash about two-thirds with a spatula. Season with smoked paprika, remaining 1/4 teaspoon turmeric, salt, and pepper.
  7. Cook the chickpeas uncovered for 8 to 10 minutes, stirring only every 2 to 3 minutes, until craggy and browned in spots.
  8. Whisk the remaining 2 tablespoons plus 1 teaspoon olive oil with the ginger, vinegar, Dijon, maple syrup, salt, and pepper. Drain the kimchi briefly if it is very wet.
  9. Let the hot vegetables stand for 3 to 5 minutes. Divide the black rice among four bowls and arrange the squash, asparagus, mushrooms, chickpeas, cucumber, and kimchi in separate sections.
  10. Drizzle with ginger vinaigrette, add the microgreens, and finish with optional toppings before serving.

Tips

  • Dry the chickpeas thoroughly before cooking so they can brown instead of steam.
  • Use a wide skillet and leave smashed chickpeas undisturbed for 2 to 3 minutes between stirs for craggy edges.
  • Leave space around the squash and asparagus on the pan; use a second pan if needed to prevent steaming.
  • Start checking asparagus after 8 minutes and remove it as soon as it is tender-crisp.
  • Keep the warm ingredients and fresh toppings in separate sections for the best texture.

Variations

  • Farro Bowl: Replace the black rice with 2 1/2 to 3 cups cooked farro for a lighter-looking bowl; note that farro contains gluten.
  • Brown Rice or Quinoa Bowl: Use cooked brown rice or quinoa in place of black rice.
  • Cold Harvest Bowl: Cool the cooked grain and roasted vegetables before assembling, then add the crisp toppings just before serving.
  • Kimchi Substitute: Use quick-pickled cabbage or sauerkraut in place of kimchi for tangy flavor.

Notes

For meal prep, refrigerate cooled rice, vegetables, mushrooms, chickpeas, and dressing separately from cucumber, kimchi, microgreens, and crunchy toppings. Rewarm only the rice, vegetables, mushrooms, and chickpeas. Do not freeze assembled bowls; plain cooked rice can be frozen separately.

Nutrition

Calories: 485 kcal | Protein: 14 g | Fat: 19 g | Carbohydrates: 72 g